Nice car. Looks like you have the rainbow spaghetti maker
Working great now. My word.
Full Version: 914 GT 3.6 Ferrari Build
Pages: 1, 2, 3, 4, 5, 6, 7, 8, 9, 10, 11, 12, 13, 14, 15, 16, 17, 18, 19, 20, 21, 22, 23, 24, 25, 26, 27, 28, 29
[quote name='tygaboy' date='Dec 29 2024, 08:25 AM' post='3183759']
Wiring, continued. At least I get to drill some holes and mount the connectors.
There have been a few distractions around The Red Barn that kept me from the build: this Cayman GTS 4.0 followed me home and my wife said we could keep it!
OK, OK so we ordered it a while back and picked it up on 12/27.
And I can now safely state that all the review videos on these things are true. It is wonderful - and I can't rev it over 4k rpm yet!
Wow Chris !!! congratulations on your new Cayman GTS !!! Hope it doesn’t distract you from your day job
Back on the wiring after some other, short-term projects. Here's the first of the engine-side harness runs with the lengths rough trimmed. You can see the candy cane mock up that I use to set the base lengths of each circuit. Connections are end-to-end tested as I go and everything shown here is working as planned.
I needed to order a few additional bits that are due to arrive tomorrow so I should be good to complete the engine harness wiring in the next week or so.
I needed to order a few additional bits that are due to arrive tomorrow so I should be good to complete the engine harness wiring in the next week or so.
That's a few more wires than in a Model T.
Congrats on the Cayman Chris. Looks awesome. Keep the vids coming. Always learning something. 
![popcorn[1].gif](http://www.914world.com/bbs2/style_emoticons/default/popcorn[1].gif)
QUOTE(Dion @ Jan 24 2025, 06:14 AM) 
Congrats on the Cayman Chris. Looks awesome. Keep the vids coming. Always learning something.
@Dion - Thanks Dion! Gotta say, the Cayman is everthing the reviewers say it is. Driving it has been a contributing factor to the slow down on this build!
I apologize if I’ve missed it in videos or other posts - what software (if any) are you using for wiring diagram and keeping track of circuit pin outs?
QUOTE(Superhawk996 @ Jan 24 2025, 10:31 AM)
I apologize if I’ve missed it in videos or other posts - what software (if any) are you using for wiring diagram and keeping track of circuit pin outs?
@Superhawk996 - Haltech does a great job providing easy access to the needed info. Beyond the expected generic wiring schematics, the ECU has a built-in I/O (input/output) report capability. Once you've set up which pins do what (outside of the hard coded stuff like ignition, injection, O2, etc.) you can generate a report. I find this REALLY handy when I'm building the harness as I can reference not just a pin # but an easy way to double check I'm working with the correct wire.
Then, for the specifics of my build, I simply created a spreadsheet to document the connections from the ECU to the bulk head.
Add up all these references and I have everything I need. And pretty much anyone who's done even a little wiring could look at all this and be able to understand it.
Looks like you forgot the yellow wire to the starter. 
QUOTE(tygaboy @ Jan 24 2025, 02:53 PM)
QUOTE(Superhawk996 @ Jan 24 2025, 10:31 AM)
I apologize if I’ve missed it in videos or other posts - what software (if any) are you using for wiring diagram and keeping track of circuit pin outs?
@Superhawk996 - Haltech does a great job providing easy access to the needed info. Beyond the expected generic wiring schematics, the ECU has a built-in I/O (input/output) report capability. Once you've set up which pins do what (outside of the hard coded stuff like ignition, injection, O2, etc.) you can generate a report. I find this REALLY handy when I'm building the harness as I can reference not just a pin # but an easy way to double check I'm working with the correct wire.
Then, for the specifics of my build, I simply created a spreadsheet to document the connections from the ECU to the bulk head.
Add up all these references and I have everything I need. And pretty much anyone who's done even a little wiring could look at all this and be able to understand it.
Factory service manuals should be like that!
Super nice documentation!
Make DAMN sure to print hard copies occasionally.
If you have the information outside of digital storage, then you NEVER have a problem with the digital stuff.
If it's exclusively on digital...
QUOTE(ClayPerrine @ Jan 24 2025, 01:49 PM)
Looks like you forgot the yellow wire to the starter.
@ClayPerrine Clay, You need to give me a little more credit.
 The wire to the starter is unlabeled in the current doc. It's one of the 12 ga, 25A wires. The other unlabeled 25A power wires are for the H2O pump, the coils and the injectors.
QUOTE(technicalninja @ Jan 24 2025, 02:52 PM)
Make DAMN sure to print hard copies occasionally.
If you have the information outside of digital storage, then you NEVER have a problem with the digital stuff.
If it's exclusively on digital...
@technicalninja - Yep, I print a copy or two of everything for the "user manual". Imagine the next person who works on this thing:


If you really want it to be Ferrari authentic, the wiring diagrams need to be hand drawn in pencil, and labeled in Italian. Then they need to not match the car. That's how the Ferrari factory did it in the 308 I worked on years ago.
Oh.. and that starter wire needs to change color and gauge 3 times between the ignition switch and the starter. And it has to have a cold solder joint in it too.
Oh.. and that starter wire needs to change color and gauge 3 times between the ignition switch and the starter. And it has to have a cold solder joint in it too.
I was one of the last factory "authorized" Fiat technicians in the early 80's when they were getting the HELL out of the United States...
The "Authorization" included a Catholic like Blessing of the cross on your body.
Every bit as disturbing as it sounds, creepy as shit...
Ninja proverb:
The wire color actually installed in the harness was directly dependent on how much wine Luigi had the night before.
I learned to read wiring diagrams on incorrect diagrams in another language and possibly mislabeled from a completely different model...
When they look like Tygaboy's stuff 95% of that battle is AVOIDED!
Very slick. Thank you for sharing that.
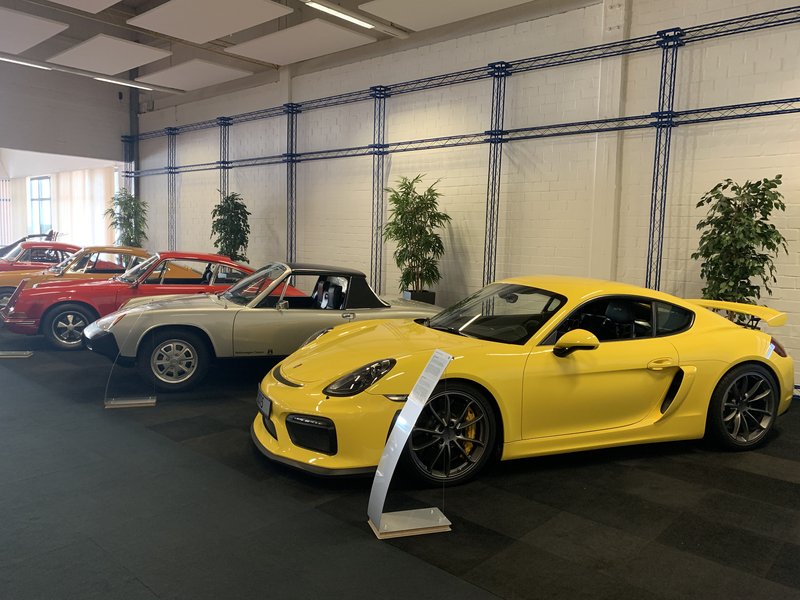
A nice aside is that the 4.0-litre Caymans are built at Osnabrück where our beloved 914s were assembled... Karmann is very proud of their links with Porsche and have an example of every car they've built in their factory museum.
Making progress. I fabbed a recessed bulkhead connector panel to create more space for the harness. Then it was work up a pass-through for the 12v feeds for the ECU and the power distributon module. All the panels are just set in place so things aren't positioned exactly as they will be.
I'll be making a cover for all this that'll get upholstered and hide everyting.
I'll be making a cover for all this that'll get upholstered and hide everyting.
Nice and clean, I like it. I’m sure you’ll be glad to move on from wiring, I know I was. It does seem fitting to put the proper amount of attention on the pasta in this Italian dish!
Looking real nice!
That is looking so sweet! Of course, by now, we all know the extremely high standard Chris holds himself to in everything he does. 
What did you use for the 12V pass throughs? They look so clean!
It's page 67 of the build so how about Episode 67 to match!
https://www.youtube.com/watch?v=jSzbjMKL4rE
https://www.youtube.com/watch?v=jSzbjMKL4rE
QUOTE(jd74914 @ Feb 7 2025, 01:31 PM)
What did you use for the 12V pass throughs? They look so clean!
@jd74914 - Amphenol SurLok connectors. Available in a number of configs and amp ratings. They are very tidy and nicely scratched my OCD itch!
That wiring is out of this world tidy.
QUOTE(tygaboy @ Feb 8 2025, 10:17 AM)
QUOTE(jd74914 @ Feb 7 2025, 01:31 PM)
What did you use for the 12V pass throughs? They look so clean!
@jd74914 - Amphenol SurLok connectors. Available in a number of configs and amp ratings. They are very tidy and nicely scratched my OCD itch!
Locking too, even cooler than I thought, thank you! These look like they'd be pretty cool for someone who trades batteries between cars too.
Guess I've been out of the game too long, these look like they've been around a few years too.

It may not look like it but that there wiring now has all the needed sensor wiring and is essentially ready to be sheathed. Then all the wires get pinned and connectors added.
After a LOT of time, I'm nearly there.
After a LOT of time, I'm nearly there.
Old meets new: That's a Ferrari 360 injector bank "connector" that I cut off the factory harness. Then I worked out the needed length and added a Deutsch connetor.
The close-up shows how the Raychem SCL heat shrink tubing adhesive seals once it's recovered.
The close-up shows how the Raychem SCL heat shrink tubing adhesive seals once it's recovered.
Are the exposed portions of the wires in a high heat environment?
QUOTE(JeffBowlsby @ Feb 13 2025, 05:40 PM)
Are the exposed portions of the wires in a high heat environment?
@JeffBowlsby - Hey Jeff. No. In the case of the injector bank connector pictured, both those connectors will live under the intake plenum. The harness is supported by p-clamps that hold it off the inside of the intake manifold and I do all I can to route everything such that it's away from any high heat sources. If there's any question, that area gets wrapped in heat blanket and/or the source gets a shield.
Same approach as I used on the LS build and that's worked out well.
QUOTE(tygaboy @ Feb 13 2025, 08:47 PM)
QUOTE(JeffBowlsby @ Feb 13 2025, 05:40 PM)
Are the exposed portions of the wires in a high heat environment?
@JeffBowlsby - Hey Jeff. No. In the case of the injector bank connector pictured, both those connectors will live under the intake plenum. The harness is supported by p-clamps that hold it off the inside of the intake manifold and I do all I can to route everything such that it's away from any high heat sources. If there's any question, that area gets wrapped in heat blanket and/or the source gets a shield.
Same approach as I used on the LS build and that's worked out well.
Awesome Chris...thank you for the response. Just wanted to be sure you were onto it.
Cylinders 8, 7, 6, 5 (left to right). The ignition and injection branches are coming together nicely. But, man, is this taking a lot longer than I'd have imagined.
That said, I do find it a very Zen process, once I'm in the zone.
That said, I do find it a very Zen process, once I'm in the zone.
You must be thinking the wiring will never be done. Me too! 
https://www.youtube.com/watch?v=r4mQ8U33EPk
https://www.youtube.com/watch?v=r4mQ8U33EPk

Why yes, it is a 914. Why do you ask? 
The engine harness is nearly complete. Well, version 1 anyway...
The engine harness is nearly complete. Well, version 1 anyway...
Electric water pump? Don't them eye-talion motors come with a good ol' fan belt and pump on the front of the block?
QUOTE(bkrantz @ Mar 4 2025, 06:29 PM)
Electric water pump? Don't them eye-talion motors come with a good ol' fan belt and pump on the front of the block?
@bkrantz - They do. But I wanted that space at the top / front of the engine for routing other stuff. Freedom to mount the electric means it's a bit simpler and tidier to plumb, too.
QUOTE(tygaboy @ Mar 6 2025, 07:51 AM)
QUOTE(bkrantz @ Mar 4 2025, 06:29 PM)
Electric water pump? Don't them eye-talion motors come with a good ol' fan belt and pump on the front of the block?
@bkrantz - They do. But I wanted that space at the top / front of the engine for routing other stuff. Freedom to mount the electric means it's a bit simpler and tidier to plumb, too.
AC compressor is a common replacement for the stock water pump.
QUOTE(tygaboy @ Mar 6 2025, 08:51 AM)
QUOTE(bkrantz @ Mar 4 2025, 06:29 PM)
Electric water pump? Don't them eye-talion motors come with a good ol' fan belt and pump on the front of the block?
@bkrantz - They do. But I wanted that space at the top / front of the engine for routing other stuff. Freedom to mount the electric means it's a bit simpler and tidier to plumb, too.
That looks a bit different from my Chevy small block.
Engine harness Version 1 is nearly done and will be used to get the car running and dialed in. But those of you who know me know Version 2 can't be far behind. And it's not.
So, here I go: my first time building a full motorsport-level, concentric twist harness.
There are a host of formulas, measurements and general best-practices that need to be followed and they take 4-5 times as long to build as a conventional harness.
Today I started by constructing a test section that helps validate the design. This is only the core and initial layer. Pretty, no?
I'll be covering all the details of this effort in episodes At The Red Barn and posting occasional pics here. I'm really excited to try my hand at this.
That is pretty; can't wait to see this progress.
Why the concentric twist? Have not seen that before.
QUOTE(JeffBowlsby @ Mar 24 2025, 08:01 AM)
Why the concentric twist? Have not seen that before.
@JeffBowlsby Jeff- there's a bunch of info available but in short, with this approach, the harness is as small as possible (due to the type of wire used), remains very flexible, it keeps everything neat and tidy and ensures none of the wires in the harness see more stress than others.
There are "service loops" (pictured) at the connectors to facilitate repair if that's ever needed.
Also, the entire harness is sealed - every connector is booted, every branch point epoxied and strain relieved. No exposed conductors anywhere. (also pictured)
Yes, it's totally unnecessary for what I'm up to with a street car. But as the saying goes:
There's no kill like overkill!
But how much does the concentric twist shorten the harness or did you add the extra length in to start with?
QUOTE(davep @ Mar 24 2025, 06:31 PM)
But how much does the concentric twist shorten the harness or did you add the extra length in to start with?
That's my question. A straight wire is the shortest route, right?
But way cool.
@davep @bkrantz A concentric twist harness is built to the same dimension since it still has to connect to everything, but uses 15-20% more wire length. The twist and service loops takes some length and, depending on the branching approach, some extra length is used there, too.
But the wire that's typically used (Tefzel M22759/32) is smaller diameter and lighter, due to the type of insulation is uses.
But the wire that's typically used (Tefzel M22759/32) is smaller diameter and lighter, due to the type of insulation is uses.
QUOTE(tygaboy @ Mar 24 2025, 07:51 PM)
@davep @bkrantz A concentric twist harness is built to the same dimension since it still has to connect to everything, but uses 15-20% more wire length. The twist and service loops takes some length and, depending on the branching approach, some extra length is used there, too.
But the wire that's typically used (Tefzel M22759/32) is smaller diameter and lighter, due to the type of insulation is uses.
And cool.
Enough with the wiring! Well, at least for a bit. Let's work on the cooling system and learn about what NOT to do when welding aluminum. 
https://www.youtube.com/watch?v=GsExTNbnSNQ
https://www.youtube.com/watch?v=GsExTNbnSNQ
This is a "lo-fi" version of our main content. To view the full version with more information, formatting and images, please click here.