How about the cover panels sliding back under the hood?
@Krieger Andy - interesting idea but the frunk needs to be sealed and I don't know if there's room enough for a channel and/or something that would allow the cover to drop, then slide back, etc. After looking at things with this wider, shallower cover, it seems that pop up may be the way to go. But even as pedestrian as that is, I do have one pretty cool idea up my sleeve...
Chris914n6
Nov 21 2023, 09:00 PM
1999 flash back
I did a one-off set for RH on a Rayco Boxster body. Had to trim the bumper to get a horizontal line to the lights. Haven't found pics yet if I even still have them. They were the 90mm Hella projectors so your 60mm would fit better.
A low profile popup is almost easier. Just change the lengths of the pivot arm and lever. The pivot is an awkward angle but you like that kind of challenge.
Last thing, that truck support you cut out to place the rad more inboard is an important structural component.
Think about moving the bumper mount inboard, as it looks like it's in the way of what your trying to do. That part of the body is going to be weak anyways with the big holes in it.
QUOTE(tygaboy @ Nov 20 2023, 02:19 PM)
I cut a mock-up mount for the Hella LEDs I'm considering. Mounting info in the pics. They're 60mm lenses, DOT legal, separate hi and low beam units. Looks like they'll work.
Bonus idea, thanks to @horizontally-opposed Pete, is that I think I can get them to sit fully behind the rear wall of the headlight bucket and rather than have the light covers pop up at the front, like stock, they'll hinge at the front and drop down at the back, exposing the bulbs.
Yes, it'll require permanently connecting the eyebrows to the covers and working up a new hinge system but, hey, if it were easy, everyone would be doing it.
Now to start roughing out the size/shape. It's made a little more difficult because the factory car has those wonderfully unique turn signal lenses that change the perspective on where things are. I have a couple other pics I can reference and I have a ways to go before anything gets cut. I think the covers are wider than what I've laid out - which is good because wider = more space for the radiators. It's a process.
Hm. Good point about the 914S's prototype turn signals, which I have always dug. They do change some of the perspective a bit, but maybe not all that much? Would be neat to measure them as well as the fender humps vs the production stuff…have never thought to do so.
Looking at your taping, I am wonder about headlight height, as the production opening looks like it will place your LEDs higher than the wider/lower openings, and then how to fill up the wider opening with LED lights—especially if you stick with just two headlights per side in a nod to the 914S.
It's always easy from a desk with a cup of tea nearby (right?), but I wonder about just how big the radiators need to be in the smaller/lighter 914 of if that's fundamentally irrelevant and it will all come down to efficient/tight ducting on the way in and easy venting on the way out.
It's actually more work to find images of Ferrari 360s without their front bumper than I would have thought, but the 360's intakes aren't all that big. If Tamiya is its usual self in terms of accuracy, the radiator angles and (apparent?) direct venting to the wheel wells is pretty interesting, and very different to the Porsche method employed on the 986/996. You might have more luck with the Ferrari method in a 914 due to the front fender space you mentioned when we were together…assuming the 914 wheel wells can be cut away in a similar fashion? Then maybe feed with the regular bumper vents and see if you need to add a third feed from the 914-6 "GT" setup? Or, maybe "cheat" a little more airflow between the bottom of the bumper and the top of the valance, as Porsche did on some of the later impact-bumper 911s.
With all that said, I do like that 914S front end...
tygaboy
Nov 23 2023, 02:45 PM
After a bit more cutting/fitting/understanding on the donor chassis, I think it's now about how best to get the air to the radiators. This is a huge mod to the chassis and I won't feel comfortable until I have enough radiator area and frontal openings that pencil out and I know I can more than adequately cool the engine. Today's exercise was seeing if I could avoid the 914/8 headlight mod and the required s*!+ ton of work and come up with a larger grill opening that I think looks good with the standard headlight cover size.
This is V1. Modeled on the black cars (with some "stretched" 914 bumper grills, one wide at the top, one wide at the bottom), then on my LS car in some scrap mesh. Both feature some bad photochoping, but it gives the idea.
I think it might work. And I like the look, particularly with the stretched factory grills. Perhaps some 3D printed items are in my future...
As always, I'll need to look at it for a while and see how it ages.
horizontally-opposed
Nov 24 2023, 05:56 PM
I think you are onto something here...
East coaster
Nov 25 2023, 02:58 AM
When I had contemplated this I was thinking of going down into the valance vs wider. My thought was 2 separate grills on each side joining into a common entrance plenum. Might be easier and keeping a sorta stock look? I’m sure you’ve already looked at that but figured I’d throw it out there anyway.
tygaboy
Nov 25 2023, 08:24 AM
And here's the Part 1 video on the corner radiators, if you're interested:
When I had contemplated this I was thinking of going down into the valance vs wider. My thought was 2 separate grills on each side joining into a common entrance plenum. Might be easier and keeping a sorta stock look? I’m sure you’ve already looked at that but figured I’d throw it out there anyway.
@East coaster - yep, you'll see I call out this very thing in the video. Keep the ideas coming; I need all the help I can get!
Cairo94507
Nov 25 2023, 08:57 AM
I look forward to all of Chris' videos. He is a just so enjoyable to watch with my morning coffee.
And here's the Part 1 video on the corner radiators, if you're interested:
Well... that really jumped the shark
Couple of notes:
Dual core rads don't work much better. The air is already hot by the time it gets to the 2nd. IIRC 85-90% of the cooling happens from the first row. Modern car design is all single row.
The nose area is high pressure, so air will get pushed to wherever you want to move it. I mention this because the headlight can dip into the incoming rad air and not affect cooling.
You could do what Kent 76-914 did on his Suby then add 2 smaller rads under the headlights. You would still have half a frunk. I've got about a 1/3rd frunk with mine and the Toyota rad.
You won't need the floorpan under the headlight with that much cut out. I'd still think about modding a 73-74 bumper to use the inboard mounts. Or if you do fiberglass you can make a support beam however you want.
There are other small LED/HID units that are not Hella and DOT isn't necessarily a benefit. We all know the 7" e-code H4 is much better.
Mount a fat tire before you finalize a design.
KELTY360
Nov 26 2023, 03:55 PM
Fascinating. Applaud your mission to retain front trunk. It's such a key 914 feature. Could you fab the headlights to attach to the underside of the covers as a unit?
tygaboy
Nov 30 2023, 09:28 AM
I had a conversation with Griffin Radiator and was told that using their core - and assuming adequate/appropriate airflow and coolant flow - a 10" x 16" rad (10 x 12 core area) has the capacity to handle 240 hp. By that math, I'd be more than covered with one of those in each corner. I have to say, that seems a little bit of a stretch. But it is encouraging. Add a center rad, just to be sure and I think I'm good.
I ordered some 60mm DOT halogens to prove out exactly what room I'll need for lighting. Once that's settled, I can get a final spec on the space for the radiators.
tygaboy
Feb 2 2024, 02:08 PM
Today was getting the shifter cables routed. A bit more clearancing needed to raise the opening on the inner firewall to but it looks like it's going to work routing through that large factory opening that's used for the wiring harness.
ClayPerrine
Feb 3 2024, 08:37 AM
Beautiful shifter.
I spy a 911 column in the driver's floor. Looks like you are planning a left hand key conversion.
Cairo94507
Feb 3 2024, 10:53 AM
Left side dash ignition definitely required for this project.
tygaboy
Feb 3 2024, 03:15 PM
Latest build video - for those who haven't yet subscribed
Waiting for the custom length shift cables so started rethinking the intake set up. I think I want to drop the whole thing so it fits under the stock sheet metal. Here it is dropped 1.5". Not quite enough. Looks like maybe 2.25" may do it. The good news is I have two intake manifolds do I can play with one and if I don't like it, I'll use the other at stock height. Not nearly as dramatic a look but more practical and a bigger surprise when things do get opened up.
Decisions, decisions...
Van B
Feb 6 2024, 08:10 PM
Why do I feel like those fixture blocks are worth more than the manifold they’re holding up?
Chris914n6
Feb 6 2024, 11:02 PM
Considering the engineering involved with the IM that you'd be messing with, I'd do a GT mesh lid and arch over it.
SirAndy
Feb 6 2024, 11:05 PM
I for one really liked how the manifold was sticking out the top. Hiding all that stuff under the lid just doesn't look right.
Cairo94507
Feb 7 2024, 08:59 AM
I wish there was a middle ground for this. Kind of like the clear hood section on the hot rod Corvette hoods (I do not know which model that was). So the engine lid/trunk body lines remain stock but you see the intake when you walk up on it.
ClayPerrine
Feb 7 2024, 09:20 AM
Personally, I like the idea of hiding it beneath a GT engine grill. That way it looks like a flared 914 from the outside.. until you look through the mesh on the engine grill.
tygaboy
Feb 7 2024, 01:01 PM
While I appreciate the comments and opinions, there are other things I'm looking to deal with such as wanting as much trunk space as I can get. The current "pointed straight back" TBs means I'd need to sacrifice trunk volume to some sort of air box - plus work out an intake location. And no, I don't want tubes running back and forth to feed the air box, I don't want an intake in the rear panel...
So. The current thinking is to reshape the rear of the upper pleunum so it essentially matches the angle of the front. Then shorten the manifold runners only as much as needed to get the intake under the engine grill. This also means no mods needed to the trunk lid.
Then, the TBs get relocated to the sides of the plenum, as pictured. This allows for air boxes that live right under the grill. And I get all the trunk space.
And before you get worked up about this sort of change, I've been in touch with one of the most respected 360 tuners to dicuss this. Part way through the conversation, he says "Let me text you a pic...". That's the first pic here. It's exactly what I'm talking about. He said it works fine - and referenced that this is the same approach Ferrari took with the Enzo. That's the 2nd pic.
Is it going to sacrifice power? Maybe. But also maybe not. And if it does, do I care? No. I was essentially assured driveability is retained, which is really the most important thing to me.
I do prefer the look of the initial version but after seeing the Enzo, I think I can come up with an attractive set up.
Chris914n6
Feb 7 2024, 08:08 PM
Moving the inlets to the sides won't affect anything, but the runner length determines the power band. Longer for midrange torque - shorter for top end hp. Most modern cars have duel length runners to fatten the power curve.
Under no circumstances reduce the volume of the plenum.
East coaster
Feb 7 2024, 08:10 PM
Looks like a couple good options for a solution
Van B
Feb 7 2024, 08:30 PM
I’m gonna take all that to mean those blocks ARE more expensive than the manifold lol…
Superhawk996
Feb 7 2024, 09:00 PM
QUOTE(Van B @ Feb 7 2024, 10:30 PM)
I’m gonna take all that to mean those blocks ARE more expensive than the manifold lol…
All depends . . . China made or Starrett or maybe Brown & Sharpe?
I’m gonna take all that to mean those blocks ARE more expensive than the manifold lol…
@Van B I wish. And I bought my fixture table and goodie set many years ago. Was even less back then.
ClayPerrine
Feb 8 2024, 01:44 PM
QUOTE(tygaboy @ Feb 7 2024, 01:01 PM)
While I appreciate the comments and opinions, there are other things I'm looking to deal with such as wanting as much trunk space as I can get. The current "pointed straight back" TBs means I'd need to sacrifice trunk volume to some sort of air box - plus work out an intake location. And no, I don't want tubes running back and forth to feed the air box, I don't want an intake in the rear panel...
So. The current thinking is to reshape the rear of the upper pleunum so it essentially matches the angle of the front. Then shorten the manifold runners only as much as needed to get the intake under the engine grill. This also means no mods needed to the trunk lid.
Then, the TBs get relocated to the sides of the plenum, as pictured. This allows for air boxes that live right under the grill. And I get all the trunk space.
And before you get worked up about this sort of change, I've been in touch with one of the most respected 360 tuners to dicuss this. Part way through the conversation, he says "Let me text you a pic...". That's the first pic here. It's exactly what I'm talking about. He said it works fine - and referenced that this is the same approach Ferrari took with the Enzo. That's the 2nd pic.
Is it going to sacrifice power? Maybe. But also maybe not. And if it does, do I care? No. I was essentially assured driveability is retained, which is really the most important thing to me.
I do prefer the look of the initial version but after seeing the Enzo, I think I can come up with an attractive set up.
I like the idea of using that intake. It looks cool. You should make a plate that says Porsche to go below the Ferrari script on the intake.
Van B
Feb 8 2024, 06:51 PM
Ah they are welded then machined. Thats not a bad price for blocks that size!
Also, I try not to opinionate much on your build out of respect for the art, but I like the idea of side inlets and the carrera GT style wire humps.
But really, this build is fun for me because it doesn’t set off my LS allergy, and your need for truly novel solutions here is pretty cool.
tygaboy
Feb 8 2024, 07:03 PM
Another "Tygaboy Re-do"! Off come the turn downs, the intake manifold get turned 180 degrees (am I surprised that worked?) and we're set to add side TBs to the plenum. The plan at this point is to keep the manifold at stock height and "embrace the bulge". But it sure looks a bunch different that it did.
tygaboy
Feb 8 2024, 07:12 PM
The biggest change is how with the "ramp" now at the back, I won't need as dramatic a bulge at the trunk. Here, I'm just playing with fit to get a feel for what sort of clearancing will be needed on the trunk. It's not much - looks like it needs about 1.5" to come into position - and I have a couple ideas for shape/function. Also note the engine lid isn't in position at the front as it fouls on the forward part of the plenum so a bit of rework needed there.
And I'll likely need a slight bulge to cover the TBs, outboard of each plenum. Yep, still a bunch of design and fab stuff to work out.
tygaboy
Feb 8 2024, 07:15 PM
Profile shot. Again, the engine lid will drop a bit at the front and expose more of the plenum.
SirAndy
Feb 8 2024, 07:17 PM
QUOTE(tygaboy @ Feb 8 2024, 05:15 PM)
Profile shot. Again, the engine lid will drop a bit at the front exposing more of the plenum.
I like it!
bkrantz
Feb 8 2024, 08:28 PM
QUOTE(tygaboy @ Feb 8 2024, 07:03 PM)
Another "Tygaboy Re-do"! Off come the turn downs, the intake manifold get turned 180 degrees (am I surprised that worked?) and we're set to add side TBs to the plenum. The plan at this point is to keep the manifold at stock height and "embrace the bulge". But it sure looks a bunch different that it did.
At least you didn't have to turn the engine around.
Van B
Feb 8 2024, 08:43 PM
Uh yes please! Maybe an upward lip across the leading edge of the trunk? 30-45 degrees up and starting 1.5” back? Would allow you to merge the lines from bulge to trunk and give additional clearance for opening and closing.
Chris914n6
Feb 8 2024, 11:02 PM
I'm glad that worked out fairly easily.
I'd be tempted to make the trunk shorter and the grille longer. Might get tight with the top in there but the lid frame is bigger than it needs to be.
tygaboy
Feb 10 2024, 08:53 AM
Making it up as I go along. As if you needed more proof. Enjoy!
Sweet! What about using a single large sheet of engine grill type material instead of reworking the lid. Then press the dome shape into it. Trim it to fit engine compartment. Then make a functional frame for it?
Chris914n6
Feb 10 2024, 03:23 PM
Couple notes.
I've got the same fitment issues you're dealing with. The issue with flipping the intake on mine was the injector rails didn't fit anymore. Also looks like they could be an issue if you splice the runners.
With the intakes on the sides you will want heat shields. I'd try to copy the Ferrari side intake location if it fits well. It's not critical but I have decision making issues lol. At this point ditch the stock engine lid.... at least the front pivot design. It's not going to open as wide with the bulge either.
Variable intake length on my Nissan: idle to 1800 = short 1800 to 3600 = long 3600 to 6800 = short
I'd stick with the factory bellows for flexibility when the engine rocks back and forth.
I will likely have a 'beauty bump' too - the price of speed
tygaboy
Feb 10 2024, 06:06 PM
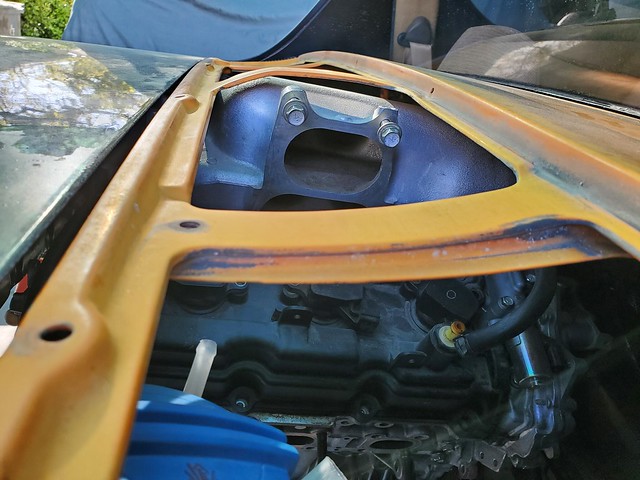
Proof of concept/test fit. The top Juuuuuuust contacts that cap. A couple things to note: - the air/oil separater isn't fully seated. It'll drop about 3/8" - the targa top is actually resting with its window seals against the inner fender so it'll lift by a bit.
In short, the roof will fit with no mods to the separater! And yes, I have a rough plan for fabbing up the needed front mounts as part of new trunk sheet metal. You'll have to check out the next video to see the overview...
tygaboy
Feb 10 2024, 06:10 PM
A top view showing how the top clears the plenum.
East coaster
Feb 11 2024, 06:13 AM
I like where this is going….
tygaboy
Feb 13 2024, 01:30 PM
Measure twice, cut once? Plan ahead? Lock down requirements before starting the build?
I'm no good at any of that which is a key reason for the "Tygaboy do-overs". In this case, it's fabbing a new trunk front wall. Ah, well.
But I mean, come on! Who would have guessed a Ferrari 360 drive train (albeit with a flipped intake) would fit inside a 914 with the trunk wall still in place? OK, to be fair, that wall is going to need a bit of a notch in the central area to clear the intake and oil supply/vent lines but, wow.
And to be fair, I want the entire trunk floor and front wall to be removable for servicability and Cars & Coffeee "look at that" sorts of events so it likely would have been cut out anyway.
tygaboy
Feb 16 2024, 03:12 PM
The trunk lid was going to need a notch so I went ahead with that. This is a crappy lid with rust, a ton of bondo and damage at the hinge mount so I didn't feel bad sacrificing it to the cause.
I think the final version may have a bit tighter clearnace at the back but I won't really know until the TBs are in place and I can get a feel for what the overall shapes look like, how a plenum grill/cover may integrate, etc. But my first reaction is that it doesn't look too bad.
rgalla9146
Feb 16 2024, 06:37 PM
Power Bulge ?
Retroracer
Feb 16 2024, 06:45 PM
Chris - at this point you might as well ditch the idea of an engine lid. Why not fab up two removable side / cover panels half metal, half mesh covered that have location pins at the back, some kind of quick connect fasteners near the trunk lip, so you can just lift them out when needed? Kind of ties in with your removable upper trunk panel.


![popcorn[1].gif](http://www.914world.com/bbs2/style_emoticons/default/popcorn[1].gif)
 or maybe Brown & Sharpe?
  Off come the turn downs, the intake manifold get turned 180 degrees (am I surprised that worked?) and we're set to add side TBs to the plenum.