Update, only because I'm very excited to have received this photo showing my entirely new and refurbished locks and handles. Cannot wait to get these on the car next-week!
For all those out there looking at re-keying and refinishing your locks and handles, look no-further than @TheCabinetmaker
Click to view attachment
Full Version: My Official Project thread
Reminder - How do you eat an Elephant? One bite at a time. I just realized that my last post mark 1,000 on this build thread. Wow, what a trip.
Based on the fact that I had it running previously I've resigned myself to that the engine not starting is something simple, or that some wire was connected wrong. My mechanic will be back in 2-weeks and I'm almost positive he'll have it working in less-than an hour once he's infront of it. Stepping away from the wiring again, I'm focusing on the 'fun' part of the restoration and yesterday was all-about the rear-window.
I'll be honest, I was a bit-intimidated reading up about the installation at first. For those looking to do the same or a 'How to' guide, the write-up in the Classics Section (Rear Window Fix/Install Step-by-Step, get rid of rattles and leaks - by Eric Shea) will give you everything you need to know. One 'note' I would like to add as the post was created some time ago; The 'rubber mounts' mentioned in Step 5 are now available via 914Rubber (link to their website here > 914Rubber.com). They are the same spacers/rubber mounts used to install the front windshield.
For me, this installation was easy enough. Just like so many other 'finishing items', it's all about prep work. Make sure to clean and prep the chassis window frame, I used a bit of lacquer thinner and followed with odorless mineral-spirits, as well as the glass itself. Also, consider cleaning the body-pieces on either side of the engine bay... This is the easiest it will ever-be. Leave the glass in an easy position to pick-up (it's awkward) and begin to apply the butyl tape. Just like the installation thread, I started in the passenger top-right corner, and began to work my way around. In my opinion, it's not so 'sticky' as much as tacky, and pretty easy to handle. Get it as straight as you can, but also remember it will smush and deform once you press on the glass. Also, expect to have extra tape (maybe 24-inches), and be prepared to cut the tape once you've made the full 'loop'. Final step here is to give it one last 'push' all around to make sure it's making contact, and then remove the paper-backing.
From here, place the rubber spacers (I put mine in the extreme corners of the bottom of the glass) and pick-up the glass. I found it easiest to line up the glass below the frame, and then go directly up and in, resting one-side on the rubber-spacer then the other because there is a channel you have to get into. This will let you make sure the glass is positioned properly, and if you're a bit off, you can still reset the glass because it's not making full-contact with the tape. Don't worry about resetting it, the tape is pretty playable and workable. Once it's exactly when you want it, give constant pressure to the edges of the glass and push it toward the tape. I did this for about 5-minutes, working my way around the glass. If you have OCD, like myself, I also took this opportunity to 'push in' the butyl from the backside using my fingers, so that everything looks uniform. This was easier than 'cutting' any globs that may have formed. Final step is to take black-electrical tape, and apply it at the bottom. This is purely cosmetic.
Some notes I had after completing this...
- I wish I would have painted the body-color strip that is on the bottom-portion of where the glass will sit. Kinda looks weird that it's orange, but I also think that this will get covered by the engine deck lid/rubber molding.
- I wish I would have gone 'higher' and 'lower' when putting on the butyl-tape along the top and bottom. I had to push-in alot of tape once I was done, and looking at the photos I could have applied it better, touching the top-portion of the roll-bar and top-most portion of the firewall.
- Erics write-up specifies putting the VW logo 'readable from the inside', behind the Drivers head. I put it on the opposite, legible from the outside, because that is how the windows are. Doesn't really matter, unless I'm missing something
- I don't plan on running a back-pad, so I'm going to look for 'wider' electrical tape.
- All in, this took me about 1.5 hours, including the prep work to the frame and cleaning the glass.
Click to view attachment
Click to view attachment
Click to view attachment
Click to view attachment
Click to view attachment
Rique you're doing fantastic work! Wow.
@Curbandgutter - Thank you. Just reviewed your thread again, and I'm sorry to hear that you were so-down, but very glad to hear that you are back at it. Stay strong and healthy, hoping your project brings you that extra bit off inspiration and health.
Taking a short break after today and yesterday before I get back on the project, and thought I would update this build-thread. Yesterday was all about the heater-blower system. I didn't notice (mostly because I never needed it in Southern CA) however, the wiring and system that was in the last car didn't have the blower exactly 'functioning'. Also, reviewing photos yesterday on this same thread, I see the soft-tubes that connect the HEs to the body weren't even installed. I'de like to take this car everywhere, and even have a dream to do a European tour one day, so this is a 'must have'.
Reading through the wiring diagrams, the Bowlsby-site is invaluable for something like this (Link to the Bowlsby site here)) and even more so, as my original relay-board has been deleted, forcing me to come up with my own-scheme that includes a relay and fuse solution. If you reference the first-photo showing the 14-pin connector that plugs into the relay board, you'll notice that there are two-leads, #9 and #11, associated with the heater switch (the lever in the cabin) and the blower that is in the engine bay, the second image shows the 'stock setup' that lists both fuse and relay. The solution I used was to install a 14-pin connector, and make the 'Ground' for the relay correspond to the heater-switch, as when its 'ON' it grounds Pin 85 on the relay, turning the system on. Also, I moved the 'hot lead' to correspond to the ignition, it didn't make sense to me that the fan would be running with the engine-off.
Additionally, as I'de like to later install another fan on the passenger-side, both providing more air-flow and making the engine bay look cleaner (no heater-hoses running up and over the engine), I left another relay for another fan in the future. If I end-up not going this direction, I like knowing that I have another relay there that I can turn on either with a signal from one of the existing leads, or 'piggy-back' on the leads originally meant for the tach, fuel-pump, etc. One more thing, I also added in in-line fuse to the fan. Though I'm thinking that if I add more equipment later, I'll add a fuse block or wiring box, like in the front trunk. Maybe I'm overthinking it, thats enough for now.
Happy Sunday everyone, back to work for me!
Click to view attachment
Click to view attachment
Click to view attachment
Click to view attachment
Click to view attachment
Click to view attachment
Continuing on yesterday, I was able to get the pedal system completely hooked-up.
For those 'newbies', a warning/recommendation; This isn't necessarily fun or easy, but is a vital skill to have for basic maintenance / roadside repairs. Almost every event that I've been to, someone has either had a clutch or accelerator cable break or had to make an adjustment on the side of the road / at the hotel. It's something you need to know as a 914-owner.
I'm only going to generally describe connecting the cables to the transmission or throttle, because my car and drivetrain (964 3.6 and 915 trans) is most likely not the norm, nor is my cable setup (Clutch cable unknown / Accelerator cable from Patrick Motorsports). First time installation is easy enough as you probably won't have the pedal board in yet. For me, it easiest to run your cables through the center tunnel (there are tubes inside the center tunnel for clutch and accelerator) BEFORE hooking them up to the throttle or clutch, but there are several ways to start. NOTE: At the 'Drivers end' of the center tunnel is an access window. I don't usually use it, but it might make things easier reaching into the tunnel.
-------
For the accelerator: You can start either in the engine bay and pull the cable through the sheet metal OR start halfway, beginning below the car and feeding the cable into the tunnel and then under the engine through the sheet metal. I started halfway and fed the accelerator cable through the tunnel first. Once it's all the way through, move to the pedal area and you should find the cable laying on the floor of the tunnel, close to where the drivers heel will be. Mine was a bit elusive this time around, but you'll get it. Once through, place the 'ball end' connector and locking nuts on, and connect it to the lever on the right-side of the pedal cluster.
You should notice that the 'lever' has two ball-ends; One ball-end is for the cable which faces the passenger side of the car (described in the previous paragraph) and the other is used for a small rod that has a ball-end on the pedal cluster side and a rounded end that fits into the back of your accelerator. I usually wait until the clutch cable is hooked up to install the rod and accelerator, it makes working down there much easier.
For the clutch: First, I slide the clutch cable into the tube at the firewall, and it should exit out the tube near the pedal cluster, just like the accelerator. It's easy cross the cables when hooking them up, so make sure they aren't tangled, because this will give you 'revs' when you're trying to shift. Typically, because it has a longer threaded-end, the clutch cable it easier to find. Before you put on the clevis that connects it to the pedal cluster, put on a nut to make sure it doesn't move (I actually use two). Push the clevis so that either end is on the outside of the pedal connection, and then put your locking pin in, and it should 'swing' and lock-against the cable.
At this point, you need to decide whether-or-not to put your pedal board and accelerator. This part is pretty easy and self-explanatory, but I will say that it is much easier without the accelerator pedal in-place.
-------
Now, we move back to the transmission and engine. Make sure the cables aren't crossed, and route them to their appropriate connections before securing them to the bottom of the engine with a hose clamp or similar piece of hardware. For the clutch on the 915, it's pretty easy to connect as it simply needs the clutch-stop piece put on, goes through the pulley, and then has another pin and clasp to finish up. All shown in the photo.
For the accelerator, and connecting to a 3.6, it's a little more tricky. I had to feed the cable up and through the 914/6 sheetmetal and route it while trying to keep it clear of all the fuel-injection hoses and wires. Patience here, it took me the better part of 30 minutes to make sure nothing was tangled or wrapped around an engine hard-fuel line. Once past the initial cluster of wires and cables, the cable will go through a zinc-plated bracket located on the intake manifold, just below the throttle body (photo attached, circled in red). You should find that the cable has a rubber grommet that secures it to the intake manifold. The grommet isn't so-much a problem, but it can get tight working in there. Give yourself plenty of light and space, and take your time. From there, and once secure on the grommet the cable will go through an 'arm' that controls the throttle position.
While you'll still have to adjust both cables to get the proper throttle and clutch response, thats a post for another time. For now, congratulations, you're done.
Click to view attachment
Click to view attachment
Click to view attachment
I knew I was going to be traveling recently, so I used this opportunity to have the painter touch-up a few areas on the car and re-spray the trunk since it had a bunch of holes from the original mounting of the ECU. Main concern was a small rust-bubble on the passenger side 'sail', and a spot behind the original paint-code tag. Glad this was the least of my problems, and that we sand-blasted the car before paint. I'm fortunate that we arranged for the painter to come to my house to do much of the 'prep', and then towed the car out to my Fathers ranch to get painted while I was away in Vegas.
Though it's not 100% complete yet, I was able to stop-by yesterday and check-out the progress. I've posted some before and afters and am very happy with how it's progressing. Great that this can still move-forward even when I'm not working on it. I'm hoping to have it completed in the next few days!
Click to view attachment
Click to view attachment
Click to view attachment
Click to view attachment
Click to view attachment
Click to view attachment
Click to view attachment
Re-reading my thread from the start I made it to about page-17 when I came to a realization. I suppose I came to a point that everyman arrives to at some-time... "Wow.... I really didn't know what the hell I was doing..."
-------
Anyway, moving on from that I've been plugging along as the car was getting prepped and focused on bleeding the brakes, setting the e-brake cables and setting the proper venting-clearance on the rotors.
For venting the rotors, check out this thread that I started > Thread Here
As for bleeding the brakes, something that was left unclear to me from various threads - bleeding the Master Cyl. (MC). If you have a new MC, or a substantially new or refurbished brake-system make sure to bleed your MC. This was unclear to me before, and when I changed from 21mm to 19mm it gave me a few problems when bleeding my brakes. @iankarr has a great video on this, and it's pretty straight-forward >Video Link Here
As for bleeding the brakes, I also referenced another video from @iankarr ( Video link here ) because I purchased the same power-bleeder. I won't go into a whole explanation, because the video is pretty clear, though I will leave some notes that I found useful. I'm sure that I made ALL the mistakes and had the worst-luck while doing this, so check out my list below...
- If you're unfamiliar with this watch Ians video a few times. Good? Now watch it again.
- Before you start, have extra towels and water ready. Have MORE than enough, and stage them around your car. This will be handy if you spill.
- Most important: Make sure your brake-fluid reservoir is solid with no leaks or cracks and same for your lines and such. I had just started bleeding the system the first-time, only to find a 'crack' in the reservoir just above the plated retaining strap. Very annoying to stop what you're doing, get a turkey-baster/syringe, drain the system, install a new reservoir, and start all over. Further, it becomes very messy and stressful, especially with all that brake-fluid around.
- Check. Your. Reservoir. Lines!. This relates to the above point. I found that, in addition to the crack I had lines that were completely deteriorated. Suggest that everyone buy new rubber brake hose to connect the reservoir to the lines and new hose-clamps. (Link to brake-lines here)
- My system had already been bled before with blue brake-fluid. As it still had fluid in the system I found this helpful because when the new, clear, fluid came through I could visually tell that the system had been 'flushed'.
- If you're bleeding your brakes after a restoration or major swap (new calipers / MC), make sure to first bleed the MC, then add more fluid before bleeding your brakes. I made a similar mistake, and when bleeding the brakes let the reservoir run dry and had to start over.
- Some call it an urban myth, but I found it helpful to tap the brakes and brake-lines while bleeding. I think the vibrations help get out any 'stuck' air-pockets.
- I brought the pressure on the power-bleeder up to 7.5 PSI, and had no problem.
- My car has early 'S' brakes. If you have the same or similar 'big brakes' you need to bleed both-sides of the caliper. Order is still the same as bleeding 'stock' brakes, though with a minor adjustment; Right-rear caliper, Left-rear caliper, Right-front inner caliper, Right-front outer caliper, Left-front inner caliper, Left-front outer caliper.
Click to view attachment
Click to view attachment
Click to view attachment
Click to view attachment
Click to view attachment
Click to view attachment
Click to view attachment
-------
Anyway, moving on from that I've been plugging along as the car was getting prepped and focused on bleeding the brakes, setting the e-brake cables and setting the proper venting-clearance on the rotors.
For venting the rotors, check out this thread that I started > Thread Here
As for bleeding the brakes, something that was left unclear to me from various threads - bleeding the Master Cyl. (MC). If you have a new MC, or a substantially new or refurbished brake-system make sure to bleed your MC. This was unclear to me before, and when I changed from 21mm to 19mm it gave me a few problems when bleeding my brakes. @iankarr has a great video on this, and it's pretty straight-forward >Video Link Here
As for bleeding the brakes, I also referenced another video from @iankarr ( Video link here ) because I purchased the same power-bleeder. I won't go into a whole explanation, because the video is pretty clear, though I will leave some notes that I found useful. I'm sure that I made ALL the mistakes and had the worst-luck while doing this, so check out my list below...
- If you're unfamiliar with this watch Ians video a few times. Good? Now watch it again.
- Before you start, have extra towels and water ready. Have MORE than enough, and stage them around your car. This will be handy if you spill.
- Most important: Make sure your brake-fluid reservoir is solid with no leaks or cracks and same for your lines and such. I had just started bleeding the system the first-time, only to find a 'crack' in the reservoir just above the plated retaining strap. Very annoying to stop what you're doing, get a turkey-baster/syringe, drain the system, install a new reservoir, and start all over.
Further, it becomes very messy and stressful, especially with all that brake-fluid around.- Check. Your. Reservoir. Lines!. This relates to the above point. I found that, in addition to the crack I had lines that were completely deteriorated. Suggest that everyone buy new rubber brake hose to connect the reservoir to the lines and new hose-clamps. (Link to brake-lines here)
- My system had already been bled before with blue brake-fluid. As it still had fluid in the system I found this helpful because when the new, clear, fluid came through I could visually tell that the system had been 'flushed'.
- If you're bleeding your brakes after a restoration or major swap (new calipers / MC), make sure to first bleed the MC, then add more fluid before bleeding your brakes. I made a similar mistake, and when bleeding the brakes let the reservoir run dry and had to start over.
- Some call it an urban myth, but I found it helpful to tap the brakes and brake-lines while bleeding. I think the vibrations help get out any 'stuck' air-pockets.
- I brought the pressure on the power-bleeder up to 7.5 PSI, and had no problem.
- My car has early 'S' brakes. If you have the same or similar 'big brakes' you need to bleed both-sides of the caliper. Order is still the same as bleeding 'stock' brakes, though with a minor adjustment; Right-rear caliper, Left-rear caliper, Right-front inner caliper, Right-front outer caliper, Left-front inner caliper, Left-front outer caliper.
Click to view attachment
Click to view attachment
Click to view attachment
Click to view attachment
Click to view attachment
Click to view attachment
Click to view attachment
Glad the videos helped. And tapping the calipers isn't a myth at all. There are lots of places for bubbles to hide. If you're replacing the calipers, do whatever you can to shake them out. Drive back and forth over railroad tracks a few times (once the car has a firm enough pedal to hit the road). There are a few other things I should've highlighted more in the videos
– Brake fluid will ruin your paint. Seriously. And Fast. Maybe in less than 30 seconds. And it's not something that compounds out. Make sure you have a way to rinse off any that gets where it's not supposed to go before you mess with it.
– Per Eric Shea at PMB, freshly rebuilt calipers need a little time to break-in before the pedal becomes as firm as it will get. The new seals pull on the pistons a bit and they need to relax.
I'm making a full brake line and caliper video for my BB build. Coming soon!
QUOTE(iankarr @ Oct 1 2021, 01:26 PM) 
Glad the videos helped. And tapping the calipers isn't a myth at all. There are lots of places for bubbles to hide. If you're replacing the calipers, do whatever you can to shake them out. Drive back and forth over railroad tracks a few times (once the car has a firm enough pedal to hit the road). There are a few other things I should've highlighted more in the videos
– Brake fluid will ruin your paint. Seriously. And Fast. Maybe in less than 30 seconds. And it's not something that compounds out. Make sure you have a way to rinse off any that gets where it's not supposed to go before you mess with it.
– Per Eric Shea at PMB, freshly rebuilt calipers need a little time to break-in before the pedal becomes as firm as it will get. The new seals pull on the pistons a bit and they need to relax.
I'm making a full brake line and caliper video for my BB build. Coming soon!
@iankarr - Thank you Señor Ian, keep them coming!

Work continues - Very happy with how all the final cut and polishing is going! Making sure everything matches, we started putting on the front and rear hoods. Only hiccup I ran into is the Camp914 Hood shocks. It seems like it takes WAY too much force to push the hood-down and, when I moved the mounting point for the hood to the bolt that is 'closer' to the Driver, the geometry of the setup causes the shock to run out of room before the hood is completely flat AND not lift completely. This would made refueling impossible. If I remember correctly, this was a pretty-popular kit, so I think I'm getting something wrong. Any input is appreciated, but for now, I'm going to order the 914Rubber hood-springs as a 'backup' and leave the hood without the shocks so I can align all my gaps, and get this thing on the road!
On another note, I fall in love each time this car gets polished. As popular as it is, 'Signal Orange' is the color these cars are supposed to be. Go ahead.... Try and change my mind!

Click to view attachment
Click to view attachment
Click to view attachment
Click to view attachment
Click to view attachment
Click to view attachment
Click to view attachment
Click to view attachment
I have a trunk.... it's even got a lid.... and trunk-shocks.... and even a wiring harness and hardware! That is all... carry on please
Click to view attachment
Click to view attachment
Click to view attachment
Click to view attachment
Click to view attachment
Click to view attachment
Click to view attachment
Click to view attachment

Getting close!!
Enrique,
You have the the oil breather system plumbed wrong. The oil breather is an integral part of the intake system. If you leave it like this, you are going to have oil leaks.
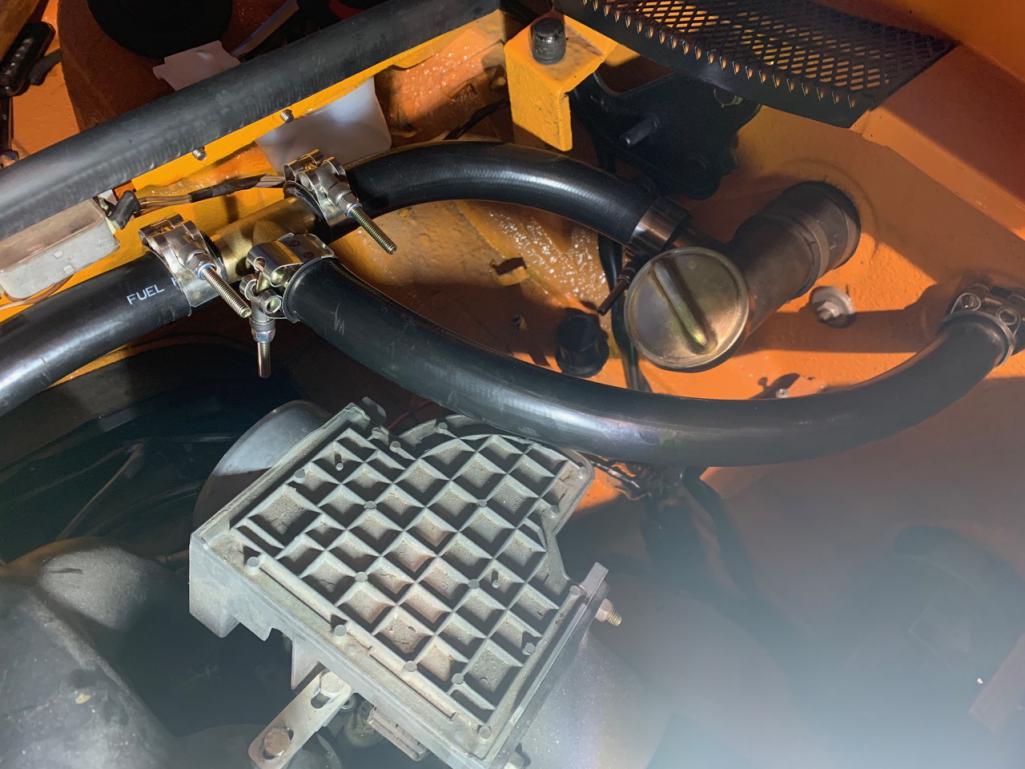
The one on the filler neck goes to the fitting on the top of the engine case. The one directly on the tank goes to the intake elbow that is between the air flow meter and the throttle body. That makes the oil system part of the air intake system, lowers emissions and prevents oil leaks.
However, the 964 used a way different oil tank from the 911 or the 914-6. So to make a 3.6 work with the 914-6, you have to add a restrictor in the line from the throttle body elbow and the oil tank. The restrictor is from a 3.2 Carrera motor, Part number 930-107-289-00. If you don't put the restrictor in, you won't be able to check the oil.
Pelican LInk on the restrictor
If you need pictures, let me know.
Clay
You have the the oil breather system plumbed wrong. The oil breather is an integral part of the intake system. If you leave it like this, you are going to have oil leaks.
The one on the filler neck goes to the fitting on the top of the engine case. The one directly on the tank goes to the intake elbow that is between the air flow meter and the throttle body. That makes the oil system part of the air intake system, lowers emissions and prevents oil leaks.
However, the 964 used a way different oil tank from the 911 or the 914-6. So to make a 3.6 work with the 914-6, you have to add a restrictor in the line from the throttle body elbow and the oil tank. The restrictor is from a 3.2 Carrera motor, Part number 930-107-289-00. If you don't put the restrictor in, you won't be able to check the oil.
Pelican LInk on the restrictor
If you need pictures, let me know.
Clay
QUOTE(ClayPerrine @ Oct 11 2021, 11:10 AM)
Enrique,
You have the the oil breather system plumbed wrong. The oil breather is an integral part of the intake system. If you leave it like this, you are going to have oil leaks.
The one on the filler neck goes to the fitting on the top of the engine case. The one directly on the tank goes to the intake elbow that is between the air flow meter and the throttle body. That makes the oil system part of the air intake system, lowers emissions and prevents oil leaks.
However, the 964 used a way different oil tank from the 911 or the 914-6. So to make a 3.6 work with the 914-6, you have to add a restrictor in the line from the throttle body elbow and the oil tank. The restrictor is from a 3.2 Carrera motor, Part number 930-107-289-00. If you don't put the restrictor in, you won't be able to check the oil.
Pelican LInk on the restrictor
If you need pictures, let me know.
Clay
@ClayPerrine - Señor Clay, thanks for the heads-up! I was actually thinking to connect the port on the oil-tank to a breather, would that not suffice? I'll check out the link you sent, and will never say 'No' to photos. Much appreciated!
This weekend was measured not in progress, but in photos! Alot of work done, hoods on, and the car 'buffed' out. To avoid rock-chips on the car, we added chip-guard and went over that with three-coats of paint. Very happy with how it all turned out, you cannot even see it if you are over 5-feet away!
As the car sat for so-long I was worried about flex and alignment, especially when it came to door and hood gaps. Fortunately, it seems like my anxiety was mis-placed as all my gaps are even! The one area I'm having a problem with is the passenger-side headlight - it seems the assembly and cover have so much adjustment, it was giving me a headache to get it all-right yesterday and trying to mount the 'eye-brow' pieces that go below the headlight assembly are no picnic either. If anyone has a recommendation on how to easily install the grommets, it would be much appreciated.
For now, I'll leave the readers with some of my favorite photos as the car is getting assembled.
Click to view attachment
Click to view attachment
Click to view attachment
Click to view attachment
Very nice Enrique. It won't be long before you are behind the wheel for real. 
QUOTE(eric9144 @ Oct 11 2021, 09:59 AM)
Getting close!!
QUOTE(Cairo94507 @ Oct 12 2021, 09:01 AM)
Very nice Enrique. It won't be long before you are behind the wheel for real.
@eric9144 @Cairo94507 - Thanks gentleman, hoping to hold a candle next to your cars! I was anticipating I would make WCR, but I just wasn't able to put in those extra-couple of weekends to finish in time. Oh well, next year!
Hey everyone! Looking for some feedback or direction regarding adjusting the position of the headlight assembly and painted 'cover' that goes on top. As it sits currently, the Drivers side is perfect with all of the gaps (Hood, Headlight cover, Fender) lining up, and a good amount of clearance between the hood and head-light cover (both on the 'top' line of the cover and the side facing the hood. However, I'm having trouble on the passenger-side and am looking for a method that other members might use, besides those listed in the manual.
To me, it seems like there is SO much adjustment I just can't get it right and 'lined-up', and I feel that the headlight cover is too-close to the hood, both on the side and the top. Further, it seems like the 'gap' between the fender and headlight cover is larger than the Drivers side. Finally, complicating the whole-matter are the 'eye-brows' - should I put these on first and then adjust based on those lines? If so, it makes adjusting the headlights harder. Thanks in advance to anyone reading this who can help-out.
Click to view attachment
Click to view attachment
That's looking like a 914 again, nice!
Headlight adjustments are a PITA. Most 914's I can get gaps pretty even, but some there seems to be nothing you can do and some gaps are just off a bit.
Takes time, opening and closing the hood a hundred times, tiny adjustments repeat...
Headlight adjustments are a PITA. Most 914's I can get gaps pretty even, but some there seems to be nothing you can do and some gaps are just off a bit.
Takes time, opening and closing the hood a hundred times, tiny adjustments repeat...
QUOTE(Root_Werks @ Oct 12 2021, 11:34 AM)
That's looking like a 914 again, nice!
Headlight adjustments are a PITA. Most 914's I can get gaps pretty even, but some there seems to be nothing you can do and some gaps are just off a bit.
Takes time, opening and closing the hood a hundred times, tiny adjustments repeat...
@Root_Werks - Thanks for the heads-up, I guess I'll just continue on. Frustrating, especially since the Driver-side headlight was perfect on the first-try.
QUOTE(ClayPerrine @ Oct 11 2021, 02:10 PM)
Enrique,
You have the the oil breather system plumbed wrong. The oil breather is an integral part of the intake system. If you leave it like this, you are going to have oil leaks.
The one on the filler neck goes to the fitting on the top of the engine case. The one directly on the tank goes to the intake elbow that is between the air flow meter and the throttle body. That makes the oil system part of the air intake system, lowers emissions and prevents oil leaks.
However, the 964 used a way different oil tank from the 911 or the 914-6. So to make a 3.6 work with the 914-6, you have to add a restrictor in the line from the throttle body elbow and the oil tank. The restrictor is from a 3.2 Carrera motor, Part number 930-107-289-00. If you don't put the restrictor in, you won't be able to check the oil.
Pelican LInk on the restrictor
If you need pictures, let me know.
Clay
Clay, Thanks for the heads up on this...I had never seen that info, especially the restriction. I have my 3.6 plumbed up as you noted, but backwards on which hose was on the intake vs. the crankcase. It was a 993 vs. 964, not sure if that matters...
Enrique, thanks for all the incredible details in your thread (sorry step in the middle of it, maybe it will help another 3.6 conversion do the road?)
This post is ALL about locks and hardware. For years, I've been looking forward to posting assembly photos (assembly-porn). While I might be nerd-ing out a bit, I'm happy the time has come for my car to shine! First-off, locks. For those of you that are having problems with your keys, locks, ignition, etc. - look no-further than @TheCabinetmaker . Curt does excellent work, flawless really. I received these a little while back, and finally have the chance to install everything. Very satisfied with the work as all the parts have been retreated, rebuilt, and assembled to my new matching key-set 
Further, to compliment my 'shiny-new' locks I purchased 'shiny-new' hardware from @bdstone914 . Loving the look of the re-plated and finished pieces, from the trunk-latches, to my tow-hook, and everything in-between.
Click to view attachment
Click to view attachment
Click to view attachment
Click to view attachment
Click to view attachment
Click to view attachment
Small but significant progress early-on this weekend, I spent the majority of Friday night adjusting the ‘gaps’ on the headlights and eye-brows. I’ve come to realize there’s really no ‘trick’ to this, other than making sure the ‘eye-brows’ are secure and aligned first, then making very-small adjustments to the headlight mechanism and hood. With that done, we can finally finish the ‘cut and buff’ in this area, and place the rest of the hardware, covers, and turn-signal lenses.
One thing I did different: I replaced the rubber-grommets holding on the eye-brows with standard M6 bolts; Much easier to install, align, and keep them in place. Originally, from my research, the factory used the rubber-solution to avoid injury, as when One is adjusting the headlight alignment and position, it’s very common that the motor will cycle and ‘Bite’ Ones hand. If this where to happen, the rubber pieces would ‘give way’ and the hand would be unharmed. I’ll wager that the factory anticipated this with new or inexperienced owners. Knowing my way around these cars, I disconnect the battery when doing this type of work and assume the risk. The result? A slightly easier process, and no-risk of loosing these pieces on the highway or after bumps (it happens, believe me).
Click to view attachment
Click to view attachment
Click to view attachment
Click to view attachment
@bahnzai
@ClayPerrine
Hi Guys, carved out time on the weekend to mock-up (and share for anyone with a similar conversion) the oil/intake system. Granted, I'll clean this up and sort correctly, but wanted to share here and 'check' with Clay. Is this the right-setup?
Click to view attachment
@ClayPerrine
Hi Guys, carved out time on the weekend to mock-up (and share for anyone with a similar conversion) the oil/intake system. Granted, I'll clean this up and sort correctly, but wanted to share here and 'check' with Clay. Is this the right-setup?
Click to view attachment
QUOTE(RiqueMar @ Oct 18 2021, 11:56 AM)
@bahnzai
@ClayPerrine
Hi Guys, carved out time on the weekend to mock-up (and share for anyone with a similar conversion) the oil/intake system. Granted, I'll clean this up and sort correctly, but wanted to share here and 'check' with Clay. Is this the right-setup?
Click to view attachment
That's exactly the right plumbing.
I left the factory elbow attached to the throttlle body, and put the aftermarket elbow out next to the air flow meter, but otherwise it is identical. I didn't have to add plumbing to the idle air motor. I suspect it can affect the idle response.
Clay
QUOTE(ClayPerrine @ Oct 18 2021, 12:22 PM)
That's exactly the right plumbing.
I left the factory elbow attached to the throttlle body, and put the aftermarket elbow out next to the air flow meter, but otherwise it is identical. I didn't have to add plumbing to the idle air motor. I suspect it can affect the idle response.
Clay
@ClayPerrine - Gracias Señor Clay, your feedback is always invaluable!
Attaching photos from Clays progress thread (as well as mine) to show the engine-bay and connect for those following along. I think it may be helpful, it sure is to me. While his intake is 'flipped', we are referencing the hose connections.
My next step is connecting the lines from the charcoal canister located above the fuel-tank. While not 'vital', I do think it will help the engine run more similar to its original design. My anticipated setup is as follows: Connect 1-line to the intake manifold elbow, and the other-line to the a port on the passenger-side plastic intake structure. If I'm correct, the port on the plastic manifold should 'blow' air from the engine into the charcoal canister, and the line connected to the rubber-intake elbow should 'suck' vapor / air / etc into the engine.
Click to view attachment
Click to view attachment
Click to view attachment
Things are a bit 'slow-go' right now. Ever since moving the car out to my parents house to get the final body-work addressed, I've lost the 'rhythm' I had of working 1-2 hours every day. To try to get back into a significant stride I figured I would start tackling interior items. So, this Saturday was all about carpet as the car continues to get buffed out... Under the supervision of my dog Apollo, of course.
For those with similar projects, see the the 914Rubber website. While I originally wanted to go with the '701 Early Charcoal German Loop' because I didn't like the previous black-kit I installed - this wasn't available, so I settled for the 'Domestic Jet-Black'. At $180 it is hard to beat. Though there are a few odd-things about the kit that I need to research (the passenger side seatbelt-hole, no gut for the e-brake 'stop', etc) I'm generally satisfied with the kit. After having it installed, I definitely like the pattern alot more than the previous black.
Pro-Tip: Installation is pretty easy and, as usual, it's all about the prep-work. For those doing a similar replacement, make sure to use plenty of plastic as you grind away at the old-carpet and adhesive... The debris will get everywhere from inside your doors to underneath your dash. A $15 investment in plastic and masking will save you a world of trouble. Also, using masking tape, layout the carpet and give yourself some registration marks to make everything easy to line-up once the adhesive is applied. This is a good time to make sure all your trim and interior components 'fit'; Speaker-pods, Door-trim, etc. Also, this will help you understand the 'sequence' of applying the pieces - For me, it was Passenger-side long, then Driver-side wheel-well, Driver-side Long, Center console, and Passenger-side foot area.
I started off on the top of the entry of the passenger-side, applying adhesive (about 3-coats) to both the carpet and the car and then massaged that piece on. Once set (5-min or so) I took the remainder of the carpet and 'flipped' it up to spray the vertical surface and chassis and massaged that in-place. I stayed in that area for about 10-min, just rubbing down the carpet. Weird thing I noticed here was that the hole on the carpet-piece didn't match up with my 1970' chassis - maybe the model-years are different.
With the passenger-side longs complete, I moved the the Driver-side wheel-well. Perhaps the most complicated piece, theres really only one-way to register it. On the left-side of the piece, if you're using he 914-rubber carpet kit, you will find a 'slit' that can be placed over the bracket that holds the speaker. From there, I just lined up my registration marks. Make sure to remove and wrap your wiring harness, so you don't get any glue on it.
As the Driver-side long 'lays' over the wheel-well, that's next. This was one of the more difficult portions of the project, because you have the small 'indent' next to the handle for the e-brake, as well as the 'posts' that stick-out for the e-brake. Oddly, my carpet piece was marked, but there was no-hole. Take your time with this piece and line everything up, it will be the most difficult part of the job, and should take you the most amount of time.
The center-console area is pretty easy, so long as you remember that this piece isn't exactly 'permanent'. You should consider that you'll need to access the center-console from time-to-time to check the wiring or make shifter adjustments, so it's really your choice whether yo use adhesive or not. In my case, I'm running two-additional gauges, so I'll have to 'slice' that piece in the middle to pass through all my new wiring - I don't think I'll be using adhesive.
Finally, the passenger-side foot area. While my car is a 70' and also has oil-lines in this area, I took a footrest from a 75' and placed it at the bulkhead. The top-portion has adhesive, but only 'lays' on the footrest. The bottom of the piece will be covered by the passenger-side mat.
One last note - Do not cut the excess of the carpet. The kit is meant to be long and 'lay' on the floor, so that when you put the floor-mats and seats in, it looks seamless. Also, because we're on the subject of carpeting, including a shot of my snazzy-new trunk carpeting from 914 rubber... I wonder if I can get the same-pattern as the interior, paging @Mikey914
Edit : Don't know why most of my pictures displayed upside down... Maybe a thoughtful moderator can help me out...
Click to view attachment
Click to view attachment
Click to view attachment
Click to view attachment
Click to view attachment
Click to view attachment
Click to view attachment
Click to view attachment
Click to view attachment
Click to view attachment
Yes we can. You are lucky. The German is getting harder to get so we can match the domestic up for you easily. PM me your number I'll call you and work out details.
Mark
Mark
Nice job Enrique. It really is coming together nicely.
Another great job and tutorial, thanks!
QUOTE(Mikey914 @ Oct 26 2021, 12:11 AM)
Yes we can. You are lucky. The German is getting harder to get so we can match the domestic up for you easily. PM me your number I'll call you and work out details.
Mark
@Mikey914 - I've been away on a trip and am just getting back to my thread. Thanks and will do!
A bit of a 'zoom' in on the carpet-job...
Following along on this thread, you might remember that I ran my oil-lines along the passenger-side of longs and then created a bulkhead mount that briefly brings them into the cabin before going into the front-trunk to connect to the cooler. Main reason for this being that I didn't like the oil-line setup on the black-car, and that my foot would often rest on the lines while driving (awkward). Using this method, I could cover the lines with a 'late' footrest and not have to deal with the heat or appearance of the lines.
Starting off, I grabbed a footrest from a 75' car that was in rough shape and after making a few 'marker' notes, began grinding away. While its really dusty, the piece is pretty easy to cut, and you only run the risk of cutting too-much too-quick. After a few trips back and fourth, I eventually had the piece with the right-fit, and could 'sand it' so it didn't look too hacked-up. Once it was ready to be installed, most of the glue went on the chassis 'above' the footrest piece, with only a little bit 'tacking' onto the rest in case I need to take it out. I think the factory did the same, in order to access the cutout that you can see in some of the pictures. From there, it's just more massaging to get the carpet in-place and then laying it all out.
This piece marks the last in the set so after, I was also able to start installing the speakers, rubber door-lining and trim that separate the door-step to the interior. This is easy enough, though it might take some 'probing' to see where the holes line up. Pro-tip: The holes for the trim will line-up with the holes for the door-step, maybe 3/4' to 1" from the door-seam. Looking back on this portion of the project, I now wonder how I can best use that 'access panel' in the foot-rest.... Maybe a small-form subwoofer or access for electronics...
Click to view attachment
Click to view attachment
Click to view attachment
Click to view attachment
Click to view attachment
Click to view attachment
Edit: Forgot to mention on my previous post, but.... What is this last-carpet piece for? The only area I can think-off is the space just-above the pedals or between the seatbelt-latches between the Driver and passenger?
Click to view attachment
Click to view attachment
Behind the seats
QUOTE(Van914 @ Nov 9 2021, 04:32 AM)
Behind the seats
@Van914 - Can you talk about this more? I only have 1-piece
Enrique, I think it’s the carpet on the front of the pedal box, under the dash. The carpet pieces behind the seats are shaped, not rectangular.
QUOTE(mepstein @ Nov 9 2021, 10:31 AM)
Enrique, I think it’s the carpet on the front of the pedal box, under the dash. The carpet pieces behind the seats are shaped, not rectangular.
Hey Mark - Yeah, thats what I was thinking, and I think I even saw the same photo you shared. I'll be back with the car tonight and try to figure it out
QUOTE(RiqueMar @ Nov 9 2021, 02:08 PM)
QUOTE(mepstein @ Nov 9 2021, 10:31 AM)
Enrique, I think it’s the carpet on the front of the pedal box, under the dash. The carpet pieces behind the seats are shaped, not rectangular.
Hey Mark - Yeah, thats what I was thinking, and I think I even saw the same photo you shared. I'll be back with the car tonight and try to figure it out
I think it gets glued to the bulkhead and is mostly cosmetic.
You are correct the small piece goes above tge drivets pedals.
On the passenger carpet, It lays flat on the floor and the upper foot rest piece goes over it so you don't have excess carpet going up it.
On the passenger carpet, It lays flat on the floor and the upper foot rest piece goes over it so you don't have excess carpet going up it.
Hello 914World! Long time no-post, however I'm still here and 'chipping' away. Had a bit of a problem in the Fall with 'rough running' on my engine that I believe has been isolated to the ECU. While that one is in for repair, modification and upgrade - I purchased a 'rebuilt' and certified unit from Steve Wong Link to SWChips.com and 'voilà!' everything works again, with the only change being that I moved pin 18 (constant power) to a fused source.
While I'm able to run the engine consistently with starter fluid, this leads me to believe I need to give the fuel system another look. Next order of business is to remove and send in the injectors for cleaning / servicing as well as the fuel-rails just to be safe, because I had them re-plated. Also, going to use this opportunity to install a fuel-pressure gauge on the fuel rail and (maybe) replace the fuel pump. More details later, but for now, sharing my 'finished' wiring diagram.
Click to view attachment
Hello Enrique - Nice to see you back and still making progress. Is WCR in your plans?
QUOTE(Cairo94507 @ Apr 7 2022, 05:45 AM)
Hello Enrique - Nice to see you back and still making progress. Is WCR in your plans?
@Cairo94507 - I've been at it, it's just been a bit 'slow' recently - our business has really picked up. No complaints here though, it's better than the alternative! I think WCR is in July - I don't think I can have my car up there that quickly, but I'll try and tag along and find an empty seat or cool car to bring.
I mentioned previously that the car was running rough. I suspect it's the injectors. As a precaution I'm also going to take this opportunity check or replace the following. I don't foresee this as a big problem, because I've had the car running in this configuration for 10-20 minutes at a time, but we'll see....
- Servicing the injectors: As much as I would like to get new ones, at $250 each, I just can't see it happening.
- New Fuel Pump: This unit sat for a while and I remember there was something 'finicky' about it before reinstalling it. Further, it's been with the car for atleast as long as I can remember and sat 'dry' for the longest time. Also, when I turn the ignition ON and the system is on, it seems a bit loud. Something here doesn't seem right.
- Check the fuel lines: These are new, but I'm going to check underneath the tank, in the tunnel and out the rear firewall for any 'kinks'.
- Lower the fuel filter: I made the mistake of mounting the fuel-filter above the fuel pump in the front trunk, and a bit too high. While it's easy to get to, clean and replace, it's too high and I need to lower lower it to about the same level as the fuel pump.
- Install a pressure Gauge on the passenger-side fuel rail: I'm sure I can do this, I'm just not sure how to yet.
Getting ready for each of these, I spent last night removing the injectors and wanted to be careful because I've already detailed the engine bay. Pretty straight forward, just started at the Passenger-side fuel rail and disconnected the supply line. It had a bit of fuel, but nothing that a water-bottle and a rag can't handle. From there, just disconnected each hose tot eh pressure regulator and engine fuel system and repeated the same on the Driver-side. For those that are doing this for the first time, give yourself about 1.5-2hrs, have a few rags and take your time. It gets a bit cramped in the 914 engine bay, but it's not too difficult with light, a Gatorade/Bottle handy and the tools on-hand (16, 17, 18, 19mm wrench).
Click to view attachment
Click to view attachment
Click to view attachment


Click to view attachment
Great looking build - hope to see your car sometime.
Great looking build - hope to see your car sometime.
Hi Guys!
Still here and with the project! Our business just really picked up last-year and, as well, went through a divorce so this was put on the back-burner. I swear, I think I was only 'home' for about a total of 4-months in 2022-2023. In any-case, working on my first-property and I'd like to see this done sometime in 2024! Last-week, I began calling around to different shops to 'push this across' the finish line - very excited to find the 'right' place!
Thought I'de check in, hope everyone is doing well!
Enrique - If I can help with anything, just let me know.
Enrique - Sorry to hear about the divorce- no fun. I really hope you are doing well, moving on and maybe that you found the shop to complete your car. I know it likely rubs you the wrong way to have someone else work on your car, but at some point, time is worth more than money. Hope to see you driving that beauty very soon.
Cheers,
Michael
Cheers,
Michael
This is a "lo-fi" version of our main content. To view the full version with more information, formatting and images, please click here.