Full Version: Intro from Montana: '73 2.0L rustoration thread
Pages: 1, 2, 3, 4, 5, 6, 7, 8, 9, 10, 11, 12, 13, 14, 15, 16, 17, 18, 19, 20, 21, 22, 23, 24, 25, 26, 27, 28, 29, 30, 31, 32, 33, 34, 35, 36, 37, 38, 39, 40, 41, 42, 43, 44, 45
Its looking good.. I have to take off from updates this weekend as out of town.. Keep the great work up to take up my slack.
Trying to do as Ben says and keep plugging along. Yesterday, I got a lesson in why it is so important to wear underwear when doing a project like this because I just about  my pants when I bolted on the door and dry fit the jamb to check door gaps. They were WAY off
  It was hard to tell how much was because the jamb needed to be tweaked for fitment, and how much was a real problem. But the gap was zero near the door handle, and (I'm just guessing) 15mm lower on the door. I decided I needed to trim the sail panel enough to clamp it on for a dry fit so I could properly align the jamb the way it will be in in its final resting place. That took a bit of fiddling to get right, but I finally got there and things started looking MUCH better.
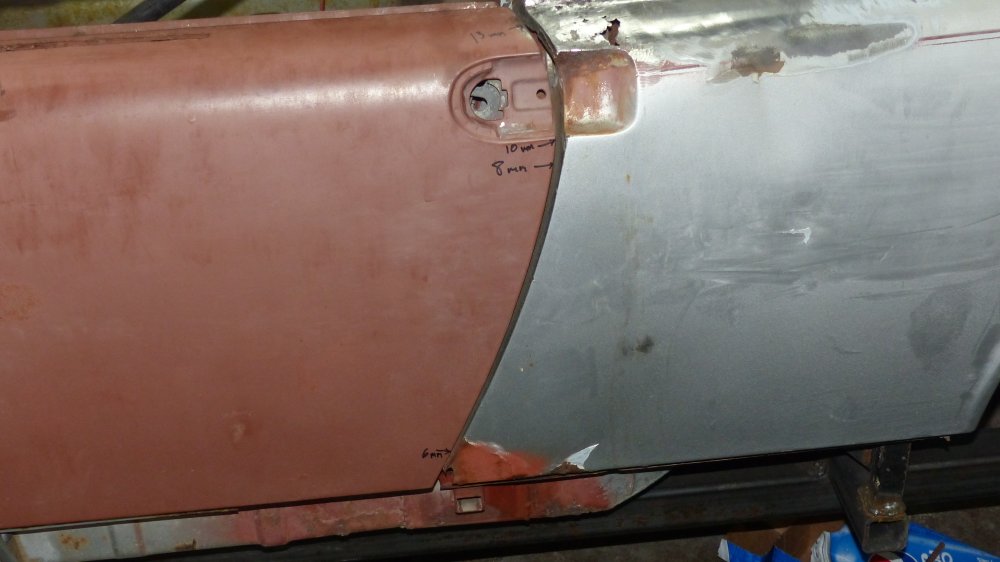
Click to view attachment
But there was still a major concern. At the spot labeled "A" in the above pic, the door was 2mm higher than the quarter panel. I adjusted the sail panel as much as possible but still couldn't get things to line up. I looked for any possible adjustments at the door hinges and found none. It was puzzling because my measurements from roll bar to window frame, and across the door opening were both spot on with factory specs. It made no sense and I was getting really worried that something was seriously bent or torqued. Then I decided to just push down on the door above the handle area and presto, the door went into perfect alignment.
Click to view attachment Click to view attachment
It's a little unsettling, but other than a couple small rust patches in the skin, the door is solid. Apparently, there is enough give in the door that it can be bent up or down a few mm.
Anywho, with that little nightmare out of the way, I spent the next couple hours plug welding the long shut. I'm getting better at my plug welding technique, but still have a tendency to overfill the holes a bit, leaving enough dome that they need to be touched with a grinder.
Click to view attachment
After welding, the door fitment and measurements were unchanged.
Click to view attachment
Just as a refresher of where this door started:
Nice improvement.
Last night, I got the jack tube welded in. Unfortunately, the replacement gun liner I ordered for my welder was for the newer style Handler and didn't fit my old unit. This leaves me with no way to run .035 wire until I find a replacement. So the inside weld around the tube required some grinding to not look like a pile of bear crap. After getting the tube in, I called it a night.
This morning, my welder gas was running on empty so I tried to use it all up in time for a run into town for a fresh exchange. I welded on the jack pyramid. I'll leave welding around the tube until I can run thicker wire.
Click to view attachment
I was still getting 20 lbs of pressure at the gun so I kept going. I welded in the threshold.
Click to view attachment
Still had gas, so I burned on the brackets.
Click to view attachment
Still had gas. So I started on the door jamb. Got it plugged on in a few spots and the gas gave out... 10 minutes too late to get to the welding shop before they closed at noon
Click to view attachment
Oh well, welding is over for the weekend. But there is plenty of other stuff to do. I ended with clamping the sail panel back on to admire the progress.
Click to view attachment
The gap is down to 2mm at the door handle, but that is just because I don't have the sail panel aligned exactly right. It will be fine with final fitment. I think this will be a good time to do a little shop cleanup and organizing.
my pants when I bolted on the door and dry fit the jamb to check door gaps. They were WAY off It was hard to tell how much was because the jamb needed to be tweaked for fitment, and how much was a real problem. But the gap was zero near the door handle, and (I'm just guessing) 15mm lower on the door. I decided I needed to trim the sail panel enough to clamp it on for a dry fit so I could properly align the jamb the way it will be in in its final resting place. That took a bit of fiddling to get right, but I finally got there and things started looking MUCH better.Click to view attachment
But there was still a major concern. At the spot labeled "A" in the above pic, the door was 2mm higher than the quarter panel. I adjusted the sail panel as much as possible but still couldn't get things to line up. I looked for any possible adjustments at the door hinges and found none. It was puzzling because my measurements from roll bar to window frame, and across the door opening were both spot on with factory specs.
It made no sense and I was getting really worried that something was seriously bent or torqued. Then I decided to just push down on the door above the handle area and presto, the door went into perfect alignment. Click to view attachment Click to view attachment
It's a little unsettling, but other than a couple small rust patches in the skin, the door is solid. Apparently, there is enough give in the door that it can be bent up or down a few mm.
Anywho, with that little nightmare out of the way, I spent the next couple hours plug welding the long shut. I'm getting better at my plug welding technique, but still have a tendency to overfill the holes a bit, leaving enough dome that they need to be touched with a grinder.
Click to view attachment
After welding, the door fitment and measurements were unchanged.
Click to view attachment
Just as a refresher of where this door started:
Nice improvement.
Last night, I got the jack tube welded in. Unfortunately, the replacement gun liner I ordered for my welder was for the newer style Handler and didn't fit my old unit. This leaves me with no way to run .035 wire until I find a replacement. So the inside weld around the tube required some grinding to not look like a pile of bear crap. After getting the tube in, I called it a night.
This morning, my welder gas was running on empty so I tried to use it all up in time for a run into town for a fresh exchange. I welded on the jack pyramid. I'll leave welding around the tube until I can run thicker wire.
Click to view attachment
I was still getting 20 lbs of pressure at the gun so I kept going. I welded in the threshold.
Click to view attachment
Still had gas, so I burned on the brackets.
Click to view attachment
Still had gas. So I started on the door jamb. Got it plugged on in a few spots and the gas gave out... 10 minutes too late to get to the welding shop before they closed at noon
Click to view attachment
Oh well, welding is over for the weekend. But there is plenty of other stuff to do. I ended with clamping the sail panel back on to admire the progress.
Click to view attachment
The gap is down to 2mm at the door handle, but that is just because I don't have the sail panel aligned exactly right. It will be fine with final fitment. I think this will be a good time to do a little shop cleanup and organizing.
Wow - AWESOME progress! And I hear you on the underpants and measurements... Nerve wracking. But man, you are knocking it out! Very nice.
And you have every right to be proud of the improved fit you've achieved.
is right!
(And you still have Sunday to tidy up...!)
And you have every right to be proud of the improved fit you've achieved.
is right!(And you still have Sunday to tidy up...!)
Nothing too exciting this week but more progress. Monday I got a fresh C25 bottle for the welder and finished welding in the door jamb.
Click to view attachment
But I was getting ahead of myself because when I cut off the old door latch bracket, I found a spot of deeply pitted metal underneath. Yes, I'm stupid. It wasn't a big deal, but if the jamb were still off, I'd probably weld in a small patch. Instead, I just cleaned it back to good steel and zap, zap, zapped to fill the hole with the welder. Then welded the new bracket in place.
Click to view attachment
I have one last task to do before I can put the shell on a rotisserie. The bumper mounts were rotted out and it would really suck to watch the rotisserie rip the nose off the car.
Click to view attachment Click to view attachment
Click to view attachment Click to view attachment
I thought this would be a quick sheet metal patch job, but the structure is a little complicated. The bumper mount is actually a 3 layer sandwich of metal that integrates a bracket, inner wheel well, and front nose skin together.
Click to view attachment
After cleaning back to solid metal, I made a tracing paper template for the front part of the inner wheel well.
Click to view attachment
I cut out some rot in the bracket and patched it with 18 g sheet. Then I fabbed a new front piece of the inner wheel well out of 21 g sheet scavenged from the trunk lid.
Click to view attachment Click to view attachment
Then a skin graft from the trunk to patch the front nose skin.
Click to view attachment Click to view attachment
I'll do some more cosmetic work on this as I go through the chassis for metal finishing. For now, at least one side is strong enough to hange the car on.
These pics are a little boring. So here's a pic from Monday. You can see the frame of my tent garage at the bottom.
Click to view attachment
And here's an older one. This is my idea of a really good day.
Click to view attachment
Click to view attachment
But I was getting ahead of myself because when I cut off the old door latch bracket, I found a spot of deeply pitted metal underneath. Yes, I'm stupid.
It wasn't a big deal, but if the jamb were still off, I'd probably weld in a small patch. Instead, I just cleaned it back to good steel and zap, zap, zapped to fill the hole with the welder. Then welded the new bracket in place.Click to view attachment
I have one last task to do before I can put the shell on a rotisserie. The bumper mounts were rotted out and it would really suck to watch the rotisserie rip the nose off the car.
Click to view attachment Click to view attachment
Click to view attachment Click to view attachment
I thought this would be a quick sheet metal patch job, but the structure is a little complicated. The bumper mount is actually a 3 layer sandwich of metal that integrates a bracket, inner wheel well, and front nose skin together.
Click to view attachment
After cleaning back to solid metal, I made a tracing paper template for the front part of the inner wheel well.
Click to view attachment
I cut out some rot in the bracket and patched it with 18 g sheet. Then I fabbed a new front piece of the inner wheel well out of 21 g sheet scavenged from the trunk lid.
Click to view attachment Click to view attachment
Then a skin graft from the trunk to patch the front nose skin.
Click to view attachment Click to view attachment
I'll do some more cosmetic work on this as I go through the chassis for metal finishing. For now, at least one side is strong enough to hange the car on.
These pics are a little boring. So here's a pic from Monday. You can see the frame of my tent garage at the bottom.
Click to view attachment
And here's an older one. This is my idea of a really good day.
Click to view attachment
It's been a bit hectic between work and this project so I skipped a week of updates. But some progress has been made.
I finished patching the driver's side front bumper mount area.
Click to view attachment
Click to view attachment
Click to view attachment
Then I hoped to start converting my roller dolly to a rottiserie to dive into finishing the engine compartment and replacing the floor, but I was waiting on parts to sort out my welder. More on that later. While waiting, I zapped a strip of 22g onto the drivers long to replace the vapor hose hold down.
Click to view attachment
Then, I decided to patch the firewall on the drivers side.
Click to view attachment
That hole above the channel bead was an unfortunate isolated pit surrounded by good metal. So I just zapped it closed using a copper backing plate.
Click to view attachment
For the lower area, I fabbed a patch and welded it in.
Click to view attachment
Click to view attachment
Click to view attachment
Click to view attachment
Still can't get rid of that shrink. Heating and hammering as Ben suggested helped, but poor access on the back limited how much of the seam I could hammer and dolly. It will only take a dab of filler to smooth those valleys, but I'd rather have it smooth with no filler. I'm starting to curse you guys that post pics of your invisible butt welds.
Still waiting for welder parts, so I harvested the rest of the hell hole pieces from my donor parts.
Click to view attachment
The battery tray had obviously been a replacement on the donor car and was in great shape other than a little surface rust. The engine mount was a bit crusty on the back, but still solid.
Click to view attachment
Both parts cleaned up nicely with bead blasting, but I have a little more work to do on the mount, so will wait to post pictures when they are done.
Unrelated to chassis work, I got a fun GB package from 914rubber.
Click to view attachment
It will be quite some time before I'm ready to used these parts, but I had to take advantage of the GB on the master cylinder. I hope I don't regret not getting the easy option.
All this welding and grinding has taken a toll on my shop air filtration filters. So replacements were in order. Certainly don't what that in my lungs!
Click to view attachment
And the welder parts arrived.
Click to view attachment
I wrote about this on another thread, but a couple months ago, my welder started acting up. I was still using the original, 30 year old, liner that came with my welder. So assumed changing the liner would make things right again. It wasn't easy to find liners for this discontinued gun, but I managed. But after installing the new liner, the welder was no better. It was time to face that I'd been in denial. The spark had gotten weak to the point that I was cranking the amps up to full power just to stitch weld thin sheet metal. After some research, I learned this is a classic symptom of bad diodes. So today I pulled them and tested them.
Click to view attachment
Sure enough, both diodes read open in both directions. The local welding shop sells Miller products, but they don't stock diodes and had no interest in helping me find them. This is the same shop that still sells silica sand for blasting media. Diodes are easy to find online and I have a set on order, but I'm dead in the water until they arrive. There are plenty of non-welding tasks to do though. So I'll manage to stay busy somehow.
I finished patching the driver's side front bumper mount area.
Click to view attachment
Click to view attachment
Click to view attachment
Then I hoped to start converting my roller dolly to a rottiserie to dive into finishing the engine compartment and replacing the floor, but I was waiting on parts to sort out my welder. More on that later. While waiting, I zapped a strip of 22g onto the drivers long to replace the vapor hose hold down.
Click to view attachment
Then, I decided to patch the firewall on the drivers side.
Click to view attachment
That hole above the channel bead was an unfortunate isolated pit surrounded by good metal. So I just zapped it closed using a copper backing plate.
Click to view attachment
For the lower area, I fabbed a patch and welded it in.
Click to view attachment
Click to view attachment
Click to view attachment
Click to view attachment
Still can't get rid of that shrink. Heating and hammering as Ben suggested helped, but poor access on the back limited how much of the seam I could hammer and dolly. It will only take a dab of filler to smooth those valleys, but I'd rather have it smooth with no filler. I'm starting to curse you guys that post pics of your invisible butt welds.
Still waiting for welder parts, so I harvested the rest of the hell hole pieces from my donor parts.
Click to view attachment
The battery tray had obviously been a replacement on the donor car and was in great shape other than a little surface rust. The engine mount was a bit crusty on the back, but still solid.
Click to view attachment
Both parts cleaned up nicely with bead blasting, but I have a little more work to do on the mount, so will wait to post pictures when they are done.
Unrelated to chassis work, I got a fun GB package from 914rubber.
Click to view attachment
It will be quite some time before I'm ready to used these parts, but I had to take advantage of the GB on the master cylinder.
I hope I don't regret not getting the easy option. All this welding and grinding has taken a toll on my shop air filtration filters. So replacements were in order. Certainly don't what that
in my lungs!Click to view attachment
And the welder parts arrived.
Click to view attachment
I wrote about this on another thread, but a couple months ago, my welder started acting up. I was still using the original, 30 year old, liner that came with my welder. So assumed changing the liner would make things right again. It wasn't easy to find liners for this discontinued gun, but I managed. But after installing the new liner, the welder was no better. It was time to face that I'd been in denial. The spark had gotten weak to the point that I was cranking the amps up to full power just to stitch weld thin sheet metal. After some research, I learned this is a classic symptom of bad diodes. So today I pulled them and tested them.
Click to view attachment
Sure enough, both diodes read open in both directions. The local welding shop sells Miller products, but they don't stock diodes and had no interest in helping me find them. This is the same shop that still sells silica sand for blasting media.
Diodes are easy to find online and I have a set on order, but I'm dead in the water until they arrive. There are plenty of non-welding tasks to do though. So I'll manage to stay busy somehow.
Not a whole lot of progress, but some. While waiting for welder parts, I worked on a couple non-Porsche projects. But I did finish cleaning up the engine mount and battery tray, and treating them with Jasco. I also stripped the Dansk tray support I got from RD. The Dansk support comes with a super tough power coat which would be great, I think. But not so great if you want to primer and spray with the chassis. It was a bear to get off. The Jasco will need to be reactivated and rinsed before installing the parts, but they cleaned up nicely.
Click to view attachment Click to view attachment Click to view attachment
With the welder down, I turned my attention to the engine. The heads are the only things that weren't rebuilt back in 1989. You know, back when Madonna and the B-52s were making me weep for the musical arts. Even Neil Young was putting out crap. Why Neil... why? Anyway.... I disassembled one head. Some of those valve keepers didn't want to let go. But I got the valves out. Everything looks good so far, no nasty surprises.
Click to view attachment
With the heads disassembled, time to clean them. I gave them a scrub with soap and water to get the worst of the almost thirty-year old grease off.
Click to view attachment Click to view attachment Click to view attachment
Still pretty nasty. I loaded up the borrowed blasting cabinet with walnut shell to finish the cleaning. Then I hit another snag. The blasting cabinet I'm using likes to clog, but I was able to get it to work barely adequately with glass bead by pulsing the trigger to clear the tube. The walnut shell was a no-go. The best I could get was maybe 20 seconds before it would clog. Putting a gloved finger over the nozzle and puffing air would clear the clog until the rubber hose worked loose enough the pop off. Then I had to get in the cabinet and reconnect things. Too much of a pain. The little bit I did blast, worked really well. But this won't do.
I did a little online research and quickly discovered that the single tube siphon in this cabinet is the problem.
Click to view attachment
I just got the go-ahead from the owner to modify the tube to this double tube design which is said to work well.
Click to view attachment
This is another pretty boring update, so here is a bat:
Click to view attachment
Click to view attachment Click to view attachment Click to view attachment
With the welder down, I turned my attention to the engine. The heads are the only things that weren't rebuilt back in 1989. You know, back when Madonna and the B-52s were making me weep for the musical arts. Even Neil Young was putting out crap. Why Neil... why? Anyway.... I disassembled one head. Some of those valve keepers didn't want to let go. But I got the valves out. Everything looks good so far, no nasty surprises.
Click to view attachment
With the heads disassembled, time to clean them. I gave them a scrub with soap and water to get the worst of the almost thirty-year old grease off.
Click to view attachment Click to view attachment Click to view attachment
Still pretty nasty. I loaded up the borrowed blasting cabinet with walnut shell to finish the cleaning. Then I hit another snag. The blasting cabinet I'm using likes to clog, but I was able to get it to work barely adequately with glass bead by pulsing the trigger to clear the tube. The walnut shell was a no-go. The best I could get was maybe 20 seconds before it would clog. Putting a gloved finger over the nozzle and puffing air would clear the clog until the rubber hose worked loose enough the pop off. Then I had to get in the cabinet and reconnect things. Too much of a pain. The little bit I did blast, worked really well. But this won't do.
I did a little online research and quickly discovered that the single tube siphon in this cabinet is the problem.
Click to view attachment
I just got the go-ahead from the owner to modify the tube to this double tube design which is said to work well.
Click to view attachment
This is another pretty boring update, so here is a bat:
Click to view attachment
Nice Pine. What state?
QUOTE(trojanhorsepower @ Nov 15 2017, 02:46 PM) 
Nice Pine. What state?
Are you talking about the siding behind the bat? It's actually "white fir" which I was told includes grand fir, noble fir, and a few other species. It was logged and milled in NW Montana. It looks a lot like pine. I don't think I'd use it again for siding though.
Cute Bat. That pick up tube looks like the one that transformed my
POS HF cabinet into a useful blaster. Eually important is the use of 3/8 ID hose and fittings. Keep on keeping on. Your almost there.
POS HF cabinet into a useful blaster. Eually important is the use of 3/8 ID hose and fittings. Keep on keeping on. Your almost there.
Diodes delivered! I made a special 6 mile round trip down our snowy mountain road to pick up the mail, giddy with the prospect of having a working welder by the end of the evening. I got home and opened the package, all aquiver with excitement.
Click to view attachment
, , and more 
One diode kit and one.... nylon insert nut? Waiting to hear from the ebay seller on my refund request. I don't think there will be a problem, but another week of delay. This whole operation depends on a welder. Without it... no chassis work, no blasting cabinet repair. Might be a good time to start working on the wiring harness.
If this isn't interesting, here's a coyote.
Click to view attachment
Click to view attachment
, , and more One diode kit and one.... nylon insert nut?
Waiting to hear from the ebay seller on my refund request. I don't think there will be a problem, but another week of delay. This whole operation depends on a welder. Without it... no chassis work, no blasting cabinet repair. Might be a good time to start working on the wiring harness.If this isn't interesting, here's a coyote.
Click to view attachment
Gettin' Wired
Here's an update for the last week and a half. Progress is still slow due partly to the holidays, but mostly because I slipped on the ice on the steep part of our driveway last week and busted a rib. That has me moving a little slow... like Uncle Joe.... at the Junction. Sorry, couldn't resist. And if you got that bad joke, you're OLD.
While waiting on welder diodes, I pulled the main wire harness out of the shed to start the restoration. It's not a lost cause, but needs some help. First steps were to clean, assess, inventory parts needed, and taking lots of reference pics to put things back together properly.
Here's how the harness looked coming out of the car.
Click to view attachment
There are two main areas of damage to be addressed. First there is the bundle running from the 14-pin connector in the engine bay. Sorry for the blurry pic.
Click to view attachment
This brought back memories. It was a warm spring day motoring along I-70 in the middle of Kansas when all of a sudden... she quit. The sweet smell of burnt insulation wafted into the car as I coasted to the shoulder. The tach wire has shorted out and fried almost every wire in that bundle with it. Only two wires survived that meltdown. I spent several hours roadside that day wrapping burnt wire with electrical tape and splicing things back together enough to get the car going. I never did repair that damage properly so now is the time.
The second big problem spot is near where the harness passes through the bulkhead to the front trunk where a rodent commandeered several inches of the harness for nesting material. Only one wire survived this assault.
Click to view attachment
The rest of the damage is dispersed. Lots of missing spade terminals, wires snipped by rodents here and there near the terminal ends. A few insulation knicks, The instrument illumintion harness a good example of the random damage.
Click to view attachment
and lots of overspray left over from a PO's cheap paint job.
Click to view attachment
It seemed daunting at first, but like anything complicated, once it is assessed and broken down into bite-sized steps, it isn't bad.
First step was a good cleaning. I started by removing removing tape and zip tying wire bundles together to keep the groupings organized. As I removed
tape, I noted the size and type and ordered new stuff. There are actually 3 types of tape in these harnesses. There is the 9mm Tessa tape that has been talked about. It measures about 7mm on the harness but I think that is because of a combination of the stretch put on the tape during wrapping and shrinking from age. There is also vinyl tape approximately 1/2" inch wide used to band the wire bundles prior to cloth tape wrapping. They also used the wider 19mm cloth tape in a few spots, but those are buried so deep you wouldn't know it until you removed all the tape. I'm anal, but not THAT anal, so I just ordered the two narrow widths.
Click to view attachment
With the harness stripped down, scrubbed every inch with a nylon brush and simple green. Then everything a good rinse and let it dry. Next I wiped everything down with 303 protectant. It is starting to look new again. I forgot to mention that I also downloaded both '73 and '74 schematics from Jeff Bowlsby's site and printed them out large. The '74 diagrams include wire sizes which I can't find on the '73 diagrams. So they are handy for sourcing the correct replacements.
Click to view attachment
Click to view attachment
Click to view attachment
Here's a before for comparison.
Click to view attachment
There was still the matter of the overspray. Most of this was on the tail light bundle and the one piece of black cable sheathing in the front trunk that is split. That was lucky because it could be easily removed. The painted sheathing and taillight section of harness got an overnight soak in brake fluid to loosen the paint. Then it was easy to remove with the green side of a scrubber sponge.
Click to view attachment
Gettin' wired continued
Now that the wire was nice and spiffy, I made a complete inventory of parts needed. I ordered a bunch of proper brass, open barrel spade terminals, a few right angle spade terminals, new brass bulb holders, contact cleaner, and an assortment of colored heat shrink tubing. Of these, only the bulb holders have arrived.
Click to view attachment
But that was enough to fully refurbish the instrument lighting harness. This consisted of splicing several broken wires using a lineman's splice, followed by flooding the splice with solder and sealing it with heat shrink. I have plenty of black heat shrink which was the right color for this wire. Finally, I soldered on new bulb holders where needed and followed with heat shrink over the joints. After a cleaning with contact cleaner, this should be good as new.
Click to view attachment
More importantly, I made a complete inventory of wire and jacketing needed to repair the main harness.
Click to view attachment
Click to view attachment
Perry Kiehl is checking his inventory of sheathing material to see if he has what I need. I'm working on sourcing the wire now. I forgot to mention that I'm going to eliminate the original fuel pump wires in the engine bay and relocate it to under the fuel tank. This will require running a new black w/ red stripe wire from the 14-pin connector up to the front trunk area, and a ground wire to a terminal somewhere up front, but yet to be decided.
I also decided to start re-wrapping sections of the harness that don't need repair or new wires strung through them. Not looking too bad.
Click to view attachment
Click to view attachment
Click to view attachment
And now for something completely different
In other news, the diodes for my welder arrived last week. It took about 45 minutes to put them in and the welder was hissing like a viper again. Unfortunately, in the process of bolting up the diodes, a lead on one of the capacitors that protects them popped off. I replaced it with the closest thing I had on hand, but I'll need to tear in there to put in the right value capacitor.
But in the mean time, I was able to mod the pickup tube on the blasting cabinet. Luckily, the cabinet already has a 3/8" hose and gun. So the mod cost nothing since I already had a piece of tubing on hand.
Click to view attachment
Boy what a difference that made! I can now blast away without clogs. And that meant I could finish walnut blasting my heads. Finally! A task on this car that didn't constantly shoot pain from my busted rib.
Click to view attachment Click to view attachment
No signs of cracks on either head.
These will go in for rebuild soon, but for now, they already make the engine look nicer.
Click to view attachment
It will be nice to have those done so I can start bolting stuff onto the engine where they are out of my way.
Now that the wire was nice and spiffy, I made a complete inventory of parts needed. I ordered a bunch of proper brass, open barrel spade terminals, a few right angle spade terminals, new brass bulb holders, contact cleaner, and an assortment of colored heat shrink tubing. Of these, only the bulb holders have arrived.
Click to view attachment
But that was enough to fully refurbish the instrument lighting harness. This consisted of splicing several broken wires using a lineman's splice, followed by flooding the splice with solder and sealing it with heat shrink. I have plenty of black heat shrink which was the right color for this wire. Finally, I soldered on new bulb holders where needed and followed with heat shrink over the joints. After a cleaning with contact cleaner, this should be good as new.
Click to view attachment
More importantly, I made a complete inventory of wire and jacketing needed to repair the main harness.
Click to view attachment
Click to view attachment
Perry Kiehl is checking his inventory of sheathing material to see if he has what I need. I'm working on sourcing the wire now. I forgot to mention that I'm going to eliminate the original fuel pump wires in the engine bay and relocate it to under the fuel tank. This will require running a new black w/ red stripe wire from the 14-pin connector up to the front trunk area, and a ground wire to a terminal somewhere up front, but yet to be decided.
I also decided to start re-wrapping sections of the harness that don't need repair or new wires strung through them. Not looking too bad.
Click to view attachment
Click to view attachment
Click to view attachment
And now for something completely different
In other news, the diodes for my welder arrived last week. It took about 45 minutes to put them in and the welder was hissing like a viper again. Unfortunately, in the process of bolting up the diodes, a lead on one of the capacitors that protects them popped off. I replaced it with the closest thing I had on hand, but I'll need to tear in there to put in the right value capacitor.
But in the mean time, I was able to mod the pickup tube on the blasting cabinet. Luckily, the cabinet already has a 3/8" hose and gun. So the mod cost nothing since I already had a piece of tubing on hand.
Click to view attachment
Boy what a difference that made! I can now blast away without clogs.
And that meant I could finish walnut blasting my heads. Finally! A task on this car that didn't constantly shoot pain from my busted rib.Click to view attachment Click to view attachment
No signs of cracks on either head.
These will go in for rebuild soon, but for now, they already make the engine look nicer.
Click to view attachment
It will be nice to have those done so I can start bolting stuff onto the engine where they are out of my way.
QUOTE(bbrock @ Nov 15 2017, 03:35 PM)
With the welder down, I turned my attention to the engine. The heads are the only things that weren't rebuilt back in 1989. You know, back when Madonna and the B-52s were making me weep for the musical arts. Even Neil Young was putting out crap. Why Neil... why? Anyway.... I disassembled one head. Some of those valve keepers didn't want to let go. But I got the valves out. Everything looks good so far, no nasty surprises.
Click to view attachment
Please don't re-use 40 yr old sodium filled exhaust valves, here's what one of mine looked like after a short rap with a mallet to verify valves not stuck prior to teardown
Click to view attachment
QUOTE(barefoot @ Nov 29 2017, 04:46 AM)
QUOTE(bbrock @ Nov 15 2017, 03:35 PM)
With the welder down, I turned my attention to the engine. The heads are the only things that weren't rebuilt back in 1989. You know, back when Madonna and the B-52s were making me weep for the musical arts. Even Neil Young was putting out crap. Why Neil... why? Anyway.... I disassembled one head. Some of those valve keepers didn't want to let go. But I got the valves out. Everything looks good so far, no nasty surprises.
Click to view attachment
Please don't re-use 40 yr old sodium filled exhaust valves, here's what one of mine looked like after a short rap with a mallet to verify valves not stuck prior to teardown
Click to view attachment
Roger that. I just had this same discussion with Mark Henry on another thread about my cylinder heads. It was a question I had because this engine is 40 years old, but it sat unused in my shed for all but 15 of those years. But... better safe than sorry. I've already had exhaust valves snap on two different engines in an old VW bus I used to have. Might as well have dropped a grenade in the case. So new valves all around for this one.
Well Goodbye Dolly
I put the car up on jack stands yesterday, and today I cut up the dolly and made a good start on turning her into a rotisserie. She played her part well. Hardest part of today was dragging those long pieces out with a broken rib. Every time I pulled, I could feel my rib grinding. Had to called in the wife for help. After that, it was downhill.
Click to view attachment
Click to view attachment
Bummer on the bad rib. Heal quickly.
Looking good on all the wiring harness work.
Looking good on all the wiring harness work.
I had high hopes of having a chassis hanging upside down in the garage by the end of the weekend. Those plans fell through when a quick brake pad replacement on my Pathfinder turned into an unplanned trip into town to buy new calipers, followed by an extended cussing session getting the system bled. Shot the whole day, but I'm glad my work truck/snow plow has new brakes.
That left just today to work on the Porsche. I made good progress om the rotisserie, but didn't quite make it to mounting the car. There is probably 2-3 more hours of work before the magic moment.
Click to view attachment
The new diodes in the welder have it hissing like a viper. Running .035 wire for 1/8" wall square tube. Working well.
Click to view attachment
In the mean time, I've been working on the wire harness as parts arrive. Theer donated a chunk of old harness to the project and I patched in everything I could. Cary is sending a care package with all the pieces I haven't been able to source new. I wasn't happy with the spade connectors I ordered on Ebay. They were okay, but a little flimsy for this project. I tracked down the OEM AMP brand crimp connectors and ordered a bunch from digi-key. MUCH better quality and a perfect match to the originals.
Click to view attachment
I also ordered some 3:1 black heat shrink to replace insulators on spade connectors. I'll add a pic later, but it is a perfect match to the factory originals
Got an envelope of gray heat shrink in the mail, so this morning I finished patching in the gray wires. I don't know, is this anal?
Click to view attachment
I need to do the same to my harness.. At some point and engine fire caused all kinds of issues.. Keep up the great work.
Before you go too far. Your building your rotisserie the same as I did. As soon as Doug's car comes off were going to change it. I what more precision on where i can lock it down.
Click to view attachment
We're going to cut back the inner tub and weld a plate on the end with a nut welded in the middle behind a hole. Then we'll fabricate a lock down handle, maybe a 914 steering wheel with a plate and a long piece of all thread. We'll do both ends.
Kind of like this. But we'll still leave the 4 pin holes for climbing in the tub.
Click to view attachment
My .02c for the am.
Click to view attachment
We're going to cut back the inner tub and weld a plate on the end with a nut welded in the middle behind a hole. Then we'll fabricate a lock down handle, maybe a 914 steering wheel with a plate and a long piece of all thread. We'll do both ends.
Kind of like this. But we'll still leave the 4 pin holes for climbing in the tub.
Click to view attachment
My .02c for the am.
What I have seen is a gm or similar flex plate welded on to the rotating assembly and then a starter motor gear welded to a handle.. Probably the easiest way to get the rotisserie to have a true stop..
QUOTE(cary @ Dec 11 2017, 08:13 AM)
Before you go too far. Your building your rotisserie the same as I did. As soon as Doug's car comes off were going to change it. I what more precision on where i can lock it down.
Click to view attachment
We're going to cut back the inner tub and weld a plate on the end with a nut welded in the middle behind a hole. Then we'll fabricate a lock down handle, maybe a 914 steering wheel with a plate and a long piece of all thread. We'll do both ends.
Kind of like this. But we'll still leave the 4 pin holes for climbing in the tub.
Click to view attachment
My .02c for the am.
I'll take a look at that. The pin showing in the pic is just a safety pin to keep the swivel from falling out of the hub. These pics show more detail of what I have planned for lock down. 1/2" nuts and bolts.
Click to view attachment Click to view attachment
But now that you mention climbing in the tub, I think I'll drill the spindle that hasn't been welded to the cross bar so I can drop a pin in the horizontal position. Should do both, but getting that spindle that is already welded in the drill press would be a bitch. Will think on that one.
Thanks for the tips!
Saturday 12/16 - Rotisserie is Done
Finished building the rotisserie today. Took longer than expected because I underestimated how long it would take to cut and grind off all the brackets from the dolly so I could recycle the square tubing.
Click to view attachment
Click to view attachment
I'm a bit nervous about how tall they are. Everything looked good until I whipped out my big ten inch..... castors. I knew they would add height so I shaved the height of the center posts as much as I dared from specs I've seen online. I hope I measured right to allow enough clearance for the car to spin. Even with shortened posts, the hubs are about chest high. I'll see how it goes, but might wind up swapping out for smaller castors.
I tested out the locking mechanism. With the bolts cranked down, I'm able to hang my whole weight out on the end of the arms. I think with both hubs locked down, I'll be able to climb in the tub without spinning. If not, I'll drill a hole in each hub so I can drop a pin to lock them into the horizontal position.
Click to view attachment
Now I have to figure out what to use for cribbing to lift the tub high enough to mount to the rig. Everything I have is buried under snow. Might pick up some cinder blocks in town tomorrow.
Tomorrow is massive clean up, plowing snow, and catching up on some non-car related chores.
Dang I'm tired.
German Luau
I've dreamed about this for almost 30 years, and now it's done. Fine German steel slowly spinning on a rotisserie. But it wasn't easy.
First I had to lift the car. Verily did this pucker my anus.
Click to view attachment
Click to view attachment
And even with the tub lifted as high as I dared, I still had 4 1/2" to go.
Click to view attachment
So I dropped two wheels off of each stand so I could dip the hubs low enough to engage.
Click to view attachment
Success! And those 1/2" brake bolts work like a champ.
Click to view attachment
With the wheels reattached, time to test the spin.
Click to view attachment
Not bad, but all is not bliss. Trying to keep this thing as low as possible, I shaved about 2 inches too much for the windsheild frame to clear the center bar for a full roll over. I could probably live with that but I'm afraid if the car ever got loose from me, it would swing around and make a really bad day. I'm thinking of two options. One is to cut the center bar under the cockpit and reweld it with a drop so the frame clears on a full spin. The other is to just cut the bar in half and add a small sleeve so it is removable. Then I would attach the center bar when I need to roll the chassis around. I can't decide. Opinions welcome! Overall though, this feels like a HUGE milestone.
Congrats Brent. This is my favourite thread at the moment - along with Tygaboy's. Makes for an interesting contrast.
30 years ? Hmmmmm I know the feeling unfortunately.
I would leave the long bar in one piece but weld a length of box section to the underside of each stand - and then slide the long bar into those. Same result - minimum effort. DAMM ! just realised there's a castor in the way. Never mind. What if you did the above suggestion and swapped the 2 inner castors for some much smaller ones ?
Good luck, keep it coming.
Andrew
QUOTE(andrewb @ Dec 19 2017, 12:56 AM)
Congrats Brett. This is my favourite thread at the moment - along with Tygaboy's. Makes for an interesting contrast.
30 years ? Hmmmmm I know the feeling unfortunately.
I would leave the long bar in one piece but weld a length of box section to the underside of each stand - and then slide the long bar into those. Same result - minimum effort. DAMM ! just realised there's a castor in the way. Never mind. What if you did the above suggestion and swapped the 2 inner castors for some much smaller ones ?
Good luck, keep it coming.
Andrew
 Yeah, contrast is an understatement. I refer to Chris'(Tygaboy's) build as "the rocket ship."
That's a great idea on he cross bar. I'm going to take a look at that. Might be a good way to go.
On mine I decided I really didn't want to risk something as you described so I just put stops so that my car will only rotate 90 degrees from sitting flat each direction. This allows me to still do all underside body work with out as much danger..
QUOTE(mb911 @ Dec 19 2017, 07:05 AM)
On mine I decided I really didn't want to risk something as you described so I just put stops so that my car will only rotate 90 degrees from sitting flat each direction. This allows me to still do all underside body work with out as much danger..
Another good idea.
I won't be able to get a full 90 degrees due to the clearance, but it might be close enough to get underpan work done. I think I'll explore this option first, since it would be easiest. First, I need to get the frunk lid off. I learned it is a bad idea to try to spin the car with that still on. 
QUOTE(bbrock @ Dec 19 2017, 06:35 AM)
QUOTE(mb911 @ Dec 19 2017, 07:05 AM)
On mine I decided I really didn't want to risk something as you described so I just put stops so that my car will only rotate 90 degrees from sitting flat each direction. This allows me to still do all underside body work with out as much danger..
Another good idea.
I won't be able to get a full 90 degrees due to the clearance, but it might be close enough to get underpan work done. I think I'll explore this option first, since it would be easiest. First, I need to get the frunk lid off. I learned it is a bad idea to try to spin the car with that still on. The thing that came to my mind was how am I going to work on the car when its upside down anyway? Not much.. Just having it rotated about 90 degrees allowed me to do the pan and all grinding.
QUOTE(mb911 @ Dec 19 2017, 07:42 AM)
QUOTE(bbrock @ Dec 19 2017, 06:35 AM)
QUOTE(mb911 @ Dec 19 2017, 07:05 AM)
On mine I decided I really didn't want to risk something as you described so I just put stops so that my car will only rotate 90 degrees from sitting flat each direction. This allows me to still do all underside body work with out as much danger..
Another good idea.
I won't be able to get a full 90 degrees due to the clearance, but it might be close enough to get underpan work done. I think I'll explore this option first, since it would be easiest. First, I need to get the frunk lid off. I learned it is a bad idea to try to spin the car with that still on. The thing that came to my mind was how am I going to work on the car when its upside down anyway? Not much.. Just having it rotated about 90 degrees allowed me to do the pan and all grinding.
I don't know what I was thinking. Of course I can get 90 degrees! It's right there in the photo. I just can't get 360, and like you said, who cares? Stops will be going in today. Easy peasy!
I'm right there with you on the pucker factor when trying to get the car high enough to be rotisseried. I'm thinking a nice mid rise lift might be justified!
Your car is coming right along.
(and yes, I'll get that window to you soon...)
MerryHappy!
Your car is coming right along.
(and yes, I'll get that window to you soon...)
MerryHappy!
QUOTE(tygaboy @ Dec 19 2017, 09:10 AM)
I'm right there with you on the pucker factor when trying to get the car high enough to be rotisseried. I'm thinking a nice mid rise lift might be justified!
Your car is coming right along.
(and yes, I'll get that window to you soon...)
MerryHappy!
I looked hard at rotisserie designs with built-in lifts. Of course, hydraulic rams can be used but I really liked designs that had a worm-drive winch in each end because it would be cheap. There were some really nice web sits out there but photobucket has F'd them up.
 And I just now thought of this.. I'll bet I could have gotten my neighbor to put forks on his skid steer and lift this sucker.
No rush on the window. As you can see, I'm nowhere close to putting glass in.

The Seamy Underbelly
Got a good start on pulling the old rusty floor off. Of course, I made a mistake. I had saved my last Rotabroach cutter and pilot bit for this task; thinking it would get me through the project since this is the last set of spot welds I'll need to cut. I grossly underestimated the number of spot welds in the floor. I babied the cutter as best I could, dipping the cutter in Blair's special wax-based lubricant after each weld, and keeping the drill speed nice and low. Still, after 60-80 spot welds, it went dull. I pulled out my last HF POS spot weld cutter to finish the section I was trying to remove. After about a dozen welds, the piece of shattered. I flipped the cutter over and got another half dozen spots cut before the piece of shattered on the other side. But it was just enough to pull a section off and reveal all the crud in the tunnel.
Click to view attachment
Checked to see if I could pick up some Rotabroach locally. No luck, closest dealer is in Billings (150 miles). Ordered a new set from Amazon. With holidays, they won't be here until Wednesday. No biggie, there is plenty to do to keep me busy. But I couldn't resist clamping up the replacement to see how it looks.
Click to view attachment
Flanges on the RD panel are wider than stock, which is probably good, but will need to be trimmed. Looks nice though.
BTW, I'm really digging the 4-bolt brake system on the rotisserie. With all 4 bolts tightened down, you can't budge the tub. To spin the tub, you open both bolts on one end all the way, then loosen the other two just enough that you have to use a bit of muscle to spin. It provides the perfect friction to position it just where you want it without worrying it is going to get away from you. Let go, and it just stays. I can't take credit, this is Rich Casto's design.
And for those who are snow deprived for the holidays, maybe a couple winter shots. Here's a pair of pine grosbeaks on our feeder just now.
Click to view attachment
and a fox from our front window a couple weeks ago.
Click to view attachment
Got a good start on pulling the old rusty floor off. Of course, I made a mistake. I had saved my last Rotabroach cutter and pilot bit for this task; thinking it would get me through the project since this is the last set of spot welds I'll need to cut. I grossly underestimated the number of spot welds in the floor. I babied the cutter as best I could, dipping the cutter in Blair's special wax-based lubricant after each weld, and keeping the drill speed nice and low. Still, after 60-80 spot welds, it went dull. I pulled out my last HF POS spot weld cutter to finish the section I was trying to remove. After about a dozen welds, the piece of
shattered. I flipped the cutter over and got another half dozen spots cut before the piece of shattered on the other side. But it was just enough to pull a section off and reveal all the crud in the tunnel.Click to view attachment
Checked to see if I could pick up some Rotabroach locally. No luck, closest dealer is in Billings (150 miles). Ordered a new set from Amazon. With holidays, they won't be here until Wednesday. No biggie, there is plenty to do to keep me busy. But I couldn't resist clamping up the replacement to see how it looks.
Click to view attachment
Flanges on the RD panel are wider than stock, which is probably good, but will need to be trimmed. Looks nice though.
BTW, I'm really digging the 4-bolt brake system on the rotisserie. With all 4 bolts tightened down, you can't budge the tub. To spin the tub, you open both bolts on one end all the way, then loosen the other two just enough that you have to use a bit of muscle to spin. It provides the perfect friction to position it just where you want it without worrying it is going to get away from you. Let go, and it just stays. I can't take credit, this is Rich Casto's design.
And for those who are snow deprived for the holidays, maybe a couple winter shots. Here's a pair of pine grosbeaks on our feeder just now.
Click to view attachment
and a fox from our front window a couple weeks ago.
Click to view attachment
FLOOR IT, BABY!!!! 
MerryHappy to you and yours, my friend.
MerryHappy to you and yours, my friend.
QUOTE(tygaboy @ Dec 22 2017, 01:29 PM)
FLOOR IT, BABY!!!!
MerryHappy to you and yours, my friend.
Right back at you!
The flange is longer then stock on the floor pans.. I figured when I spray seam sealer it would not be noticed.
Brent,
You really showed your fine talents on how to put a car back in proper restoration.
Next year should find you with a finished very nice 73 that will be as good or better than it was the day you got married.
I mite say stay thirsty my friend but I think I will say, stay warm my friend.
Happy holidays to you, yours and Montana.
Bob B
QUOTE(mb911 @ Dec 22 2017, 02:04 PM)
The flange is longer then stock on the floor pans.. I figured when I spray seam sealer it would not be noticed.
On mine, the flanges are a bit wider than the recess in the bottom the longs. Trimming will be needed to make it fit nice and tight. Otherwise, I'd do exactly the same as you.
QUOTE(burton73 @ Dec 22 2017, 02:09 PM)
Brent,
You really showed your fine talents on how to put a car back in proper restoration.
Next year should find you with a finished very nice 73 that will be as good or better than it was the day you got married.
I mite say stay thirsty my friend but I think I will say, stay warm my friend.
Happy holidays to you, yours and Montana.
Bob B
Thanks Bob! I'll take your advice as I head out to plow the driveway in a few. Happy holidays to you and yours as well!
QUOTE(bbrock @ Dec 22 2017, 01:30 PM)
QUOTE(mb911 @ Dec 22 2017, 02:04 PM)
The flange is longer then stock on the floor pans.. I figured when I spray seam sealer it would not be noticed.
On mine, the flanges are a bit wider than the recess in the bottom the longs. Trimming will be needed to make it fit nice and tight. Otherwise, I'd do exactly the same as you.
With the indents in the long.???
QUOTE(mb911 @ Dec 22 2017, 04:44 PM)
QUOTE(bbrock @ Dec 22 2017, 01:30 PM)
QUOTE(mb911 @ Dec 22 2017, 02:04 PM)
The flange is longer then stock on the floor pans.. I figured when I spray seam sealer it would not be noticed.
On mine, the flanges are a bit wider than the recess in the bottom the longs. Trimming will be needed to make it fit nice and tight. Otherwise, I'd do exactly the same as you.
With the indents in the long.???
Yep. Here are a couple of pics of it. Measured the original floor and the flanges are 1.5cm wide where the RD flanges are 2.5cm. I'll just trim 1cm off and everything should be good.
Click to view attachment Click to view attachment
FWIW, I needed to trim my RD rear floor exactly that same way.
Oh makes sense
A Good Stiff Member
I can't cut any more of the floor pan off until my new Rotabroaches arrive, so I got bored and decided to play with my member... I mean... the center member across the floor pan It had rusted away around the e-brake switch.
Click to view attachment
But before I could get very far, I had an unpleasant task to complete. A few days ago, my air compressor started leaking. I tracked it down to a stuck check valve but the valve wouldn't budge, so I left it to soak with penetrating oil for a couple days. So, this morning I went out to the unheated shed that contains the compressor and went to work. It was 5 degrees F, that's -15C for those of you who live in first world countries. A.K.A. "cold as shit." Fingers froze pretty quick but I managed to get the check valve out. It was packed with fuzz and stuck open. A frickin' mouse had crawled inside the compressor housing and made a nest. Somehow, that shit got sucked through the cylinder and into the check valve. It has an air filter to supposedly prevent such things, but it obviously didn't work. Shitty design. Of course, that meant I had to tear the think apart to clean out all the crap. With the cold temps, I had to warm up the plastic shroud with a heat gun so it didn't just shatter when I unsnapped it. Got all the crap cleaned out and put back together. It wasn't too bad except a couple of itty bitty screws that were a bear to get in with frozen fingers. But I got the job done and hands warmed up. I'll need to do some rodent proofing of that shed, but not today.
So back to work on the rusty old member. Fabbed a new end for it.
Click to view attachment Click to view attachment
Turned out pretty good. I'll need to cut out a hole for the e-brake switch but there wasn'e enough left of the old piece to provide a location guide, and the switch disentegrated. Thought about using one of the door switches as a guide but decided to just wait until I have a new switch in hand to make sure it is located correctly.
Next was the long process of prepping the member and trimming a little at a time to sneak up on a good fit.
Click to view attachment
Click to view attachment Click to view attachment
That'll do. Welded it in place.
Click to view attachment Click to view attachment
And smooth it down.
Click to view attachment Click to view attachment
Seems like I'm getting a lot less shrink since I changed the diodes in the welder. I left the plug welds on the longitude flanges for later. No reason to weld overhead when the car is on a whirly-gig thingy.
That took most of the day. We have company coming tomorrow so I needed to knock off a little early to do some major cleaning since the project has spread from the garage and into the house.
I can't cut any more of the floor pan off until my new Rotabroaches arrive, so I got bored and decided to play with my member... I mean... the center member across the floor pan
It had rusted away around the e-brake switch.Click to view attachment
But before I could get very far, I had an unpleasant task to complete. A few days ago, my air compressor started leaking. I tracked it down to a stuck check valve but the valve wouldn't budge, so I left it to soak with penetrating oil for a couple days. So, this morning I went out to the unheated shed that contains the compressor and went to work. It was 5 degrees F, that's -15C for those of you who live in first world countries. A.K.A. "cold as shit." Fingers froze pretty quick but I managed to get the check valve out. It was packed with fuzz and stuck open. A frickin' mouse had crawled inside the compressor housing and made a nest. Somehow, that shit got sucked through the cylinder and into the check valve. It has an air filter to supposedly prevent such things, but it obviously didn't work. Shitty design. Of course, that meant I had to tear the think apart to clean out all the crap. With the cold temps, I had to warm up the plastic shroud with a heat gun so it didn't just shatter when I unsnapped it. Got all the crap cleaned out and put back together. It wasn't too bad except a couple of itty bitty screws that were a bear to get in with frozen fingers. But I got the job done and hands warmed up. I'll need to do some rodent proofing of that shed, but not today.
So back to work on the rusty old member. Fabbed a new end for it.
Click to view attachment Click to view attachment
Turned out pretty good. I'll need to cut out a hole for the e-brake switch but there wasn'e enough left of the old piece to provide a location guide, and the switch disentegrated. Thought about using one of the door switches as a guide but decided to just wait until I have a new switch in hand to make sure it is located correctly.
Next was the long process of prepping the member and trimming a little at a time to sneak up on a good fit.
Click to view attachment
Click to view attachment Click to view attachment
That'll do. Welded it in place.
Click to view attachment Click to view attachment
And smooth it down.
Click to view attachment Click to view attachment
Seems like I'm getting a lot less shrink since I changed the diodes in the welder.
I left the plug welds on the longitude flanges for later. No reason to weld overhead when the car is on a whirly-gig thingy.That took most of the day. We have company coming tomorrow so I needed to knock off a little early to do some major cleaning since the project has spread from the garage and into the house.
Man, you're doing a magnificent job on every aspect of the restoration, Brent 
Really nice fab/welding - a job well done! You're doing a great job on your build.
Brent + +
+  =
=
Brent +
+ =
Back in Hell
I went a little A.D.D on Christmas day. Started out planning to work on repairing the lower inner firewall. It only took about 30 minutes to have a good start on a fabricated patch.
Click to view attachment
But after moving the outer engine mount piece out of my way for the fifth time, I decided, dammit, I'm going to get that out of my way for good. You might recall that I mentioned the section of my fabricated inner long under the outer mount not mating perfectly. I had skipped welding that bit until I could flip the car up for better access to address the issue.
Click to view attachment
That also caused the mount to fit poorly. I was hoping I could just chase that flange into place with a hammer, but the double-walled construction locks things together very stiffly and it wouldn't budge. So I cut out the divot I had banged into the inner long to fit the mount to relieve stress, and now I see I didn't get a pic of it opened up. But it was a bit of a shock to open up the frame and find nothing but clean, solid steel and epoxy primer. Just doing that brought the clam shells together so it just took a little hammer and dolly to bring the inner to mate perfectly with the outer. I must have built up some stress welding in the inner wall on the first round.
This pic doesn't look great because I left the fabricated flange long and ragged so I could trim it back flush with the RD piece after everything was together. But the two pieces now fit perfectly together.
Click to view attachment
I finished plug welding that section but forgot to snap a pic. Next was the job of patching that hole. I needed to make two patches with that indent for the engine mount nested to form the double wall. I've been wanting to buy a metal shaping shot bag for just this sort of thing, but never did. So, it was time to improvise. I snooped around and found an old, partially used bag of mortar mix and a freebie tarp from HF.
Click to view attachment
I wrapped the mortar in the tarp and, walla! Redneck Shot Bag I alternated between banging on the hillbilly bag and the anvil, intermingled with a few tweaks on the stretcher until I had something close to the shape I was after.
Click to view attachment
At that point, I was able to use the mount itself as a hammer form for final adjustment. Light taps only so as not to ding up the mount.
Click to view attachment
Then I repeated this to make another piece that nested inside the first. Got too busy for pics. Next, I did a little surgery to cut the outer skin wider than the inner so I could stagger the welds between layers. Hey! There's that pic of the open hole.
Click to view attachment
I needed to match the patch to the channel bead in the original. I cheated by forming a little scrap to the profile of the channel and welding it to the patch.
Click to view attachment
After welding the patch to the inner wall, I ground out the material over the scrap to reveal the channel. The next couple pics are disappointing because I had to use a flash which distorted the perspective and makes things look horrible. It isn't beautiful, but it doesn't look THIS bad. Anyway, it is strong and I'll probably be dead before anyone ever sees it again.
Click to view attachment
And here's a pic with the outer skin laid in place. Again, the flash messes things up. To my brain, this pic looks like up is down and down is up. I left the outer edge ragged so I could cut it flush with another piece welded to the bottom.
Click to view attachment
That's where I left it on Christmas. Wednesday, I welded up the outer patch and mixed up 3 tablespoons of DP50 epoxy primer to paint the inner long and inside of the mount. Here it is almost ready to weld. After this pic, I sanded off the epoxy from the areas that would be plug welded and sprayed with U-Pol copper.
Click to view attachment
And here's the mount in place and before cleaning up any of the welds.
Click to view attachment
My new rotabroaches arrived a day early, but I haven't had time to use them yet. I'll probably cut out some spot welds tonight before sitting down for movie night.
I went a little A.D.D on Christmas day. Started out planning to work on repairing the lower inner firewall. It only took about 30 minutes to have a good start on a fabricated patch.
Click to view attachment
But after moving the outer engine mount piece out of my way for the fifth time, I decided, dammit, I'm going to get that out of my way for good. You might recall that I mentioned the section of my fabricated inner long under the outer mount not mating perfectly. I had skipped welding that bit until I could flip the car up for better access to address the issue.
Click to view attachment
That also caused the mount to fit poorly. I was hoping I could just chase that flange into place with a hammer, but the double-walled construction locks things together very stiffly and it wouldn't budge. So I cut out the divot I had banged into the inner long to fit the mount to relieve stress, and now I see I didn't get a pic of it opened up. But it was a bit of a shock to open up the frame and find nothing but clean, solid steel and epoxy primer. Just doing that brought the clam shells together so it just took a little hammer and dolly to bring the inner to mate perfectly with the outer. I must have built up some stress welding in the inner wall on the first round.
This pic doesn't look great because I left the fabricated flange long and ragged so I could trim it back flush with the RD piece after everything was together. But the two pieces now fit perfectly together.
Click to view attachment
I finished plug welding that section but forgot to snap a pic. Next was the job of patching that hole. I needed to make two patches with that indent for the engine mount nested to form the double wall. I've been wanting to buy a metal shaping shot bag for just this sort of thing, but never did. So, it was time to improvise. I snooped around and found an old, partially used bag of mortar mix and a freebie tarp from HF.
Click to view attachment
I wrapped the mortar in the tarp and, walla! Redneck Shot Bag
I alternated between banging on the hillbilly bag and the anvil, intermingled with a few tweaks on the stretcher until I had something close to the shape I was after.Click to view attachment
At that point, I was able to use the mount itself as a hammer form for final adjustment. Light taps only so as not to ding up the mount.
Click to view attachment
Then I repeated this to make another piece that nested inside the first. Got too busy for pics. Next, I did a little surgery to cut the outer skin wider than the inner so I could stagger the welds between layers. Hey! There's that pic of the open hole.
Click to view attachment
I needed to match the patch to the channel bead in the original. I cheated by forming a little scrap to the profile of the channel and welding it to the patch.
Click to view attachment
After welding the patch to the inner wall, I ground out the material over the scrap to reveal the channel. The next couple pics are disappointing because I had to use a flash which distorted the perspective and makes things look horrible. It isn't beautiful, but it doesn't look THIS bad. Anyway, it is strong and I'll probably be dead before anyone ever sees it again.
Click to view attachment
And here's a pic with the outer skin laid in place. Again, the flash messes things up. To my brain, this pic looks like up is down and down is up. I left the outer edge ragged so I could cut it flush with another piece welded to the bottom.
Click to view attachment
That's where I left it on Christmas. Wednesday, I welded up the outer patch and mixed up 3 tablespoons of DP50 epoxy primer to paint the inner long and inside of the mount. Here it is almost ready to weld. After this pic, I sanded off the epoxy from the areas that would be plug welded and sprayed with U-Pol copper.
Click to view attachment
And here's the mount in place and before cleaning up any of the welds.
Click to view attachment
My new rotabroaches arrived a day early, but I haven't had time to use them yet. I'll probably cut out some spot welds tonight before sitting down for movie night.
Looking good.. Your catching up to me.. I better get mine in gear.
What are the little yellow tags you've left hanging on the car ?
I just know there'll be a good reason and I want to copy it
I just know there'll be a good reason and I want to copy it
QUOTE(andrewb @ Dec 31 2017, 12:09 AM)
What are the little yellow tags you've left hanging on the car ?
I just know there'll be a good reason and I want to copy it
Those are my to-do reminders; mostly for tasks that were left undone because they would be easier when the car was repositioned on the rotisserie, or have to wait until some other task is completed. Picked a pack of these tags up at Staples and figured bright yellow dangly things would be hard to ignore.
Click to view attachment
This is a "lo-fi" version of our main content. To view the full version with more information, formatting and images, please click here.