Help - Search - Members - Calendar
Full Version: Intro from Montana: '73 2.0L rustoration thread
914World.com > The 914 Forums > 914World Garage
Pages: 1, 2, 3, 4, 5, 6, 7, 8, 9, 10, 11, 12, 13, 14, 15, 16, 17, 18, 19, 20, 21, 22, 23, 24, 25, 26, 27, 28, 29, 30, 31, 32, 33, 34, 35, 36, 37, 38, 39, 40, 41, 42, 43, 44, 45
Superhawk996
QUOTE(bbrock @ Mar 24 2020, 01:16 PM) *

QUOTE(Superhawk996 @ Mar 24 2020, 09:59 AM) *

I ain't never seen me no Bonobo use a welder to weld up a spring puller. av-943.gif


IPB Image


I thought I was looking into a mirror for a monment av-943.gif
preach
Brent great work (as always), love the switch and USBs.

I am also looking forward to some wildlife pics when they start coming in the yard again. smile.gif
bbrock
QUOTE(preach @ Mar 24 2020, 10:07 PM) *

Brent great work (as always), love the switch and USBs.

I am also looking forward to some wildlife pics when they start coming in the yard again. smile.gif


I'll get on that. Just had two healthy looking moose run by my office window through the snow last week but couldn't grab the camera fast enough. beerchug.gif
Tdskip
QUOTE(Superhawk996 @ Mar 24 2020, 05:03 PM) *

QUOTE(bbrock @ Mar 24 2020, 01:16 PM) *

QUOTE(Superhawk996 @ Mar 24 2020, 09:59 AM) *

I ain't never seen me no Bonobo use a welder to weld up a spring puller. av-943.gif


IPB Image


I thought I was looking into a mirror for a monment av-943.gif


Nope, that’s me!
KELTY360
QUOTE(Tdskip @ Mar 25 2020, 06:06 AM) *

QUOTE(Superhawk996 @ Mar 24 2020, 05:03 PM) *

QUOTE(bbrock @ Mar 24 2020, 01:16 PM) *

QUOTE(Superhawk996 @ Mar 24 2020, 09:59 AM) *

I ain't never seen me no Bonobo use a welder to weld up a spring puller. av-943.gif


IPB Image


I thought I was looking into a mirror for a monment av-943.gif


Nope, that’s me!


You guys need to quit smoking. smoke.gif
bbrock
Okay, time to stop monkeying around. With all the craziness going on right now, it really gets you thinking about what is truly important in life and focusing on that. In my case, I'm talking about tunes! rock_band.gif

Ive done some serious upgrading and darn close to having this all buttoned up. It started with fishing and 8 gauge amp wire through the snorkel in the firewall. I dreaded this task but it really wasn't too difficult.

Click to view attachment

And then tucking it away out of sight. Look closely and you can see just a little showing.

Click to view attachment

Click to view attachment

I ran a matching 8 gauge ground wire to the ground stud behind the fuse panel.

Click to view attachment

Both wires are routed to the center console.

Click to view attachment

I also ran better quality 16 gauge speaker wire out to the pods. First, I replaced the factory plastic that was glued to the chassis. That should improve the sound a bit.

Click to view attachment

And now for a nice and tidy installation of all the bits.

Click to view attachment

Hmm dry.gif That doesn't quite look like I had in mind. Let's see if we can do a little better.

I don't believe in magic, but I do believe in harnesses. I made up a harness for the antenna and amp controls. The harness takes power from the head unit antenna wire to turn on the amp when the head unit comes on. It also sends power to a rocker switch in the center console next to the trick usb charger. The other side of the switch sends power back to the bulkhead and to the switch wire for the power antenna. Now I have the option to lower the antenna when streaming music to the head unit rather than the radio.

Click to view attachment

Here's the amp mounted inside the console. I secured the mounting board to existing bolts on the console so no holes were drilled or modifications made. Everything is 100% reversible to stock simply by taking the thing out.

Click to view attachment
bbrock
Now let's talk subs. The first sub I ordered was a JL Audio 8" sub. It sounded awesome even just playing it from its packing box. Incredibly tight, punchy sound. I can't stand Thump, thump, sound systems that are meant to attract attention rather than produce beautiful music and the JL Audio sub checked all the boxes. Unfortunately, it wouldn't fit the foot space. On paper there was enough depth, but the odd shape of the footwell space and width of the magnet made it just a little too deep unless I was will to loos leg room. I was not. A quick call to Crutchfield and the JL Audo was on its way back to them, and a Rockford-Fosgate 8" Punch 3 shallow mount was on its way to me. At first I didn't like the Fosgate. Too much thump and no nuance. But as the speaker broke in, it started sounding better and I was able to dial it in for some pretty impressive sound. Again, just playing it using the packaging box as an enclosure. The system isn't going to rattle any teeth (thank goodness), but it does produce amazingly good sound. Far better than I thought I'd be abe to get.

For temporary mounting, I cut a piece of scrap plywood the same profile as the front of the foot foam and mounted the speaker. It fits quite nicely!!! piratenanner.gif

Click to view attachment

Not surprisingly, the bass sounds rather flaccid mounted on the board running in free air. It's kind of like punching a pillow. No satisfaction. It's still a huge improvement over just the Infinity pod speakers, but I'm really hoping 914Rubber offers their foot well sub enclosure soon. If I have to make my own, it will cost 3X as much. For now, here's a pick of how it will look in the final installation.

Click to view attachment

That's right, invisible. Subs are meant to be heard/felt and not seen. tunez.gif
Superhawk996
Nice job hiding the amp. I'll be interested to see how this all turns out.

Back in the day, I made my own center console out of plywood with a center baffle to divide driver side from pasenger side and mounted some 6x9's in it and had some sort of simple Radio Shack two channel amp up in the frunk. Maybe 50W/ch - wasn't much power by todays standards. The flip side of that limited power was that I never had issues with the OEM 55A alternator.

I was pretty happy with that setup back in the day.

As usual, you've upped the stakes and now I'll feel compelled to mimic your setup. laugh.gif
mb911
Looks great.. I decided for my application I am going to do a Marine Bluetooth speaker and mount similar to what you have done..
bbrock
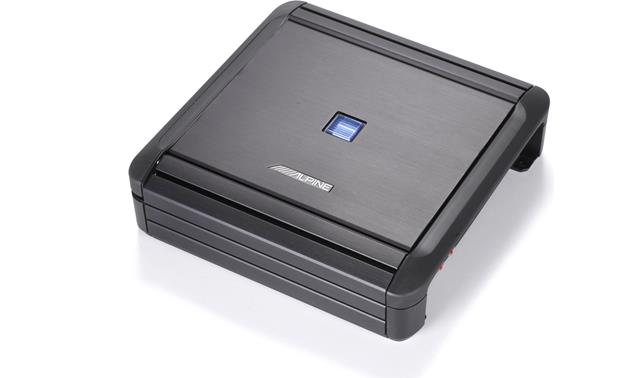
Thanks Phil. I realized I didn't post any details on the amp. I went with an Alpine MRV-F300 which is by no means a beast or high end, but consistently shows up at the top of 4-channel amp reviews.

IPB Image

It is rated 75W per channel @ 2 ohms but actual is usually a fair amount higher. The factory certified mine at 94W per channel. Doesn't matter because my speakers are rated at max 60W RMS and the sub is 150W (75W per voice coil). What I like about this amp is that it is a Class D which is more power efficient that most other amps. For the sub, I split the signal from the head unit to the amp. I tried wiring the sub with bridged output from the amp to a 4 ohm load and it worked okay, but I thought it sounded a little better running a single channel to each voice coil which are 2 ohms. I'm not sure why that would make a difference. It might just be my imagination, but that's how it is wired.

The sound from this system is way above what I had hoped. If you are looking for clean, quality sound, it is fantastic. If you want to rattle the windows of the third car ahead at a traffic light, you will be dissapointed. The Infinity speakers are incredible. They are small, so I set my cross-overs on the amp a tad on the high size (100 Hz) to hand off the lower range to the sub. What has shocked me the most is that you actually get a 3-dimensional sound stage if you sit on the center cushion. Listening to Pachelbel's Canon in D with eyes closed and you can imagine yourself in a concert hall (yeah, I know some music snops like to poo poo Pachelbel, but screw you. That piece is genius). Crank up the Steppenwolf and you'd swear John Kay was standing in the frunk. Unfortunately you don't often get to listen from the center cushion.

The system isn't going to win any awards, but considering the limitations we are working with in these little cars, I'm more than satisfied. I just want that sealed sub box to finish this thing off.
Dion
The level of attention and detail continue to astound.
Fantastic Brent.
This one is for you! beerchug.gif
Superhawk996
I'm a huge vintage stereo fan so getting onboard with a Class D amp might be a challenge. shades.gif But, honestly they have come a long way and you are absolutely right that the power efficiency is amazing and puts a Class A/B to shame. I'd have no reservation about using in automotive and Class D would really help with the heat issue being in that tight console space.

Nothing wrong with Pachelbel's Canon in D as long as it's done right.


https://www.youtube.com/watch?v=by8oyJztzwo
bbrock
QUOTE(Dion @ Apr 5 2020, 08:22 AM) *

The level of attention and detail continue to astound.
Fantastic Brent.
This one is for you! beerchug.gif


aktion035.gif Yes! I've spent some time in their tap room. beer3.gif
mepstein
Brent - I don't remember if this was discussed but do you have your car insured?
bbrock
QUOTE(mepstein @ Apr 5 2020, 08:32 AM) *

Brent - I don't remember if this was discussed but do you have your car insured?


Yep, I have it under Hagerty's restoration (comprehensive only) policy. It has a rider that automatically increments the insured value each month so the valuation keeps up with the work being done. it's very cheap too since there is no liability insurance. The only special requirement is that the car can't be registered for road use. Once I get my plates, I'll have to switch to a conventional policy.

@superhawk996
I agree about the Class D. They certainly have come a long way but still don't match Class A or A/B usually. This one sometimes gets dinged for a bit low signal to noise ratio (89 dB) although I haven't heard anything but clean sound. Some people also complain about heat generation at high output. Both of these seem to be related to insufficient grounds. Even after an hour of cranking this at the speaker limits (which are well below the amp limits), the amp chassis is barely warm. For all the reasons you checked off, I do think this is a good choice for this application. There are cleaner A/B amps in this price range but I would have needed a much fatter power cable and have to worry about heat and draw on the alternator.
FlacaProductions
Thats's good work Brent - thanks for blazing that trail. When (if?) I get back to my 914, this set up is high on the list.....
914Toy
QUOTE(Superhawk996 @ Apr 5 2020, 08:28 AM) *

I'm a huge vintage stereo fan so getting onboard with a Class D amp might be a challenge. shades.gif But, honestly they have come a long way and you are absolutely right that the power efficiency is amazing and puts a Class A/B to shame. I'd have no reservation about using in automotive and Class D would really help with the heat issue being in that tight console space.

Nothing wrong with Pachelbel's Canon in D as long as it's done right.


https://www.youtube.com/watch?v=by8oyJztzwo


Not my favorite recording of Pachelbel's Canon, but what incredible guitar skill. Brought a smile to my face. beerchug.gif
bbrock
QUOTE(914Toy @ Apr 5 2020, 10:45 AM) *

QUOTE(Superhawk996 @ Apr 5 2020, 08:28 AM) *

I'm a huge vintage stereo fan so getting onboard with a Class D amp might be a challenge. shades.gif But, honestly they have come a long way and you are absolutely right that the power efficiency is amazing and puts a Class A/B to shame. I'd have no reservation about using in automotive and Class D would really help with the heat issue being in that tight console space.

Nothing wrong with Pachelbel's Canon in D as long as it's done right.


https://www.youtube.com/watch?v=by8oyJztzwo


Not my favorite recording of Pachelbel's Canon, but what incredible guitar skill. Brought a smile to my face. beerchug.gif


Needs a better drum score, but I like it! aktion035.gif
FlacaProductions
Brent - did you just scribe around the footwell foam to make the pattern? Does that foam just pull right out? It's strange, I've never been under there/behind the passenger footwell carpet.
bbrock
QUOTE(FlacaProductions @ Apr 5 2020, 11:47 AM) *

Brent - did you just scribe around the footwell foam to make the pattern? Does that foam just pull right out? It's strange, I've never been under there/behind the passenger footwell carpet.


Yep. Once you lift the carpet, the foam just pops right out and scribe the face outline onto a board. You want to extend the side toward the center about 1-1/4" because the foam dives back toward the bulkhead there and you need to mount the sub far to the lower left corner to line the magnet up with the deepest recess on the bulkhead. It will all make sense once you have the foam out. Like I said, this really needs to be an airtight sealed enclosure for best results.
euro911
I don't stop in here every day, but when I do, get to see a lot of progress and interesting new processes. Great work, and your car is looking spectacular beerchug.gif
bbrock
The Thrill of Victory and Agony of Defeat


As the title says, today was a day of progress and setbacks.

A few weeks ago I was acused of nit picking on my car when I said the hood gaps didn't deserve the praise I was getting. That's because the headlight covers were flopping loose. The threads on the outer pivot pins got roached by the plater. In a case of perfect timing, somebody posted on another thread not to send the cast pins for plating for that reason, but it was posted WHILE mine were at the plating shop. Also, one of the plates that goes inside the fender for the pivot pin bolts went missing.

First the plate. they are 14g which turned out to be a hard thickness to find in small quantities. Then I discovered that most Simpson Strong Tie fasteners for construction framing are 14g so I picked up the cheapest appropriate size plate for 76 cents. I went ahead and cut two plates. It doesn't hurt to have an extra.

Click to view attachment

Then I plated them yesterday along with a few other parts. This may be my last zinc plating adventure. Something has gone bad with my plating bath and it is darn near impossible to plate parts now. I was lucky to get these done and they aren't my best work.

Click to view attachment

Next up was drilling out the dooshed-up pivots and inserting Helicoils.

Click to view attachment

And after putting everything back together... NOW you may marvel at those gaps. shades.gif

Click to view attachment
bbrock
Now the main event for the day. I actually started this almost two months ago. The front signal buckets needed some love.

Click to view attachment

Click to view attachment

After bead blasting, wire wheeling, and spraying the interior with Spaz Stix Mirror Chrome, they don't look half bad. The Spaz Stix was the best stuff for restoring the reflectors I could find. There are good Youtube vides on it. The right way to used it is to first spray a high gloss black background and then spray the mirror on top. You get a near mirror reflective surface that way. I just cleaned the interior with alcohol and sprayed it directly over the dulled original surface. Works good enough for me.

Click to view attachment

At this point, the plan was to buy a DIY Euro turn signal conversion kit form Martin Baker but he didn't reply to my PMs so I finally decided to DIY from scratch. It's probably for the best because I have a feeling this virus is going to hit me in the wallet a few months from now, so probably better to watch my spending. This route only cost me time, but lots of it.

First was making a cardboard pattern trying to fit the contour of the lens.

Click to view attachment

Click to view attachment

Click to view attachment

Click to view attachment

After a few tries, I got two decent brackets made out of 26g sheet. These were zinc plated later.

Click to view attachment

Next is making the little reflector thingies. I happened to have some mirrored aluminum sheet that has been laying around the shop for over a decade. Made a crude hammer form. This was version 1. I forgot to snap a pic of the version I used in action.

Click to view attachment

After much fiddling, I had all the parts ready to assemble. Boy, with all those failed versions lined up in front of the Masonite, this is starting to look like a Chris Baker film ( @tygaboy ) av-943.gif

Click to view attachment

This is a shitty pic, but in the interest of making mods reversible, I disabled the original parking light by putting a double layer of insulating shrink wrap on the contacts. It didn't really matter for this one because that contact is about to break off anyway. But there it is.

Click to view attachment

bbrock
The pigtails on the sockets I bought were a tad too short so I had to splice on longer tails. I decided to hide the splices under the sockets. Pics of OEM Euro lights I've seen used white wire. The closes I had of the correct guage was white with yellow stripe. Close enough.

Click to view attachment

I forgot to take a pic of the sockets soldered in place. My plan was to solder on the reflectors too and I'm embarrassed to say I didn't know you couldn't solder aluminum. Now I do. blush.gif So out came the pop riveter and again, I forgot to snap a pic. Again in the interest of reversible mods, I crimped a piggyback connector to the pigtails so it becomes plug and play with no soldering.

Click to view attachment

Here's the finished setup... almost. That isn't the correct bulb in there but it works for testing. You don't have to look hard to see these are homemade, but I'm not going to take the lenses off just so someone can make fun of me. If they ask me to, I'll call them a dick.

Click to view attachment

Okay, after wrestling to get the wires hooked up and the boot on the back, the bucket is remounted with hardware for the first time in three decades. Just need to screw the lens on. A few light turns of the screw driver and... *tink*

DOH! headbang.gif

Click to view attachment

Turns out that I got the back of these things just a scooch too high and snapped the lens right at the seam. It's not as bad as it looks. These are 914Rubber repros and I have the proper solvent to fuse them back together. I'm a little concerned at how little pressure it took to break them apart though and wonder how long the other lens will last. At any rate, I have some more filing to do but that's where I left things tonight. You can't win 'em all. beer3.gif
preach
Beautiful gaps man!
defianty
Top work Brent! Love the gaps clap56.gif
Superhawk996
Love the hammer form work to make the reflectors to add 2nd euro bulb. beerchug.gif

mbseto
Nice work!
Cairo94507
Amazing gaps for sure. I love your euro-light conversion work. Looking forward to the picture of them illuminated. beerchug.gif
UROpartsman
It's not original at all, but some restoration guys say if you're trying to maximize the light output of old tail lights or turn signals, spray painting the inside of the reflector white provides more output than using rattle can silver or chrome.

Just depends if you're trying to achieve originality or safety.
bbrock
QUOTE(UROpartsman @ Apr 6 2020, 12:23 PM) *

It's not original at all, but some restoration guys say if you're trying to maximize the light output of old tail lights or turn signals, spray painting the inside of the reflector white provides more output than using rattle can silver or chrome.

Just depends if you're trying to achieve originality or safety.


Yes! There is actually a lot of data on that from the horticulture world. That's why I didn't worry about trying to get a mirror finish. Mirrors are for focusing light but for reflecting and scattering light, flat white is king. Flat silver comes very close. What I did sort of splits the baby between originality and efficiency.
tygaboy
shades.gif
KELTY360
It used to be that the highest praise around here was to be called an asshat....now it’s getting Brent to call you a dick.

I think I have a new purpose in life! cheer.gif
tygaboy
QUOTE(bbrock @ Apr 5 2020, 09:42 PM) *


After much fiddling, I had all the parts ready to assemble. Boy, with all those failed versions lined up in front of the Masonite, this is starting to look like a Chris Baker film ( @tygaboy ) av-943.gif


https://www.youtube.com/watch?v=j1wjvP-raOI
raynekat
"Okay, after wrestling to get the wires hooked up and the boot on the back, the bucket is remounted with hardware for the first time in three decades. Just need to screw the lens on. A few light turns of the screw driver and... *tink* "

DOH! headbang.gif

Brent, if I were you, I'd just go ahead and break the other lense right now and get it out of your system. Then you won't have to worry about it needlessly at at a later time. smile.gif lol-2.gif

Everything looks great as usual you mad scientist. w00t.gif
bbrock
You guys are hilarious av-943.gif

After doing a bit of filing, the other lens fits fine (no "tink"). Figured I'd better take one last pic before I preemptively break it. smile.gif When I get the correct bulbs, I'll take a pic of them lit up. I did test them, but I'm afraid these bulbs will melt the lens.

Click to view attachment

Now for the tail lights. To call this overspray ios an understatement. It looked more like just spray.

Click to view attachment

I know people hate to use it, but I prefer brake fluid for getting paint off the plastic. Everything else I've tried tends to attack the plastic. It takes a long time, but it does work.

Click to view attachment

Getting the reflectors out took some work. The bulb receptacles just snap in but they are stiff and being almost 50 years old, I was being extra careful. They all came out just fine though.

Click to view attachment

And after a few light coats of Spaz Stix.

Click to view attachment

Now here was a dissapointment. The 914Rubber tail lens gasket material is shockingly unacceptable. To start, they are black where the originals are white and that does show through the lenses.

Original:

Click to view attachment

914Rubber:

Click to view attachment

Yes, that is nit picking and I could have lived with that, but it is worse. The replacement material is both harder and smaller diameter than original. So much smaller in diameter that they fall out of the grooves were the originals are a snug fit.

Click to view attachment

On top of that, they cut the damn things way too short!
bbrock
Here's how the originals line up.

Click to view attachment

And you can see the replacements are over an inch short.

Click to view attachment

I love 914Rubber, but these are not even close to being usable. I'm going to give the AA gaskets a try.
bbrock
Housings and reflectors spiffed up.

Click to view attachment

Click to view attachment

And installed.

Click to view attachment

The PET shows rubber washers between the housings and brackets and the yellow tag reminds me to install them when they arrive.

Click to view attachment

And the money shot.

Click to view attachment
914_7T3
QUOTE(bbrock @ Apr 6 2020, 09:26 PM) *


I love 914Rubber, but these are not even close to being usable. I'm going to give the AA gaskets a try.


Looking good! The AA ones fit really well and work great as a replacement.
bbrock
QUOTE(914_7T3 @ Apr 6 2020, 09:36 PM) *

QUOTE(bbrock @ Apr 6 2020, 09:26 PM) *


I love 914Rubber, but these are not even close to being usable. I'm going to give the AA gaskets a try.


Looking good! The AA ones fit really well and work great as a replacement.


Good to know. Thanks! thumb3d.gif BTW, I'm not convinced I have the right flasher. I need to get a full set of bulbs and do some testing.
914_7T3
QUOTE(bbrock @ Apr 6 2020, 09:45 PM) *

QUOTE(914_7T3 @ Apr 6 2020, 09:36 PM) *

QUOTE(bbrock @ Apr 6 2020, 09:26 PM) *


I love 914Rubber, but these are not even close to being usable. I'm going to give the AA gaskets a try.


Looking good! The AA ones fit really well and work great as a replacement.


Good to know. Thanks! thumb3d.gif BTW, I'm not convinced I have the right flasher. I need to get a full set of bulbs and do some testing.


If you are referring to the relay, below is the one that worked in my car before the electrical Gremlins surfaced. There are different versions of the Hella TBB4 ending in part #-02 or -04 etc... I believe the -02 to be correct for a '73.

Click to view attachment

dr.tim
Spiffy.


...and anything that was binding me to a date of April 25 has been closed or cancelled. dry.gif


That also means I am available for an eastern journey as necessary, convenient, or bored.
UROpartsman
We haven't offered a tail light seal for the 914, but we do have a BMW 2002 tail light seal that could be a similar material and profile. It's part number 63 21 1 356 945, and it's grey in color, is 5mm diameter by 70cm long (you'd have to use more than one per 914 tail light), and it's a soft silicone foam material.

If folks are interested, we could look into increasing the length to fit 914 tail lights.
bbrock
I haven't been good with updates because as usual, I have several mini-projects going simultaneously and all have stalled until I make a run into Cootieville for supplies. I didn't like going to Cootieville before the pandemic and now really don't like going. However, yesterday I notices something wasn't quite right with my dash pad. I couldn't quite put my finger on it.

Click to view attachment

Click to view attachment

I decided to give it a good cleaning and the old 303 Protectant treatment. That stuff has worked wonders for sprucing up vinyl so let's see what it does here.

Click to view attachment

Click to view attachment

Yep. That looks a fair bit better. I tell you, this stuff is just magic. shades.gif
Now off to Cootieville for supplies.
KELTY360
bs.gif biggrin.gif

But it looks like you've perfected orange peel. shades.gif
euro911
WTF.gif ... It took out all the cracks?

... c'mon, man screwy.gif
Cairo94507
Hey...I wonder if 303 makes a rust repair???? I could have saved a lot of money! beerchug.gif
Superhawk996
QUOTE(euro911 @ Apr 19 2020, 04:16 PM) *

WTF.gif ... It took out all the cracks?

... c'mon, man screwy.gif


agree.gif the suspense is killing me hissyfit.gif
FlacaProductions
It's called elbow grease, fellas!!! 303 doesn't work like that of you?? Rub harder!!!
bbrock
QUOTE(FlacaProductions @ Apr 19 2020, 07:33 PM) *

It's called elbow grease, fellas!!! 303 doesn't work like that of you?? Rub harder!!!


^^^^^ This. It's all in the technique guys.

However... rolleyes.gif I might have glossed over the step where I pre-ordered a 914Rubber dash top in their Black Friday sale and it finally showed up last week. As others have said, it is a very good reproduction. The only thing that causes concern is that the hood over the instrument pod on the original is rigid - I think there is a metal frame embedded inside. The 914Rubber piece is flexible so I hope it doesn't start to deform over many hot summers of use. Enough of these are running around SoCal now that I would think such a problem would have already shown up.

I do have a few tips for installing these things. The nylon studs are screwed in to embedded nuts and are longer than the originals. That is not helpful. Also, some of them were clipped at slight angles which makes the nuts want to cross thread when they go on. Also not helpful. It might be worth getting out the old Dremel to trim them to the correct length and maybe put a taper on them. Also, it looks like blue locktite was used to lock the studs in place. That is not strong enough and the stud can start to turn when you tighten the nut on install. If it turns enough, it will push a visible bulge into the top of the dash top. REALLY not helpful and a real bitch to correct when you are half way through an already difficult install. I peeled the siding off the house with my cursing. blowup.gif This is one of those rare jobs for red Locktite. Stick 'em down! Oh, the dash also comes with steel nuts which seems like a bad combo on nylon studs. The factory used nylon nuts and so did I.

My top was actually missing one of the studs so I moved the missing location to the easiest to access above the radio cutout. I can install it with dash top in place. Hopefully it is in the package arriving tomorrow.
This is a "lo-fi" version of our main content. To view the full version with more information, formatting and images, please click here.
Invision Power Board © 2001-2024 Invision Power Services, Inc.