Toyota Land Cruiser, a '75 with a 350 Chevy in it.
Just can't get over the uniquely American perspective that everything can be improved by putting some sort of V8/SBC/LS in it.
Thank God that Brent stayed on the straight and narrow path.
I've always been drawn more to quick, nimble and somewhat versatile. I just never bought into the "there is no replacement for displacement" philosophy.
mb911
Feb 16 2021, 07:26 PM
QUOTE(bbrock @ Feb 16 2021, 05:01 PM)
QUOTE(Dion @ Feb 16 2021, 05:47 PM)
Looking fantastic Brent. I like the sealant idea. Great research on your part. As usual your thread is a wealth of knowledge. Quick question: What fuel clamps are you using? Source? I need a bunch for my carbs. Also my next project on the car is placing the fuel tank back in, running lines etc. As Cairo said , don’t need any fire!
Thanks man. I wish I could give a better answer on the clamps, but I just went to my FLAPS (O'Reilly) and told them I needed the "good" fuel clamps that are omega shaped with the rolled edges that don't cut the hose. They knew exactly what I was talking about and grapped a box from the back room stock shelves (not the aisles). The box says Master Pro Select if that helps. However, the clamps I got from @Rotary'14 when I bought my SS lines from him are better because they have phillips screws rather than slotted like these. I find slotted screws on hose clamps a big PITA. It might be worth checking with him.
Belmetric has the ones you speak of.
bkrantz
Feb 16 2021, 09:07 PM
QUOTE(Superhawk996 @ Feb 16 2021, 08:10 AM)
QUOTE(Cairo94507 @ Feb 16 2021, 09:54 AM)
Toyota Land Cruiser, a '75 with a 350 Chevy in it.
Just can't get over the uniquely American perspective that everything can be improved by putting some sort of V8/SBC/LS in it.
Thank God that Brent stayed on the straight and narrow path.
If I remember correctly, a small block V8 weighs less than the Landcruiser straight 6, provides more hp, torque, and mpg. Maybe not stock, but I would call it improved.
Dion
Feb 17 2021, 06:25 AM
QUOTE(mb911 @ Feb 16 2021, 05:26 PM)
QUOTE(bbrock @ Feb 16 2021, 05:01 PM)
QUOTE(Dion @ Feb 16 2021, 05:47 PM)
Looking fantastic Brent. I like the sealant idea. Great research on your part. As usual your thread is a wealth of knowledge. Quick question: What fuel clamps are you using? Source? I need a bunch for my carbs. Also my next project on the car is placing the fuel tank back in, running lines etc. As Cairo said , don’t need any fire!
Thanks man. I wish I could give a better answer on the clamps, but I just went to my FLAPS (O'Reilly) and told them I needed the "good" fuel clamps that are omega shaped with the rolled edges that don't cut the hose. They knew exactly what I was talking about and grapped a box from the back room stock shelves (not the aisles). The box says Master Pro Select if that helps. However, the clamps I got from @Rotary'14 when I bought my SS lines from him are better because they have phillips screws rather than slotted like these. I find slotted screws on hose clamps a big PITA. It might be worth checking with him.
Belmetric has the ones you speak of.
Thanks fellas! Looking forward to more Brent.
bbrock
Feb 22 2021, 08:22 PM
The O-ring grease I ordered has gone MIA in the USPS abyss so didn't arrive before the weekend as expected. That meant I couldn't finish off the engine assembly but I found a bunch of small things to keep me busy but it's pretty weird that I'm starting to run out of things to do.
Let's get the negative thing out of the way. I'm really not trying to pick on 914Rubber. I've probably bought 80% of the items in their catalog and probably 80% of that is great quality stuff. But sometimes they miss and the engine tin J-pipe grommets are a miss. I tried installing them and found they fit very loosely in the openings and would not stay in at all when the pipes were pushed in. Even though most part sources listed the OEM part as NLA, I found them listed in the Sunset Porsche catalog. Ridiculously expensive but a cheap repro that doesn't work is a waste of money. I ordered a pair expecting to get an email the next day saying they were NLA. Instead, I got an email from Luke saying they would have to be ordered from Germany and would take 3-4 weeks. I still expected to get an NLA noticed when the Germans got the order, but to my surprise, they arrived about 3 weeks later so here is a comparison.
The OEM grommet on the left is a full 3mm larger OD and the center membrane is 1mm thinner than the 914Rubber grommet on the right.
After that, I had to run to town but picked up something I've needed for many decades. I finally replaced my crappy and downright dangerous old Craftsman jack.
That's it for now. If things go right this week, next weekend may be an epic milestone on the project.
bbrock
Mar 8 2021, 07:34 PM
I'm two weeks behind on posting so let's get caught up. I had limited time to work on the car last weekend, so I made the most of it by going for the big O -rings.
These gaskets have been sitting in a parts bin for over 30 years. They look like they may have shrunk a bit. Luckily, these aren't prone to leaking so I should be okay They do seem to fit snug on the heads though but I need to double check that I have newer ones on hand when the oil gusher hits.
And this engine is buttoned up! The rest of the weekend was dinking around with odds and ends and tidying up the shop a little. Nothing picture worthy.
During the week, this arrived. It was not easy to find. All the FLAPS claim to have genuine Bosch reman starters available for ~ $130(ish) but when the each checked availability, they couldn't get them. Pelican has them but over $100 higher price. I found this one at Autohauz at FLAPS price. All the stickers and packaging indicate it was rebuilt by Bosch so hopefully it is good quality.
Now for the weekend update. First, more on the starter. I like the idea of using a starter relay as it doesn't make a lot of sense to send 20 amps or so all the way through that long wire and through the expensive starter switch. @914_7T3 sent me a Bosch relay he wasn't going to use so I cleaned it up and installed. Of course, I had to do a little extra by adding heat shrink to the terminal clips. Then I painted all those connections with liquid electrical tape to seal them against moisture.
I think it makes for a tidy installation. There are some threads on the Samba with a lot of starter relay hate. Personally, I think it is nonsense. The argument pretty much comes down to not wanting to add another part that could fail. Let's see, if the relay fails, the fix is to simply unplug the starter wire from the relay and plug it into the spare terminal on the solenoid. That sounds a lot easier than having to replace a fried $60 switch.
That was also the moment of maximum stupidity. Note that I'm preparing to roll the whole package under the car with carbs and air cleaner intact. What a greedy dumbass. Bear in mind that it has been 35 years since I jacked an engine into the belly of a 914 and my technique was rusty to say the least. I also never had a jack capable of sticking the ass of the car so high it looked like it was doing Downward Dog. And I've never installed one with dual 40IDFs. This was a bad combo of too much clearance, too much angle, and not enough brains. That is to say, it was a fight that included removing the air box under less than ideal conditions. Getting the right carb hung up on the chassis and mangling my lovely housing a bit before having to yank the carb off under REALLY less than ideal conditions, and having one helluva time jacking the engine high enough to secure the mounts. Thanks to my wife for helping out through the whole deal. Eventually, I prevailed.
Still a lot of work to do under there but a great milestone that left me beat by the end of the day. How does it look from the topside though? Pretty damn badass, if you ask me.
It's not all sunshine and baked potatoes in paradise though. There is a MAJOR problem.The trunk torsion rods interfere with the right carb housing preventing it from lining up to latch. Also, the engine lid won't close! The crank case breather port on top interferes with the rain tray. Both can be fixed. At a minimum, I'll have to do a fairly major rework of the right carb housing. However, if I have to lower the whole assembly, it will take some really major rework. I'll get it done though.
Dion
Mar 9 2021, 05:32 AM
An all day affair to be sure, BUT it’s in! A major milestone indeed. Congrats. So you have a little tweaking to do. What ever you come up with I know it will look factory. Nice job man.
Superhawk996
Mar 9 2021, 07:10 AM
QUOTE(bbrock @ Mar 8 2021, 08:34 PM)
My pushrod tubes are not all fancy like @Superhawk996 's but I like 'em anyway .
If they aren't dull grey zinc, rust, or black oil dirt covered, they are considered fancy. Especially so if they are shinny yellow chromate colored.
So good to see the engine in it. Great Job.
You're not too far from now!
Cairo94507
Mar 9 2021, 07:57 AM
Congratulations on getting the engine & transaxle back into your car. Major milestone to be celebrated for sure.
barefoot
Mar 9 2021, 08:07 AM
Did you bench run the engine first ? I did to: 1st enable carb tuning, 2nd to re-check valve lash, 3rd to re-torque the cylinder heads and the exhaust studs.
i needed a lot of carb tuning the valve lash stayed pretty much the same head torques were OK, but exhaust studs needed some love after a few heat cycles.
Good luck, you're getting very close
tygaboy
Mar 9 2021, 08:41 AM
EXCELLENT! Great progress, Brent!
But now, The Challenge: Drive it under its own power before you reach 100 pages!
I'll have to check with my bookie on the the over/under...
bbrock
Mar 9 2021, 08:59 AM
QUOTE(barefoot @ Mar 9 2021, 07:07 AM)
Did you bench run the engine first ? I did to: 1st enable carb tuning, 2nd to re-check valve lash, 3rd to re-torque the cylinder heads and the exhaust studs.
i needed a lot of carb tuning the valve lash stayed pretty much the same head torques were OK, but exhaust studs needed some love after a few heat cycles.
Good luck, you're getting very close
No bench run. I did a lot of research and thinking on that and decided even a minimal run bench wasn't worth the expense and hassle for a one time use.
I did pre-tune the carbs following the Weber Tech Manual and advice on Aircooled.Net. Valve lash has been set and, of course, will be rechecked after cam break-in, but that is easy to do with the engine in the car. From what I've read, you don't need to retorque heads on the Type 4 engine and most people don't because you have to remove the engine tin to access the upper nuts.
I know dialing in the engine would be easier on a test stand, but it just didn't make sense for me to build something that would take up even more shop space than I have for a one time use.
bbrock
Mar 9 2021, 09:09 AM
QUOTE(tygaboy @ Mar 9 2021, 07:41 AM)
EXCELLENT! Great progress, Brent!
But now, The Challenge: Drive it under its own power before you reach 100 pages!
I'll have to check with my bookie on the the over/under...
You'll have to define "drive." Would moving under its own power for 5 ft. before it gets stuck in the snow waiting outside the garage count?
bbrock
Mar 9 2021, 08:02 PM
Damage Report
I lopped the crank breather port off the top of the air box to see if it fixed the clearance problem.
The lid still sticks up about 3/4" which means I need to drop the air box down about an inch to add some clearance. That will require a rework of the mounting bracket (not a big deal) but probably some modification to the box to clear the carb linkage. Dropping the box will change the geometry of the intake runners so it is a can of worms. CSP makes these low height manifolds which would avoid the geometry problem and probably let me sink the box lower than an inch for more clearance and a better look, but the are $200 and I worry about loss of low end torque and increased heat soak with shorter manifolds.
Why not modify the rain tray to remove an inch? Might be easier than reworking the whole airbox? Would that get you there? "Hot form" the rain tray around the obstruction? Remove completely for short term? Not sure how much running in the rain you might do in short term.
I wouldn't worry about short manifolds wrecking low end torque too much. Not like there is much runner length there with standard IDF manifolds. Especially as compared to FI runner lengths. Heat soak - use the phonelic spacers at the head. That mostly moves mainfolds laterally not upwards. That probably means some minor mods to you air intake connection to air box (i.e. boot length?).
I'll keep thinking. Sleep on it, don't do anthing rash.
Thanks Phil. Modifying the rain tray would be the easy route but most definitely a no-go for me. Violates my rule of only reversible mods (except shaving warts which is just good manners ).
I already have phenolic spaces involved so no issues there. This will be a step wise process. First lower the airbox and get the clearance, then worry about tweaks needed to align the runners. There's also the issue of the interference with the trunk torsion rod. That won't be hard I need to work out the height clearance first. Short manifolds are an attractive option other than price. Of course, that assumes they only differ in height and not lateral dimension. All doable. It's part of the journey.
Superhawk996
Mar 10 2021, 06:44 AM
QUOTE(bbrock @ Mar 9 2021, 10:24 PM)
Modifying the rain tray would be the easy route but most definitely a no-go for me. Violates my rule of only reversible mods (except shaving warts which is just good manners ).
Rain tray is a reversible mod. You just buy a new one later if you want. . . . Just saying'
mb911
Mar 10 2021, 06:56 AM
QUOTE(Superhawk996 @ Mar 10 2021, 04:44 AM)
QUOTE(bbrock @ Mar 9 2021, 10:24 PM)
Modifying the rain tray would be the easy route but most definitely a no-go for me. Violates my rule of only reversible mods (except shaving warts which is just good manners ).
Rain tray is a reversible mod. You just buy a new one later if you want. . . . Just saying'
bbrock
Mar 10 2021, 08:00 AM
QUOTE(mb911 @ Mar 10 2021, 05:56 AM)
QUOTE(Superhawk996 @ Mar 10 2021, 04:44 AM)
QUOTE(bbrock @ Mar 9 2021, 10:24 PM)
Modifying the rain tray would be the easy route but most definitely a no-go for me. Violates my rule of only reversible mods (except shaving warts which is just good manners ).
Rain tray is a reversible mod. You just buy a new one later if you want. . . . Just saying'
Nope. VETO! The intake has to fit without modifying the car. Moving on...
930cabman
Mar 10 2021, 08:07 AM
Hats off to a 35 years restoration, best of luck with your first drive
mb911
Mar 10 2021, 08:27 AM
QUOTE(bbrock @ Mar 10 2021, 06:00 AM)
QUOTE(mb911 @ Mar 10 2021, 05:56 AM)
QUOTE(Superhawk996 @ Mar 10 2021, 04:44 AM)
QUOTE(bbrock @ Mar 9 2021, 10:24 PM)
Modifying the rain tray would be the easy route but most definitely a no-go for me. Violates my rule of only reversible mods (except shaving warts which is just good manners ).
Rain tray is a reversible mod. You just buy a new one later if you want. . . . Just saying'
Nope. VETO! The intake has to fit without modifying the car. Moving on...
Lol ok.. trying to help
bbrock
Mar 10 2021, 08:44 AM
QUOTE(mb911 @ Mar 10 2021, 07:27 AM)
QUOTE(bbrock @ Mar 10 2021, 06:00 AM)
Nope. VETO! The intake has to fit without modifying the car. Moving on...
Lol ok.. trying to help
I thought posting this might be a little over the top
Strangely, I admire it. But we'll have to talk about how the IDF's ended up there . . . and whether or not that is reversable
KELTY360
Mar 10 2021, 02:32 PM
QUOTE(930cabman @ Mar 10 2021, 06:07 AM)
Hats off to a 35 years restoration, best of luck with your first drive
35 years??? Doesn't seem like a day over 25.
narino
Mar 10 2021, 03:17 PM
I've been sitting on the same VW bus intake hemming and hawing on how to make it work. I am SO glad I saw these posts! This is going to save me so much time, Thank you! Sadly I'll have to translate your elegant solutions to fiberglass.
Do you happen to have the Mcmaster sku # for the oversized tubing you bought to create the hose adapter? Was it this one? https://www.mcmaster.com/2805N11
Keep up the amazing work!
bbrock
Mar 10 2021, 04:37 PM
QUOTE(Superhawk996 @ Mar 10 2021, 10:19 AM)
Strangely, I admire it. But we'll have to talk about how the IDF's ended up there . . . and whether or not that is reversable
I'm disappointed. The story on those carbs is somewhere in this very short build thread. I can't believe you have not read every word Here's the short version:
Clueless guy gets tired of being stranded by an aging FI and also pouring a quart of oil in the engine every week to make up for the leaks. Clueless guy tears down the engine for a rebuild. Internet is not a thing at the time and all clueless guy knows is what he read in VW/Porsche magazine. All the cool kids were putting dual Webers on their 914s and clueless guy wants to be cool. He sends his cam off for regrind and sticks it in his engine. Then clueless guy puts the engine in storage for 30+ years. Clueless guy finally revives the project but my how times have changed. Clueless guy wants to put the FI back on but doesn't want to split the case so decides to run with the carbs for awhile and maybe revisit the fuel system problem later. To atone for the mistake, clueless guy tries to make a badass air intake to make the carbs feel at home but clueless guy can't use a tape measure. Then annoying guy comes along and wants clueless guy to mutilate a perfectly innocent rain tray for some reason.
QUOTE(narino @ Mar 10 2021, 02:17 PM)
I've been sitting on the same VW bus intake hemming and hawing on how to make it work. I am SO glad I saw these posts! This is going to save me so much time, Thank you! Sadly I'll have to translate your elegant solutions to fiberglass.
Do you happen to have the Mcmaster sku # for the oversized tubing you bought to create the hose adapter? Was it this one? https://www.mcmaster.com/2805N11
Keep up the amazing work!
@narino Thanks. Just make sure you can measure better than me! Here is the link to the tubing I bought. How much do you need? PM me and I'll pop short pieces in the mail for you. Please post your work doing this with fiberglass. I strongly considered going that route.
Hats off to a 35 years restoration, best of luck with your first drive
35 years??? Doesn't seem like a day over 25.
I know, right?
Superhawk996
Mar 10 2021, 05:44 PM
QUOTE(bbrock @ Mar 10 2021, 05:37 PM)
Then annoying guy comes along and wants clueless guy to mutilate a perfectly innocent rain tray for some reason.
You're too kind. I was expecting way worse!
barefoot
Mar 10 2021, 06:13 PM
QUOTE(bbrock @ Mar 9 2021, 09:59 AM)
QUOTE(barefoot @ Mar 9 2021, 07:07 AM)
Did you bench run the engine first ? I did to: 1st enable carb tuning, 2nd to re-check valve lash, 3rd to re-torque the cylinder heads and the exhaust studs.
i needed a lot of carb tuning the valve lash stayed pretty much the same head torques were OK, but exhaust studs needed some love after a few heat cycles.
Good luck, you're getting very close
No bench run. I did a lot of research and thinking on that and decided even a minimal run bench wasn't worth the expense and hassle for a one time use.
I did pre-tune the carbs following the Weber Tech Manual and advice on Aircooled.Net. Valve lash has been set and, of course, will be rechecked after cam break-in, but that is easy to do with the engine in the car. From what I've read, you don't need to retorque heads on the Type 4 engine and most people don't because you have to remove the engine tin to access the upper nuts.
I know dialing in the engine would be easier on a test stand, but it just didn't make sense for me to build something that would take up even more shop space than I have for a one time use.
Test Stand ?? how about a couple cinder blocks some 2x6, and a 4x4.
Test Stand ?? how about a couple cinder blocks some 2x6, and a 4x4.
That's pretty much what I would have done only I was looking at strapping it to a pallet. There's still some work involved there with switches, fuel pump etc. and I'm lazy.
raynekat
Mar 10 2021, 09:52 PM
Checked out your latest updates and have to say....
My 4 year old twins were laughing up a storm at all the different emoji's on this thread. They didn't care that much about what you were doing (hey, they're four), but were chuckling up a storm about all the emoji's. Well done there Mr. Mad Scientist.
bbrock
Mar 24 2021, 08:55 PM
QUOTE(raynekat @ Mar 10 2021, 08:52 PM)
Checked out your latest updates and have to say....
My 4 year old twins were laughing up a storm at all the different emoji's on this thread. They didn't care that much about what you were doing (hey, they're four), but were chuckling up a storm about all the emoji's. Well done there Mr. Mad Scientist.
I'm overdue for an update, but first, a special emoji for the twins @raynekat . This one make me chuckle
Now back to business. With the engine hanging under the chassis, I was finally able to set the ride height. I started by adjusting the front to factory spec. That required re-indexing to get it up high enough, but no biggie. Whoa! it looked like a rally racer at that height so I dialed it back down about 12mm. I don't want to go too low because I have that 3 miles of dirt road between my house and nearest pavement. The rear was low riding so I pulled the shocks and adjusted the perches up a click.
Then I turned back arse end. I had to move the whole drive train rearward about a quarter inch. That was easy enough to do by loosening the mounts and just pulling it back. The is was a matter of tuning up the engine bay seals. The rear seal had me scratching my head a bit until I figured out you need to pull a stretch on the seal to draw it down around the rear tin.
Then some final trimming on the other seals. I know you can use hog rings to pull the front corners together but after trimming, they were close enough I opted for another way. I gooped in 3M Weatherstrip adhesive into the joints and clamped them together to cure overnight.
I did the same at the rear corners but will spare you the pic. Then a bunch of bits and bobs to move closer to a working machine. My genius plan for mounting the starter relay hit a snag. How are you going to access that you dumbass?
Damn ,you put a few hours in. Was missing this. Is that coating on the trans dry? Or is it like an oil? Nice golden hue. 3 miles of dirt road! You need to get some period correct rallye tyres! Looking great as usual.
KELTY360
Mar 24 2021, 09:43 PM
Yowsa, you're adding fluids! Looks like store bought; I'm surprised you're not concocting your own personal brew of 90wt. Well, I guess you've got to cut corners somewhere.
BTW, I'm loving the body color sail and wartless front fender. Ride height looks perfect.
bbrock
Mar 24 2021, 10:20 PM
QUOTE(Dion @ Mar 24 2021, 08:20 PM)
Damn ,you put a few hours in. Was missing this. Is that coating on the trans dry? Or is it like an oil? Nice golden hue. 3 miles of dirt road! You need to get some period correct rallye tyres! Looking great as usual.
Thanks man. That coating (Tectyl) dries to a barely tacky wax. I can work all day under the car without gloves and my hands are barely dirty.
Moving on... I had one last grungy job to complete. I saved the best for the last.
Several hours of degreaser, scrubbing and scraping off years of baked on oil and grime, followed by filing the mating surfaces to make sure they were perfectly aligned and they looked like this.
Now to put them on. There are several old threads with Cap'n Krusty explaining the exhaust nuts that Porsche used on our cars. This one is the best. They are again what Porsche calls "mid-grip" nuts that look like deep M8 nuts with helicoil inserts. They are still available if you want to pay about $80 for a set of nuts. Too rich for my blood so I decided to get clever. I ordered a bunch of of deep M8 nuts from Belmetric with the idea of drilling them out and inserting Helicoils, but after doing one, it didn't have the grip that the "mid-grip" transmission nuts have so I decide to use the rest of the nuts as is. I think the inserts Porsche uses much be slightly oversized to add just a bit of extra grip. We'll see how these hold. Here's the one I Helicoiled next to an unmolested version.
The plan is to break in the cam with VR1 in the case. Then I'll change the oil and filter, recheck the valves, and refill with Driven Break-in oil for the first few hundred miles of break in. For now, the important thing is - NO LEAKS!
The plan is to break in the cam with VR1 in the case. Then I'll change the oil and filter, recheck the valves, and refill with Driven Break-in oil for the first few hundred miles of break in. For now, the important thing is - NO LEAKS!
After all this beautifully detailed work I can't believe you have to drive up and down a long dusty gravel driveway! My sympathies!
Cairo94507
Mar 25 2021, 08:44 AM
Man, I totally agree. It would be breaking my heart to have to do that every time the car goes for a drive. But we do what we have to to let others enjoy our cars.
FlacaProductions
Mar 25 2021, 10:19 AM
So....about that rain tray....
930cabman
Mar 25 2021, 10:27 AM
Can you smell victory? Lookin great, thanks for posting
bbrock
Mar 25 2021, 01:31 PM
QUOTE(Cairo94507 @ Mar 25 2021, 07:44 AM)
Man, I totally agree. It would be breaking my heart to have to do that every time the car goes for a drive. But we do what we have to to let others enjoy our cars.
You guys It'll be fine. These cars are tough. It just a windy 20 mph road (except for a couple of assholes) so a nice slow tool through a canyon to warm her up before hitting the pavement. And yes, she will be driven in the rain too.
QUOTE(FlacaProductions @ Mar 25 2021, 09:19 AM)
So....about that rain tray....
QUOTE(930cabman @ Mar 25 2021, 09:27 AM)
Can you smell victory? Lookin great, thanks for posting
I smell oil. Is that the same?
raynekat
Mar 25 2021, 05:07 PM
OK....now go park it in the living room. Too nice to drive or chase moose with.
The plan is to break in the cam with VR1 in the case. Then I'll change the oil and filter, recheck the valves, and refill with Driven Break-in oil for the first few hundred miles of break in. For now, the important thing is - NO LEAKS!
After all this beautifully detailed work I can't believe you have to drive up and down a long dusty gravel driveway! My sympathies!
This has been a monumental build thread, your skills are well evident in your high quality photos as illustration for many others. That comment about your photos is from a professional photographer, retired! Many thanks for your journey and commentary.
bbrock
Mar 27 2021, 11:24 PM
QUOTE(Jamie @ Mar 25 2021, 05:21 PM)
This has been a monumental build thread, your skills are well evident in your high quality photos as illustration for many others. That comment about your photos is from a professional photographer, retired! Many thanks for your journey and commentary.
I appreciate the high praise but I have to say the compliment on my photos made me laugh. I have a reputation among my friends for the crappy pics I take. I just point and hope for the best.
Here's a few more crappy photos. Last week I went to hook up hoses to the fuel vapor circuit and discovered I didn't have grommets on the plastic tube where they entered the engine bay. I had forgotten that 914Rubber's full restoration kit only included 2 of those grommets and you need 4 for a full restoration.
Forgetting these meant I had to pull the relay board and heater blower, plus the wheel to access the outside. After clearing the way, the install was pretty easy and I got things buttoned up, but the whole affair chewed up the whole morning.
After lunch I set about on a chore I have not been looking forward to - torquing down the ball joints. I bought a 2-1/4" 4WD axle spindle socket at the FLAPS over a year ago for the task. It fit the castellated nut well but 180 ft. lbs. is a lot. Despite using my jack to hold pressure on the torque wrench, it kept popping out and I couldn't quick get the satisfying click at 180. I finally figure out that your REALLY need to put pressure on with the jack. Compressing the shock all the way to just about the point your are about to lift the car was the ticket. Then it was easy to reef it down for that nice *click*.
I ended the day with a stumbling block. I hooked up the wires to the oil pressure and temp senders and turned on the key. The temp gauge jumps to attention but no green light on the combo gauge. Troubleshooting was one of those irritating head scratchers because there were two problems. The first was that the LED bulbs I bought don't fit right in the dual post sockets in the gauges. I'm not exactly sure what the problem is but neither the oil pressure or low fuel lights were doing their thing. I had to fish around for some incandescent bulbs and those worked, but the green oil light would only come on if I connected the wire in the engine bay direct to ground. I pulled the switch and tried cleaning it with brake fluid. Continuity from the wire terminal to the body was glitchy though so a new switch is on order. I was hoping to set the static timing tomorrow and see if I could get oil pressure, but that's all on hold since the distributor has to be pulled to install the new switch. Not sure I'll get much done tomorrow. We'll see.
914werke
Mar 27 2021, 11:46 PM
dr.tim
Mar 28 2021, 07:36 AM
WOW! Getting close.
Superhawk996
Mar 28 2021, 05:28 PM
QUOTE(bbrock @ Mar 25 2021, 03:31 PM)
It just a windy 20 mph road (except for a couple of assholes) . . .
I didn't think you could see when I was driving up there!
Getting so close
This is a "lo-fi" version of our main content. To view the full version with more information, formatting and images, please click here.


 .
.
 The rest of the weekend was dinking around with odds and ends and tidying up the shop a little. Nothing picture worthy.
 This is happening!!!!


 now!
now!

 Great progress, Brent!
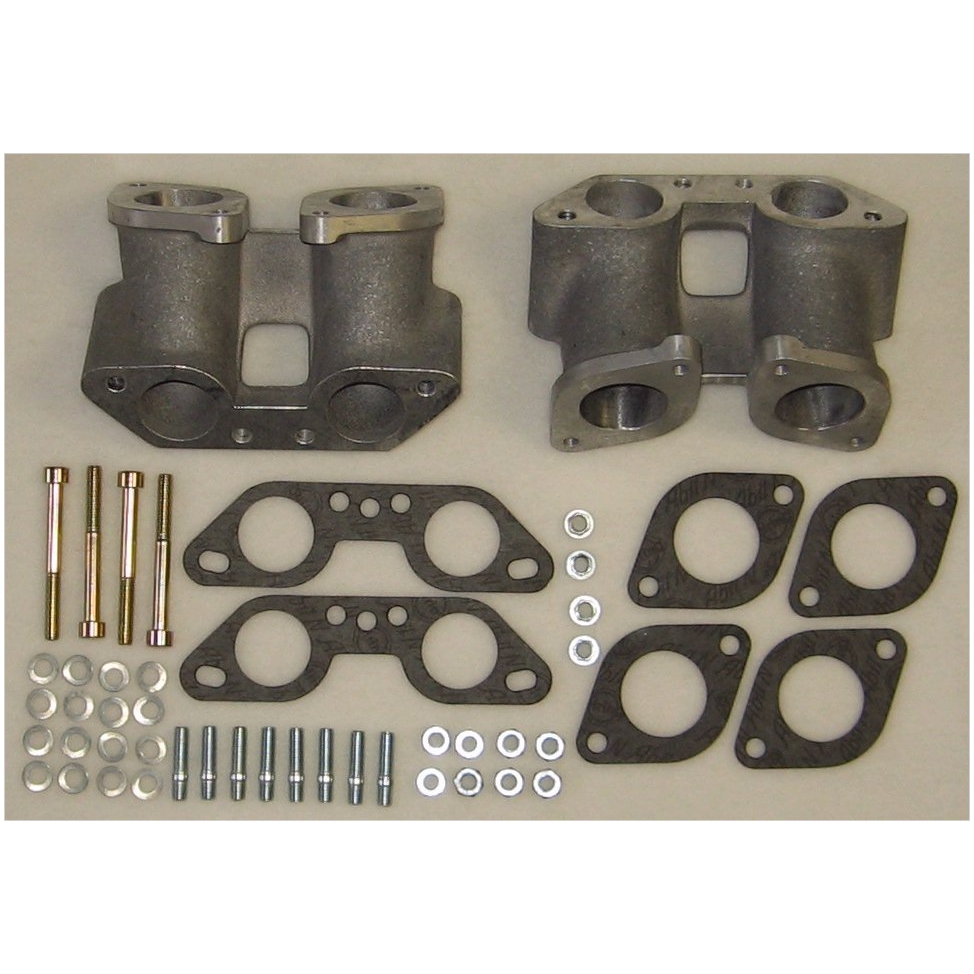


 ).
).


 I thought posting this might be a little over the top


![popcorn[1].gif](http://www.914world.com/bbs2/style_emoticons/default/popcorn[1].gif)

 It'll be fine. These cars are tough. It just a windy 20 mph road (except for a couple of assholes) so a nice slow tool through a canyon to warm her up before hitting the pavement. And yes, she will be driven in the rain too.


