Full Version: BUILD-OFF CHALLENGE: Tygaboy's '75 LS3
Pages: 1, 2, 3, 4, 5, 6, 7, 8, 9, 10, 11, 12, 13, 14, 15, 16, 17, 18, 19, 20, 21, 22, 23, 24, 25, 26, 27, 28, 29, 30, 31, 32, 33, 34, 35, 36, 37, 38, 39, 40, 41, 42, 43, 44, 45, 46, 47, 48, 49, 50, 51, 52, 53, 54, 55, 56, 57, 58, 59, 60, 61, 62, 63, 64, 65, 66, 67, 68, 69, 70, 71, 72, 73, 74, 75, 76, 77, 78, 79, 80, 81, 82, 83, 84, 85, 86, 87, 88, 89, 90, 91, 92, 93
Those are nice! Will they get the Midas touch or are you keeping them that color?
QUOTE(tygaboy @ Aug 14 2019, 06:33 AM) 
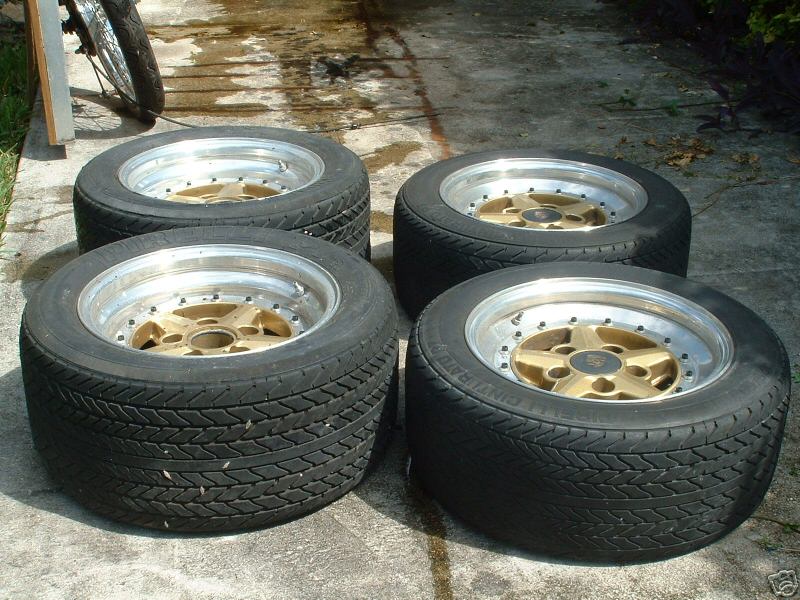
And the 8" / 9" x 16" Ronals are here.
You don't see them all the time and I think they'll nicely compliment the look of this build.
Wow! Those look very simmilar to some 15" gotties I had about 10 years ago!
QUOTE(tygaboy @ Aug 14 2019, 06:33 AM)
And the 8" / 9" x 16" Ronals are here.
You don't see them all the time and I think they'll nicely compliment the look of this build.
Big thanks to @MarkHoward for spotting these!
Glad those worked out. Gonna be fresh!
QUOTE(tygaboy @ Aug 14 2019, 05:33 AM)
And the 8" / 9" x 16" Ronals are here.
You don't see them all the time and I think they'll nicely compliment the look of this build.
Big thanks to @MarkHoward for spotting these!
Those rims are nice. Remind me of 917 look.
Very cool.
QUOTE(Andyrew @ Aug 14 2019, 08:02 AM)
QUOTE(tygaboy @ Aug 14 2019, 06:33 AM)
And the 8" / 9" x 16" Ronals are here.
You don't see them all the time and I think they'll nicely compliment the look of this build.
Wow! Those look very simmilar to some 15" gotties I had about 10 years ago!
Wow, those centers are essentially identical! That 3 -piece, bolt together look would go nicely with the rivets, too...

QUOTE(Krieger @ Aug 14 2019, 06:50 AM)
Those are nice! Will they get the Midas touch or are you keeping them that color?
Hi Andy - I'm kinda digging the anthracite look - seems "tougher" looking to me. So it'll be as-is for now. Easy enough to change color later.
Nice wheels...  always wanted a set.
I have these but they are, 15inch, also I saw these today... 3 bucks versus 1 buck, and 3 times longer to use..
always wanted a set.I have these but they are, 15inch, also I saw these today... 3 bucks versus 1 buck, and 3 times longer to use..
Well that makes a bit of a difference, eh? A bit of envisioning it with paint but I'm really happy with how these are going to look on the car.
And credit where credit is due: @BuddyV has Ronals on his car and I loved the look.
A major attraction is that these do a really nice job of filling out the flares with no spacers! So it's standard length studs, too.
A major attraction is that these do a really nice job of filling out the flares with no spacers! So it's standard length studs, too.
QUOTE(tygaboy @ Aug 14 2019, 01:43 PM)
And credit where credit is due: @BuddyV has Ronals on his car and I loved the look.
A major attraction is that these do a really nice job of filling out the flares with no spacers! So it's standard length studs, too.
They'll tuck a good half inch as the suspension drops to ride height as well.
Very nice fitment!
QUOTE(tygaboy @ Aug 14 2019, 01:38 PM)
Well that makes a bit of a difference, eh? A bit of envisioning it with paint but I'm really happy with how these are going to look on the car.
A pure look! And I thought these were only for 500 SEC's.. Think the grey will flow with your color choice. Gold would look good too but why rush into that.
Today was working on the radiator install. And given the earlier questions about tools, I thought this might be interesting to some:
This is an inexpensive copy of a Beverly shear.
The real deal items are around $600. Copies can be had for ~ $160 at Harbor Freight.
Remember, you get what you pay for and a genuine Beverly is a joy. These aren't bad, though.
Anyway, it makes quick, clean (and quiet!) work of cutting sheet metal. The throatless design lets you turn the piece and cut essentially any shape. Plus, it's a shear so no kerf to factor in, if that's of concern.
In all, a very handy and cost effective tool.
Here, I'm just trimming a support piece that sits under the radiator frame.
Main frame fabricated, support brackets installed and floor shroud rough fit.
I still have to add some supports to the upper, outer corners that tie forward to the chassis. Then it's add the side and top shrouding and cut the front panel.
I still have to add some supports to the upper, outer corners that tie forward to the chassis. Then it's add the side and top shrouding and cut the front panel.
Radiator frame upper supports nearly complete.
This build is a benchmark build.
and a single cleco in the picture.... Nice mount
There are so many things to do and I'm all over the place, bouncing from one "to do" item to the next. I'm currently in process on probably 5-7 sub-projects.
What can I say? I'm easily distracted. Doing this seems to work for me in that it keeps things moving while simultaneously creating time for me to (re)consider the design/execution I've partially completed.
Today, it was working up a test mount for the A/C unit. After hours of trying to work out some super duper cool, stealth location, I decided I was overthinking it and opted to mount it where it'll likely work the best without me having to try and invent a completely new housing and fan set up. Of course I reserve the right to do that in the future.
Again, this is a test mount that can be slid around on the front hoop to let me work out where the A/C unit will end up. I'm aware it isn't well engineered. Once I finalize the location, I'll probably add tabs and mounting points that eliminate this whole contraption. And if I do keep it, at the very least, I'll add a mount at the rear that ties to the chassis.
Hows the footroom there?
Not a bad spot assuming you have ample foot room. Even would work as a decent foot rest.
Love the mount
Not a bad spot assuming you have ample foot room. Even would work as a decent foot rest.
Love the mount
QUOTE(Andyrew @ Aug 17 2019, 01:41 PM)
Hows the footroom there?
Not a bad spot assuming you have ample foot room. Even would work as a decent foot rest.
Love the mount
@Andyrew - That picture isn't giving a good sense of how the unit fits. The good news is there's no problem re: foot room for either driver or passenger. Still some fiddling to do but it seems like it'll work just fine in this general position.
With the radiator support all done, I started on the shrouding.
First, it was working up a retaining plate. The rear face of the frame and the underside of this plate will get some rubber padding.
First, it was working up a retaining plate. The rear face of the frame and the underside of this plate will get some rubber padding.
Then, it was the top shroud. Hmmm, looks like I'd have to trim the shroud to clear around the retainer plate. That likely won't do.
Do-over #2! 
I think I like this more. A target for design / engineering is to have a single part that performs more than one function. So here's my top shroud/retainer!
I'll back this up with carbon fiber to keep the overall design theme I have in the interior.
I think I like this more. A target for design / engineering is to have a single part that performs more than one function. So here's my top shroud/retainer!
I'll back this up with carbon fiber to keep the overall design theme I have in the interior.
 version three is where you press the piece and make look really cool. Flat panel is so ________________
QUOTE(tygaboy @ Aug 21 2019, 09:23 AM)
Do-over #2!
I think I like this more. A target for design / engineering is to have a single part that performs more than one function. So here's my top shroud/retainer!
I'll back this up with carbon fiber to keep the overall design theme I have in the interior.

For months, I've been staring at the hole where the fuel tank sits so today I opted to make up the first of the lines.
Yet another example of cool new components hanging out with this ratty looking chassis and other older items.
I can't hardly wait to see what all this will look like once things are powder coated, anodized and painted.
Yet another example of cool new components hanging out with this ratty looking chassis and other older items.
I can't hardly wait to see what all this will look like once things are powder coated, anodized and painted.
are you doing drivers side fill..??
I like the new top shroud but agree it needs some bead roller detail to make it fit the theme.
Dig the radiator support, now I want to redo mine!
QUOTE(sixnotfour @ Aug 21 2019, 02:36 PM)
are you doing drivers side fill..??
@sixnotfour What? You mean you haven't poured over all 90 + pages and committed everything to memory?

Yes, driver side fill. The pump needed to drop into the tank's sump so I had to move the filler. Here's the planned set up, from an earlier post.
QUOTE(914forme @ Aug 21 2019, 10:11 AM)
version three is where you press the piece and make look really cool. Flat panel is so ________________@914forme and @Cairo94507 - So it's true: Everyone's a critic...
And you seem to have no problem creating more work for me!

But I'm claiming I beat you to it - I was at the metal store today, picking up the materials needed to make the stamp for this.
Hard fuel lines competed at the front bulkhead, so 1/2 way done! Now on to making them connect to the rear bulkhead.
I'll also fab a couple of supports for these.
I'll also fab a couple of supports for these.
Damnit,,its been a rough week..... 


I like the drivers side fill, also notice the nice flange delete you did on section of the tank. Great work, all your efforts are really paying off, and you have made huge leaps in skill level from when you started this project.
Would you please get to the Tangerine Racing Suspension Console raise, right now your making me think of adding items to my project instead of solving my fear of hacking the rear suspension pickup points out of the car.
Come on help a guy out.
After that if you don't mind working on the compound curve section to graph in the 944 Sunroof section that help would be greatly appreciated. Actually if you make those pieces I will gladly take the version 2 off your hands Chris . Version two of your stuff is like version 15 of mine. I would gladly
  onto my 944 roof panel and the top of my EG car.
@tygaboy thanks for helping me out
Would you please get to the Tangerine Racing Suspension Console raise, right now your making me think of adding items to my project instead of solving my fear of hacking the rear suspension pickup points out of the car.
Come on help a guy out.
After that if you don't mind working on the compound curve section to graph in the 944 Sunroof section that help would be greatly appreciated. Actually if you make those pieces I will gladly take the version 2 off your hands Chris
. Version two of your stuff is like version 15 of mine. I would gladly onto my 944 roof panel and the top of my EG car.@tygaboy thanks for helping me out
Stamped. And yes, I changed the design.
The retainer tab cut outs are a flipped/scaled down replica of the front of the removable doghouse cover design.
I also tightened up the clearances around the hood latch.
Now all the panels are matchy match!
Y'all happy now @Cairo94507 and @914forme ? 
The retainer tab cut outs are a flipped/scaled down replica of the front of the removable doghouse cover design.
I also tightened up the clearances around the hood latch.
Now all the panels are matchy match!
Y'all happy now @Cairo94507 and @914forme ?
Me likey.

square cut around trunk latch....just sayin...
QUOTE(sixnotfour @ Aug 22 2019, 05:03 PM)
square cut around trunk latch....just sayin...
[quote name='Andyrew' date='Aug 22 2019, 04:52 PM' post='2740664']
[quote name='sixnotfour' post='2740650' date='Aug 22 2019, 05:03 PM']
square cut around trunk latch....just sayin...
[/quote]
[/quote
Ouch! Tough crowd. This build never disappoints. You go Chris
[quote name='sixnotfour' post='2740650' date='Aug 22 2019, 05:03 PM']
square cut around trunk latch....just sayin...
[/quote]
[/quote
Ouch! Tough crowd. This build never disappoints. You go Chris
QUOTE(914forme @ Aug 22 2019, 11:17 AM)
I like the drivers side fill, also notice the nice flange delete you did on section of the tank. Great work, all your efforts are really paying off, and you have made huge leaps in skill level from when you started this project.
Would you please get to the Tangerine Racing Suspension Console raise, right now your making me think of adding items to my project instead of solving my fear of hacking the rear suspension pickup points out of the car.
Come on help a guy out.
After that if you don't mind working on the compound curve section to graph in the 944 Sunroof section that help would be greatly appreciated. Actually if you make those pieces I will gladly take the version 2 off your hands Chris
. Version two of your stuff is like version 15 of mine. I would gladly onto my 944 roof panel and the top of my EG car.@tygaboy thanks for helping me out
@914forme Thanks for the kind words, Stephen. I remain convinced most anyone who wants to develop these sorts of skills can do it. It's just a matter of time invested. Being retired has certainly helped speed my development.
Re: the Tangerine rear pick ups, the current plan is to get the car running essentially as is, debug all the systems, verify I've got all the needed holes, mounts, tabs, etc.
Then I'll blow the whole thing apart, do the Tangerine stuff, paint it and reassemble.
I like the idea of the hard top, as you know. I'll have to look into that and maybe grab a 944 roof from Parts Heaven before they close up for good.
QUOTE(sixnotfour @ Aug 22 2019, 05:03 PM)
square cut around trunk latch....just sayin...
Man, @Dion called it. Tough crowd, indeed! You guys are making me think I should wait until each part is "done" before posting any pics... Nah, my skin's thicker than that!

@sixnotfour - The square cut is essentially required to get those edges of the shroud as close to the latch mechanism as possible. This to prevent air from finding a way out that isn't through the radiator. I tightened up the opening to get it as close as I could.
If what you mean is that I didn't address the "plainness" of that area, we're on the same page. As I've developed my approach to the stamping process I use, it's sometimes easier for me to come back and do a secondary operation on one or more areas of a panel, and that's the case here.
What works best for me is to make my stamping die set the exact same outside shape as the panel being stamped. It ensures I get a nearly perfect dimension on the step of each recessed area. But with this panel, it meant I couldn't/didn't stamp anything around the latch cut out.
That said, to address the latch area, I'll make an "edge stamp" die set and form something that's more interesting than just the plain cut out.
Once I've finished, I'll post pics of all the dies I made for this piece.
Could I have done it all differently? Probably, but as I mentioned, this is the process that (currently) works for me.
I find it really helpful to hear other folks' opinions and ideas so keep the cards and letters coming!
Here are the main panel stamping dies:
First the female.
First the female.
The male with the area dies aligned but not bolted on and then with the female set on top.
And here's the "edge" stamp I made this morning. The female (the lower piece) goes under the panel and aligns with the front edges. The male gets butted up to and aligned with the edges of the female die and the main panel.
Clamp things together and slide it into the press...
Done.
I'm happy with how it turned out.
I'm happy with how it turned out.
![popcorn[1].gif](http://www.914world.com/bbs2/style_emoticons/default/popcorn[1].gif)

Your shroud looks kind of angry...why don't you drop CF insets into those reliefs?
T
T
QUOTE(tygaboy @ Aug 22 2019, 08:23 PM)
QUOTE(914forme @ Aug 22 2019, 11:17 AM)
I like the drivers side fill, also notice the nice flange delete you did on section of the tank. Great work, all your efforts are really paying off, and you have made huge leaps in skill level from when you started this project.
Would you please get to the Tangerine Racing Suspension Console raise, right now your making me think of adding items to my project instead of solving my fear of hacking the rear suspension pickup points out of the car.
Come on help a guy out.
After that if you don't mind working on the compound curve section to graph in the 944 Sunroof section that help would be greatly appreciated. Actually if you make those pieces I will gladly take the version 2 off your hands Chris
. Version two of your stuff is like version 15 of mine. I would gladly onto my 944 roof panel and the top of my EG car.@tygaboy thanks for helping me out
@914forme Thanks for the kind words, Stephen. I remain convinced most anyone who wants to develop these sorts of skills can do it. It's just a matter of time invested. Being retired has certainly helped speed my development.
Re: the Tangerine rear pick ups, the current plan is to get the car running essentially as is, debug all the systems, verify I've got all the needed holes, mounts, tabs, etc.
Then I'll blow the whole thing apart, do the Tangerine stuff, paint it and reassemble.
I like the idea of the hard top, as you know. I'll have to look into that and maybe grab a 944 roof from Parts Heaven before they close up for good.
Knowing how you are at making things from scratch, I could bring my 944 up there whenever you get into starting that so you can take measurements/angles/mock up, ect.
Double!
This is a "lo-fi" version of our main content. To view the full version with more information, formatting and images, please click here.