After a fair bit of head scratching on the design, I've now (mostly?) thought through the " how should I actually construct the fire wall?" so today I got started on the first of the "real" pieces.
My plan is to build the lower, vertical wall, then frame the critical edge joints to be sure I have fixed points from which I can generate accurate measurements.
First I measured and determined the arch and cut the blank for the lower vertical.
Plasma table to the rescue!
Full Version: BUILD-OFF CHALLENGE: Tygaboy's '75 LS3
Pages: 1, 2, 3, 4, 5, 6, 7, 8, 9, 10, 11, 12, 13, 14, 15, 16, 17, 18, 19, 20, 21, 22, 23, 24, 25, 26, 27, 28, 29, 30, 31, 32, 33, 34, 35, 36, 37, 38, 39, 40, 41, 42, 43, 44, 45, 46, 47, 48, 49, 50, 51, 52, 53, 54, 55, 56, 57, 58, 59, 60, 61, 62, 63, 64, 65, 66, 67, 68, 69, 70, 71, 72, 73, 74, 75, 76, 77, 78, 79, 80, 81, 82, 83, 84, 85, 86, 87, 88, 89, 90, 91, 92, 93
I want to spot weld the vertical lower to the arched cross bar so I need to make a flange across the lower, curved edge.
I set up an appropriate set of dies in the bead roller and in 5 or 6 passes, I have my roughed in flange.
Note that when you tip a flange on an inside curve like this, you end up with a flange where the outer most edge is shorter than the rest of the flange, so as the flange edge tips over, that short side causes the piece to curve.
These are the sorts of moments where I start to wonder if this will be another "practice piece".
Next, it's off to the shrinker/stretcher. A bit of stretching on the flange (and shrinking when I go to far!) and... She's FLAT! 
I still have to tune up the flange edge to get it a bit more crisp but it's looking like this piece will end up in the car!
I still have to tune up the flange edge to get it a bit more crisp but it's looking like this piece will end up in the car!
There's still a bunch of trimming and fitting (and you can see why I want that flange edge to be a bit more crisp) but I couldn't resist a very loose test fit.
At this point, I'm happy with how it's coming along.
At this point, I'm happy with how it's coming along.
Whoa. Nice fit!  I know what you mean about shrinking when you stretch too far... or when you meant to stretch but shrink but shoved the piece in the stretcher by mistake. Not that I've ever done that...
I know what you mean about shrinking when you stretch too far... or when you meant to stretch but shrink but shoved the piece in the stretcher by mistake. Not that I've ever done that...
Spent all day yesterday reorganizing the shop. I have a ton more room! I can use most everything without having to move anything. Much better...
So today was back to the lower fire wall piece.
I used a different set of dies on the bead roller and got a much improved, nice crisp edge. The fit is near perfect. Very happy with this!
Then it was trimmed to a rough fit so I could locate a bead that the upper pieces will land on. I didn't want "exposed edge" joints so the bead offset will give things what I think will be a more finished look.
And yes, I'll be cutting the center section out and routing it forward to form the ledge for the access cover. But I wanted to do the bead work across the entire piece to ensure symmetry.
Onward...
I like that version, looks great
QUOTE(Mueller @ Feb 25 2018, 01:10 PM) 
I like that version, looks great
Thanks Mike. And just to be clear, that's the same piece, I just "tuned up" the flange and added the bead.
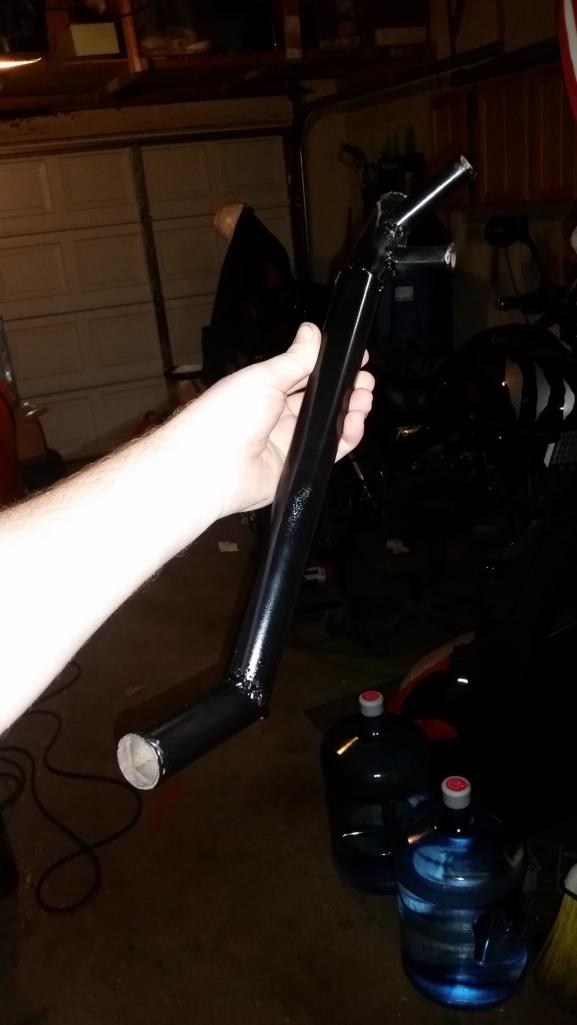
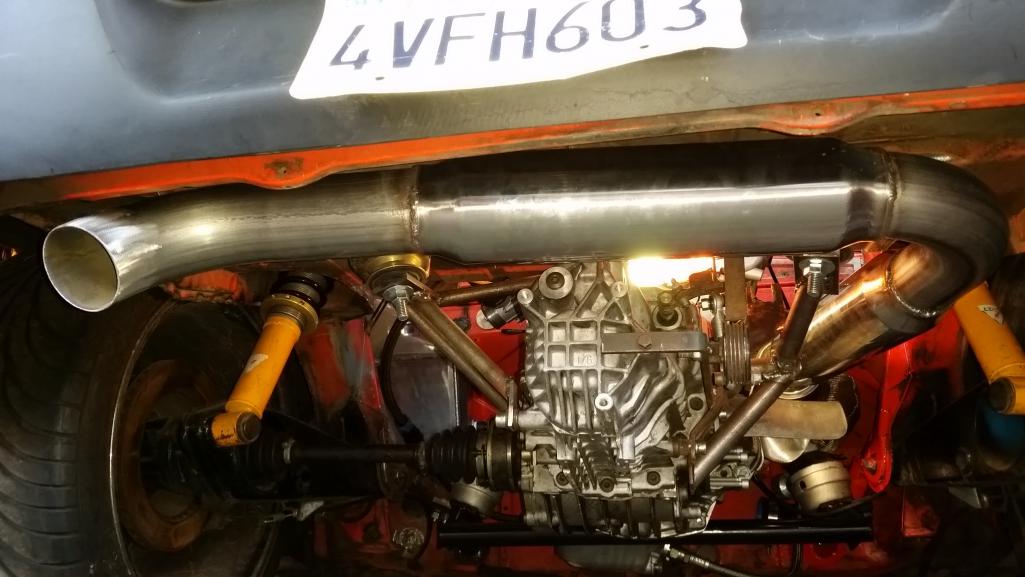
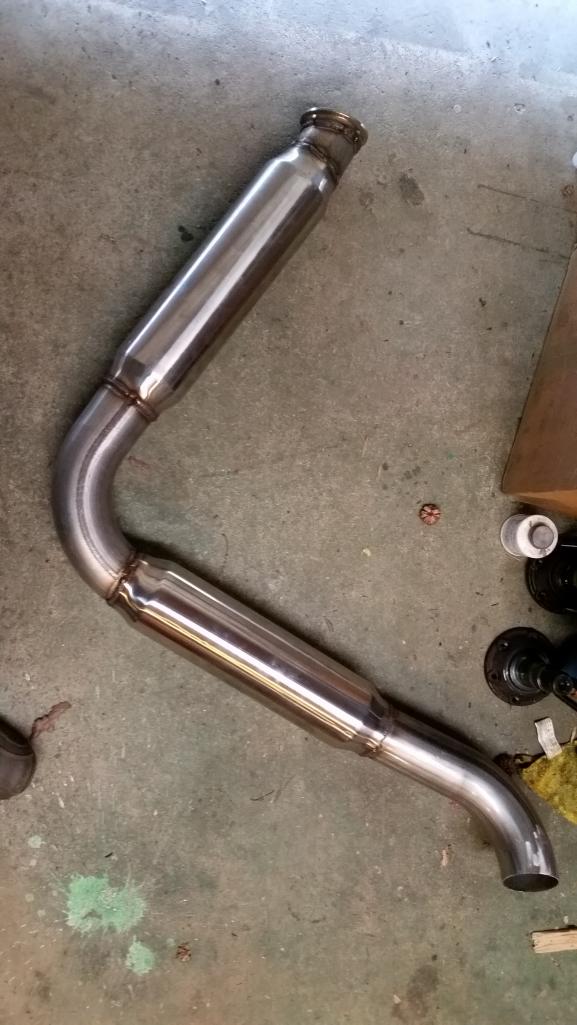
An exhaust system for an LS 914. Some assembly required..? 
The bends are mild steel. I want to fit everything up to be sure it all works as desired, then I'll redo it all in 304 stainless.
The bends are mild steel. I want to fit everything up to be sure it all works as desired, then I'll redo it all in 304 stainless.
Redo it?
You are one strange cat! I found some good stainless 3" mandrel J pipes on ebay.
I found it really easy to weld with the mig and some stainless wire.
You are one strange cat! I found some good stainless 3" mandrel J pipes on ebay.
I found it really easy to weld with the mig and some stainless wire.
QUOTE(Andyrew @ Feb 26 2018, 12:29 PM)
Redo it?
You are one strange cat! I found some good stainless 3" mandrel J pipes on ebay.
I found it really easy to weld with the mig and some stainless wire.
No back purge?
QUOTE(Andyrew @ Feb 26 2018, 12:29 PM)
Redo it?
You are one strange cat!
Andrew - Meow!
Yep, I've proved to myself I rarely like "version 1" of what I build so...
When are you coming over to bend up a roll bar?

And Mike -
Yes, it'll all be back purged during final welding.
QUOTE(Mueller @ Feb 26 2018, 12:39 PM)
QUOTE(Andyrew @ Feb 26 2018, 12:29 PM)
Redo it?
You are one strange cat! I found some good stainless 3" mandrel J pipes on ebay.
I found it really easy to weld with the mig and some stainless wire.
No back purge?
I didnt back purge it at all and had no issues. I have some welds about 6" from my turbo that havent cracked and the stainless has already rainbowed. Is it medical grade welds? No. But it seems really strong. It welded JUST like standard steel. Lemme see if I can find a pic.

About 1ft from the turbo, Stainless flange on stainless downpipe
Bunch of these water pipes. All stainless.
5 welds here, No issues
I would confidently do this again the exact same way.
Chris looking good..
QUOTE(tygaboy @ Feb 17 2018, 03:42 PM)
This is the current thinking re: the replacement firewall design. The center section (below the cross bar) will be removable. I get all the clearance I need for fuel lines, etc, it's easy to service things that would otherwise be a real pain to get to.
I'm still working on the design above the cross bar but I really like the "mini-tub" look that it has going on behind the door bar.
(Hey, it is the RaceRod, so I figure it's OK...
 )
)Now, can I duplicate all this in metal and have it look the way I want?
Wish me luck.
Just so cool. It looks evil in a Darth Vader way. Heheh. I really like the way the creases in the center section flow down. Really nice Chris.
Have you even determined a colour for this beast yet?
This weekend was spent on design and practice:
Design: working out the details around how to build the fire wall.
I didn't want the various panels to just butt up against each other in the corners, neither inside nor outside corners.
Practice: working on the bender, bead roller and shrinker/stretcher to see if I could get the bead I wanted on both inside and outside corners.
The good news is that I was able to get what I wanted!
In some cases, it was using "mismatched" dies on the bead roller.
For whatever reason, I ended up tackling what I figured was the harder one: Bead on an inside corner with a curve. Here it is!
And again
And here's how the corner will look with the panels.
I think this will look far more "complete" than panels that just terminate in/at the corners.
I think this will look far more "complete" than panels that just terminate in/at the corners.
Then I went after what will become the flange that will be spot welded to the chassis under the top of the door bar. Here's the sorta test fit. No, I haven't yet removed all of the original firewall... this piece will replace what's left there now.
Hard to see, but its got a bead right at the edge that the panel will sit down into.
The next pic makes it a bit more clear.
Hard to see, but its got a bead right at the edge that the panel will sit down into.
The next pic makes it a bit more clear.
Here's that same piece and the initial plan for how it will intersect with the base panel that sits on the curved cross bar, and how the firewall panel will sit inside the beads.
So far, so good. I'm happy with how this design is looking. Just lots of fabbing yet to do.
So far, so good. I'm happy with how this design is looking. Just lots of fabbing yet to do.
Then it was on to tacking in the first part of the exhaust:
The reducers are on!
The reducers are on!
Then it was more practice. This time preparing for installing the flares.
The plan is butt welded TIG.
This was playing with fusion welding vs using some filler. Then planished with hammer and dolly.
The plan is butt welded TIG.
This was playing with fusion welding vs using some filler. Then planished with hammer and dolly.
And tested to see how it'll look once metal finished. Again, I'm happy with this.
The trick will be to see how it translates from practice on the bench to actual flares on the car...
The trick will be to see how it translates from practice on the bench to actual flares on the car...
Nice job on the fusion welding there. The only real trick is keeping the joint very tight. Bench to actual welds is always a guessing game. Best of luck.
That is just begging to be fired up just like that with the open pipes!
About 6 in the morning ought be the right time I say.
About 6 in the morning ought be the right time I say.
That compound curve is gorgeous!
Welds look good with great clarity!
I agree with Mike as well, How bout a video?
Welds look good with great clarity!
I agree with Mike as well, How bout a video?
I wish I could post that the engine runs! It's not even close... So back to the fab stuff:
The tedium of trying to, ahem, "engineer" the firewall. Not too exciting and I've been thinking I should stop posting until I have something "done". Tell me if I'm boring you...
As I've gotten farther into the firewall, and having moved the drive train forward 1.5", I determined I want to step out the upper frame to buy a bit more clearance on the engine side. With this latest approach, and the upper piece you see here, with the seat all the way back, it'll juuuuuuust misses contacting the firewall.
The upper piece is a working part that is being used to determine the various angles, etc. It'll end up being the official profile for the upper frame.
Learning as one goes is fun, if time consuming. Things like learning how much to over bend a flange when you know you're going to add a bead that ends up "unbending" it.
But I'm getting better at it.
I'd REALLY like to get part of this put in this weekend. Fingers crossed.
QUOTE(tygaboy @ Mar 4 2018, 07:55 PM)
This was playing with fusion welding vs using some filler.
I nearly always prefer to use a little filler wire. The deoxidizers in the filler alloy improve the quality of the weld by reducing the likelihood of porosity.
Sometimes .045" TIG wire is too big so I cut pieces of MIG wire and straighten them as best I can.
Hey Chris - Thanks for the guidance. I was leaning toward filler after seeing how it was working with/without.
Looking forward to meeting you in person in a few weeks!
Looking forward to meeting you in person in a few weeks!
I'm making progress on the parts and pieces I'll need and how they'll fit together but all the fiddly little pieces take way longer to make than I'd ever have believed. Thankfully, once I get one side figured out, the other side goes much quicker.
But it really does nicely finish off the edge.
But it really does nicely finish off the edge.
Hard to get a good angle but here it is, mocked in place.
It looks better in person. And once it's actually welded in, the edge bead should show up a bit more.
It looks better in person. And once it's actually welded in, the edge bead should show up a bit more.
Final welding on the tops of the door bars. This had to get done in order to get the fire wall fully designed.
And a bit of "out of position" work! If only it were back on the rotisserie.
And a bit of "out of position" work! If only it were back on the rotisserie.
The fire wall is turning out to be the most tedious work I've done yet. Every piece has to fit "just so".
It's looking like I'll end up making each piece at least a couple times since on a couple of them, each end will need to be trial fit, tweaked, trial fit, etc.
I think the fastest way will be to make each end as a template then transfer the shapes onto a full length blank. If that doesn't work out, I may have to make the ends and splice them together. We'll see.
Here, I'm working out how the top frame piece will need to be trimmed to accommodate that fancy little drop at the end of the cross bar.
And I'm still playing with bead design and location.
Looking good as usual. That is one stout chassis.
Kudos Chris.
Kudos Chris.
QUOTE(tygaboy @ Mar 17 2018, 05:21 PM)
The fire wall is turning out to be the most tedious work I've done yet.
This is a bit like trying to wrap my brain around the concept of infinity considering the source. Awesome work as usual.
As I work through the design, I realize that I need to plan more before fabbing. The latest "duh" moment was realizing that it's better to have flat panels remain in the same plane so as to avoid twisting.
This means rebuilding the upper panel that will live under the cross bar. It needed to be a steeper angle to line up with the rear portion of the console.
And as long as things were up for a do-over, I figured I'd rebuild said console rear portion with round tube. This will keep a consistent corner radius over the whole console. At least, that's the plan.
Here's the new upper partially formed.I still need to work out all the corner angles.
And here's the view from on high, complete with the new, round rear console section.
The bender in action, fabbing a practice piece to help me understand some of the console-to-fire wall panel connection joints.
https://www.youtube.com/watch?v=TohVH1r0Bts
https://www.youtube.com/watch?v=TohVH1r0Bts
QUOTE(tygaboy @ Mar 18 2018, 10:09 PM)
And here's the view from on high, complete with the new, round rear console section.
This photo is poster worthy. It's just beautiful.
Did I say "tedious"?
Forgive the horrific-ness of this little part. I an no where near skilled / experienced enough to be able to apply the "measure twice, cut once" approach to this part of the project.
Instead, I make a little practice part to learn how all these angles and corners need to come together. It's all about learning for the next little while. But I think you get the idea of what I'm after. I'm pretty confident I will achieve a good fit and I think it'll look pretty good.
That said, "practice" translates to "wasted material".
Just perfect timing for a steel tariff!
Great work!
I don't know if you've ever seen the rapid sheet-metal prototyping machines, video below:
https://youtu.be/Wl5_wUVxRvw
I don't know if you've ever seen the rapid sheet-metal prototyping machines, video below:
https://youtu.be/Wl5_wUVxRvw
QUOTE(live free & drive @ Mar 19 2018, 09:52 AM)
Great work!
I don't know if you've ever seen the rapid sheet-metal prototyping machines, video below:
https://youtu.be/Wl5_wUVxRvw
Thanks, very cool! I haven't seen that before...
It seems a bit like flow forming. I'm about to give that a try.
Essentially, you use an air hammer/rivet gun with a soft-ish head and (carefully!) drive the metal into a form. The form can be made of wood.
It opens a lot of doors as it's not silly expensive to get started.
QUOTE(tygaboy @ Mar 19 2018, 12:42 PM)
QUOTE(live free & drive @ Mar 19 2018, 09:52 AM)
Great work!
I don't know if you've ever seen the rapid sheet-metal prototyping machines, video below:
https://youtu.be/Wl5_wUVxRvw
Thanks, very cool! I haven't seen that before...
It seems a bit like flow forming. I'm about to give that a try.
Essentially, you use an air hammer/rivet gun with a soft-ish head and (carefully!) drive the metal into a form. The form can be made of wood.
It opens a lot of doors as it's not silly expensive to get started.
Can't wait to see what you produce with the flow forming. I have a project I hope to tackle sometime this summer that I was going to try that on. Looking forward to hearing/seeing you experience with it.
For all the other tool geeks/whores, here's more of the bender in action:
rolling the radius farther around
I'm fortunate to have some pretty cool tools and it really drives home the fact that all these things really do is speed up the process of making the part... or totally screwing up the part and wasting material!
I have a long way to go and lots to learn...
https://www.youtube.com/watch?v=DGyqrkp1RLo
 That Magnabrake is on a very long list of items I would love to have in my shop.
I have an oxy/acet rig with Meco torch that you are free to borrow to weld on those flares.
I don't have real truck so you'd have to pick up , I'll provide entertainment with a tour of poorly put together and disorganized shop
https://www.tinmantech.com/products/welding...ch-accessories/
I don't have real truck so you'd have to pick up , I'll provide entertainment with a tour of poorly put together and disorganized shop
https://www.tinmantech.com/products/welding...ch-accessories/
Working on the final upper portion of the fire wall that lives under the cross bar.
Learning, learning... When making multiple folds that need to intersect at a particular angle, I need to plan better. I didn't know exactly what the angle needed to be so I had to, um.... improvise! Yes, let's go with that.
Hammer and dolly = improvise
Fortunately, it turned out OK. Still needs to be trimmed to final dimensions so that little bit of overlap at the corner isn't an issue. Plus, I'll weld it up, too.
Essentially impossible to see but I need this piece to tilt down a bit. That's to allow clearance for the cross bar to be fitted ahead of final welding.
You wouldn't know it but since the door bars angle down as they leave the fire wall, the cross bar needs to slide up and in as it's being installed.
Super happy I accounted for this before final welding the part I'm working on!
Anyway, what's the big deal about this piece needing to tilt down?
As a flat plane tilts away from a curve, like this piece does with that reinforcement arch I added to the fire wall, it creates a gap at the front of the curve.
So I used the English wheel to raise up a bit of a hump to close that gap. Again, no one will ever see it but it makes all the difference in terms of fitment.
Line 'em up! 
This is a "lo-fi" version of our main content. To view the full version with more information, formatting and images, please click here.